Asennuksen jälkeen
Tässä luvussa kuvataan ensimmäiset asetustyökalut, jotka avautuvat, kun olet suorittanut asennuksen, käynnistänyt järjestelmän uudelleen ja kirjautunut sisään ensimmäisen kerran.
Two separate configuration tools are part of Fedora. If you installed the GNOME desktop environment (the default Fedora environment, installed for example as part of the Fedora Workstation Edition), the GNOME Initial Setup utility will open; for all other graphical environments, the Initial Setup tool serves the same purpose.
Both of these tools will allow you to configure user-specific settings which have not been configured during the installation. Some of the settings are available both in the graphical installer (or as Kickstart commands) as well as in the initial-setup utilities; in that case, they will only be displayed after the first reboot if you skipped them during the installation. This means that, for example, if you configured a user account before the installation finished, you will not be prompted to do so again after the installation completes.
Alkumääritys
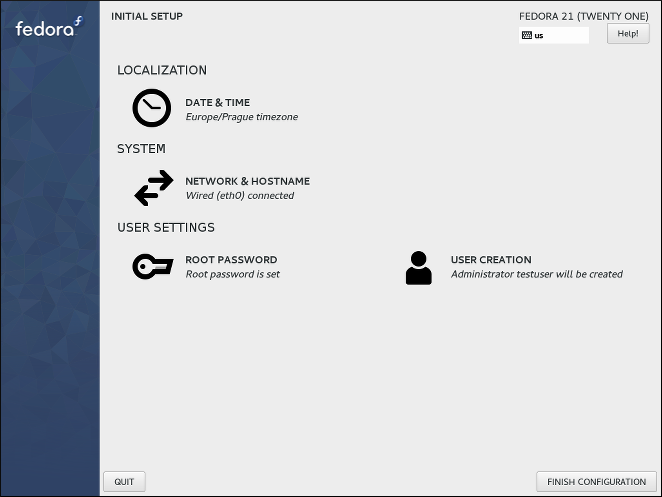
Alkuasetusnäyttö tulee näkyviin, kun asennus on valmis ja asennettu järjestelmä käynnistyy ensimmäisen kerran, ennen ensimmäistä kirjautumista, mikäli seuraavat ehdot täyttyvät:
-
Ohjelmistovalintasi sisälsi graafisen ympäristön (esimerkiksi asensit järjestelmän käyttämällä Fedora Workstationin live-levykuvaa).
-
Asentamasi graafinen ympäristö ei ole GNOME-työpöytäympäristö (se tarjoaa oman alkuasetusapuohjelman, joka on kuvattu kohdassa GNOME-alkuasennus ).
-
initial-setup-paketti on asennettu.
-
Et ole määrittänyt kaikkia graafisessa asennusohjelmassa käytettävissä olevia näyttöjä.

Alkuasennuksen avulla voit määrittää useita järjestelmäasetuksia. Kaikki nämä voidaan myös konfiguroida asennuksen aikana, mutta niitä ei vaadita asennuksen loppuun saattamiseksi. Vain asetukset, joita ei ole määritetty asennuksen aikana, näytetään; Jos esimerkiksi et luonut ei-root-käyttäjätiliä asennuksen aikana, Alkuasetukset käynnistyy ensimmäisen uudelleenkäynnistyksen jälkeen, ja voit määrittää sellaisen. Jos määritit kaikki käytettävissä olevat asetukset asennuksen aikana, Alkuasetukset ei näy ollenkaan.
Jos haluat määrittää jotain apuohjelmassa saatavilla olevaa järjestelmän osaa, napsauta sen pääikkunassa olevaa linkkiä (esimerkiksi "Luo käyttäjä"). Jokainen linkki johtaa erilliseen näyttöön erillisillä vaihtoehdoilla; nämä näytöt ovat samat, jotka olivat käytettävissä graafisen asennuksen aikana. Jos tarvitset apua, paina vasemmassa yläkulmassa "Ohje" avataksesi uuden ikkunan, joka sisältää ohjeita kyseiselle näytölle.
Kun olet määrittänyt jonkun näytön, palaa Alkuasetukset-päävalikkoon painamalla vasemmassa yläkulmassa olevaa Valmis-painiketta. Kun olet määrittänyt kaikki asetukset, napsauta "Lopeta määritys" oikeassa alakulmassa tallentaaksesi kaikki määritetyt asetukset. Määritysapuohjelma sulkeutuu ja voit kirjautua järjestelmään.
|
On mahdollista määrittää Alkuasetukset näyttämään kaikki käytettävissä olevat vaihtoehdot, vaikka ne olisi määritetty jo asennuksen aikana. Tätä varten sinun on käytettävä Kickstart-tiedostoa asennuksen alussa, ja tämän tiedoston on sisällettävä seuraava komento: firstboot --enable --reconfig --reconfig-vaihtoehto määrittää, että kaikki vaihtoehdot tulee näyttää. Katso Asennuksen automatisointi Kickstartilla saadaksesi tietoja Kickstart-asennuksista. |
|
Normaalisti Alkuasennukseen ei voi palata sen jälkeen, kun olet sulkenut sen ja kirjautunut järjestelmään. Voit saada sen näkyviin uudelleen (seuraavan uudelleenkäynnistyksen jälkeen, ennen kuin kirjautumiskehote tulee näkyviin) suorittamalla seuraavan komennon käyttäjänä "root": # systemctl enable initial-setup-graphical.service Käynnistä sitten järjestelmäsi uudelleen. |
GNOME Initial Setup
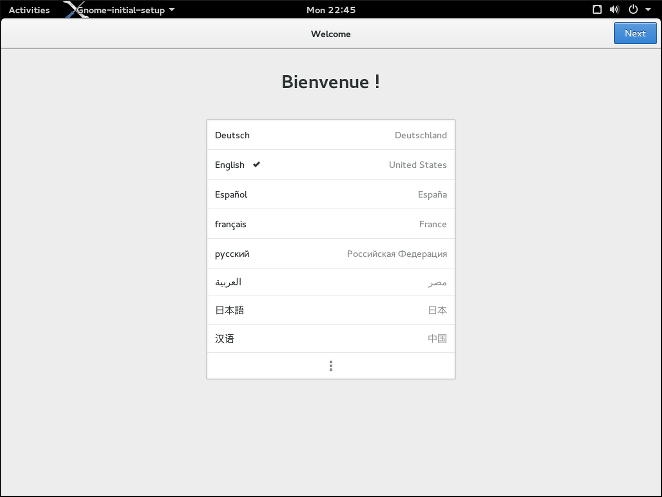
The GNOME Initial Setup utility will be displayed after you log in for the first time with any user account, as long as your first login is in the GNOME desktop environment.

This utility allows you to configure several user-specific settings, such as system language or the default keyboard layout. Use the Next and Previous buttons at the top of the window to navigate between screens. Some screens (Configure online accounts in particular) are optional and can be skipped using the Skip button in the top right corner.
After you finish configuring all screens, click Start using Fedora to exit the utility. After that, the Getting Started page from GNOME help will be displayed, and you can either browse the help content, or close it and start using your desktop.
Common Post-installation Tasks
After you finish the installation and go through one of the initial setup utilities described above, your system is ready for use. However, other administrative tasks not covered by the installer or the initial setup utilities may still be necessary, depending on how you plan to use your system. The list below describes some of the more common tasks usually performed immediately after a new installation.
- Recover a lost
rootpassword -
The
rootpassword, which is configured during the installation, is required for accessing the system as therootuser. Without this password you will not be able to configure your system or install additional software. If you lost or forgot yourrootpassword, you can reset it by following the steps described in Resetting the Root Password. - Configure the network
-
In most cases, network access is configured during the installation process, either in the Anaconda installation program (see Network & Hostname) or in a Kickstart file (see network (optional) - Configure Network Interfaces). For information on configuring the network after the installation, see the Fedora Networking Guide, available at https://docs.fedoraproject.org/.
- Perform an initial system update
-
If you installed Fedora from a full installation ISO image (such as the Workstation live image or full Server DVD), it is recommended to perform an initial system update, because your installation media likely contained older versions of software packages. During the initial update, all installed packages are updated to their latest available versions. Updates to packages provide security fixes, bug fixes and enhancements.
The DNF package manager is used for updating installed packages. For more information about updating your system with DNF, see the Fedora System Administrator’s Guide, available at https://docs.fedoraproject.org/.
- Install driver updates
-
Usually, drivers for system devices are already supported in the kernel provided by Red Hat Enterprise Linux. However, occasionally, support for devices that have been released recently could be missing. In these cases, a driver update enabling your device may be available.
Devices necessary to complete the installation can have driver updates provided before the installation begins. If a device is missing a driver, but it is not essential during the installation, it is recommended to wait until after the installation completes, and install additional drivers afterwards. For instructions on installing and enabling additional drivers on the installed system using RPM and DNF, see the Fedora System Administrator’s Guide, available at https://docs.fedoraproject.org/.
- Configure additional repositories
-
New software is installed from package repositories. Package repositories are organized sets of software and metadata that can be accessed by the DNF package manager. By default, several update repositories provided by Fedora are configured automatically and you can install updates and additional software from those. However, if you want to set up additional repositories, for example ones containing your own software, some extra steps are needed.
For information about configuring additional software repositories, see the Fedora System Administrator’s Guide, available at https://docs.fedoraproject.org/.
- Install additional packages
-
You can control which packages will be installed by selecting an environment in the
Software Selectiondialog in the graphical installation (see Software Selection). This dialog does not provide a way to choose individual packages, only predefined sets. However, you can use the DNF package manager to install additional packages after the installation. See the Fedora System Administrator’s Guide, available at https://docs.fedoraproject.org/, for more information. - Switch to a graphical login
-
Depending on the options you chose during the installation process, it is possible that your system does not have a graphical interface, instead offering only a text-based prompt. If this is the case and you wish to enable a graphical desktop after the installation, you must install the X Window System and your preferred desktop environment (either GNOME or KDE).
As with all other software, these packages can be installed using the DNF package manager. For information about using DNF to install new packages, see the Fedora System Administrator’s Guide, available at https://docs.fedoraproject.org/. For information on how to enable graphical login by default, see Booting into a Graphical Environment.
Want to help? Learn how to contribute to Fedora Docs ›