File and Print Servers
This chapter guides you through the installation and configuration of Samba, an open source implementation of the Server Message Block (SMB) and common Internet file system (CIFS) protocol, and vsftpd, the primary FTP server shipped with Fedora. Additionally, it explains how to use the Printer tool to configure printers.
Samba
Samba is the standard open source Windows interoperability suite of programs for Linux. It implements the server message block (SMB) protocol. Modern versions of this protocol are also known as the common Internet file system (CIFS) protocol. It allows the networking of Microsoft Windows, Linux, UNIX, and other operating systems together, enabling access to Windows-based file and printer shares. Samba’s use of SMB allows it to appear as a Windows server to Windows clients.
|
Installing the samba package
In order to use Samba, first ensure the samba package is installed on your system by running, as ~]# dnf install samba For more information on installing packages with DNF, see Installing Packages. |
Introduction to Samba
Samba is an important component to seamlessly integrate Linux Servers and Desktops into Active Directory (AD) environments. It can function both as a domain controller (NT4-style) or as a regular domain member (AD or NT4-style). .What Samba can do:
-
Serve directory trees and printers to Linux, UNIX, and Windows clients
-
Assist in network browsing (with NetBIOS)
-
Authenticate Windows domain logins
-
Provide Windows Internet Name Service (
WINS) name server resolution -
Act as a Windows NT-style Primary Domain Controller (PDC)
-
Act as a Backup Domain Controller (BDC) for a Samba-based PDC
-
Act as an Active Directory domain member server
-
Join a Windows NT/2000/2003/2008 PDC/Windows Server 2012
-
Act as a BDC for a Windows PDC (and vice versa)
-
Act as an Active Directory domain controller
Samba Daemons and Related Services
Samba is comprised of three daemons (smbd, nmbd, and winbindd). Three services (smb, nmb, and winbind) control how the daemons are started, stopped, and other service-related features. These services act as different init scripts. Each daemon is listed in detail below, as well as which specific service has control over it.
The smbd server daemon provides file sharing and printing services to Windows clients. In addition, it is responsible for user authentication, resource locking, and data sharing through the SMB protocol. The default ports on which the server listens for SMB traffic are TCP ports 139 and 445.
The smbd daemon is controlled by the smb service.
The nmbd server daemon understands and replies to NetBIOS name service requests such as those produced by SMB/CIFS in Windows-based systems. These systems include Windows 95/98/ME, Windows NT, Windows 2000, Windows XP, and LanManager clients. It also participates in the browsing protocols that make up the Windows Network Neighborhood view. The default port that the server listens to for NMB traffic is UDP port 137.
The nmbd daemon is controlled by the nmb service.
The winbind service resolves user and group information received from a server running Windows NT, 2000, 2003, Windows Server 2008, or Windows Server 2012. This makes Windows user and group information understandable by UNIX platforms. This is achieved by using Microsoft RPC calls, Pluggable Authentication Modules (PAM), and the Name Service Switch (NSS). This allows Windows NT domain and Active Directory users to appear and operate as UNIX users on a UNIX machine. Though bundled with the Samba distribution, the winbind service is controlled separately from the smb service.
The winbind daemon is controlled by the winbind service and does not require the smb service to be started in order to operate. winbind is also used when Samba is an Active Directory member, and may also be used on a Samba domain controller (to implement nested groups and interdomain trust). Because winbind is a client-side service used to connect to Windows NT-based servers, further discussion of winbind is beyond the scope of this chapter.
|
Obtaining a list of utilities that are shipped with Samba
See Samba Distribution Programs for a list of utilities included in the Samba distribution. |
Connecting to a Samba Share
You can use either Nautilus or command line to connect to available Samba shares.
Mounting the Share
Sometimes it is useful to mount a Samba share to a directory so that the files in the directory can be treated as if they are part of the local file system.
To mount a Samba share to a directory, create a directory to mount it to (if it does not already exist), and execute the following command as root:
mount -t cifs //servername/sharename /mnt/point/ -o username=username,password=password
This command mounts sharename from servername in the local directory /mnt/point/.
For more information about mounting a samba share, see the mount.cifs(8) manual page.
|
Installing cifs-utils package
The mount.cifs utility is a separate RPM (independent from Samba). In order to use mount.cifs, first ensure the cifs-utils package is installed on your system by running, as ~]# dnf install cifs-utils For more information on installing packages with DNF, see Installing Packages. Note that the cifs-utils package also contains the cifs.upcall binary called by the kernel in order to perform kerberized CIFS mounts. For more information on cifs.upcall, see the cifs.upcall(8) manual page. |
|
CIFS servers that require plain text passwords
Some CIFS servers require plain text passwords for authentication. Support for plain text password authentication can be enabled using the following command as ~]# echo 0x37 > /proc/fs/cifs/SecurityFlags
|
Configuring a Samba Server
The default configuration file (/etc/samba/smb.conf) allows users to view their home directories as a Samba share. It also shares all printers configured for the system as Samba shared printers. You can attach a printer to the system and print to it from the Windows machines on your network.
Graphical Configuration
To configure Samba using a graphical interface, use one of the available Samba graphical user interfaces. A list of available GUIs can be found at https://www.samba.org/samba/GUI/.
Command-Line Configuration
Samba uses /etc/samba/smb.conf as its configuration file. If you change this configuration file, the changes do not take effect until you restart the Samba daemon with the following command, as root:
~]# systemctl restart smb.service
To specify the Windows workgroup and a brief description of the Samba server, edit the following lines in your /etc/samba/smb.conf file:
workgroup = WORKGROUPNAME
server string = BRIEF COMMENT ABOUT SERVER
Replace WORKGROUPNAME with the name of the Windows workgroup to which this machine should belong. The BRIEF COMMENT ABOUT SERVER is optional and is used as the Windows comment about the Samba system.
To create a Samba share directory on your Linux system, add the following section to your /etc/samba/smb.conf file (after modifying it to reflect your needs and your system):
[sharename]
comment = Insert a comment here
path = /home/share/
valid users = tfox carole
writable = yes
create mask = 0765
The above example allows the users tfox and carole to read and write to the directory /home/share/, on the Samba server, from a Samba client.
Starting and Stopping Samba
To start a Samba server, type the following command in a shell prompt, as root:
~]# systemctl start smb.service
|
Setting up a domain member server
To set up a domain member server, you must first join the domain or Active Directory using the net join command before starting the |
To stop the server, type the following command in a shell prompt, as root:
~]# systemctl stop smb.service
The restart option is a quick way of stopping and then starting Samba. This is the most reliable way to make configuration changes take effect after editing the configuration file for Samba. Note that the restart option starts the daemon even if it was not running originally.
To restart the server, type the following command in a shell prompt, as root:
~]# systemctl restart smb.service
The condrestart (conditional restart) option only starts smb on the condition that it is currently running. This option is useful for scripts, because it does not start the daemon if it is not running.
|
Applying the changes to the configuration
When the |
To conditionally restart the server, type the following command, as root:
~]# systemctl try-restart smb.service
A manual reload of the /etc/samba/smb.conf file can be useful in case of a failed automatic reload by the smb service. To ensure that the Samba server configuration file is reloaded without restarting the service, type the following command, as root:
~]# systemctl reload smb.service
By default, the smb service does not start automatically at boot time. To configure Samba to start at boot time, type the following at a shell prompt as root:
~]# systemctl enable smb.service
See Services and Daemons for more information regarding this tool.
Samba Server Types and the smb.conf File
Samba configuration is straightforward. All modifications to Samba are done in the /etc/samba/smb.conf configuration file. Although the default smb.conf file is well documented, it does not address complex topics such as LDAP, Active Directory, and the numerous domain controller implementations.
The following sections describe the different ways a Samba server can be configured. Keep in mind your needs and the changes required to the /etc/samba/smb.conf file for a successful configuration.
Stand-alone Server
A stand-alone server can be a workgroup server or a member of a workgroup environment. A stand-alone server is not a domain controller and does not participate in a domain in any way. The following examples include several user-level security configurations. For more information on security modes, see Samba Security Modes.
The following /etc/samba/smb.conf file shows a sample configuration needed to implement anonymous read-only file sharing. Two directives are used to configure anonymous access – map to guest = Bad user and guest account = nobody.
[global]
workgroup = DOCS
netbios name = DOCS_SRV
security = user
guest account = nobody # default value
map to guest = Bad user

[data]
comment = Documentation Samba Server
path = /export
read only = yes
guest ok = yes
The following /etc/samba/smb.conf file shows a sample configuration needed to implement anonymous read/write file sharing. To enable anonymous read/write file sharing, set the read only directive to no. The force user and force group directives are also added to enforce the ownership of any newly placed files specified in the share.
|
Do not use anonymous read/write servers
Although having an anonymous read/write server is possible, it is not recommended. Any files placed in the share space, regardless of user, are assigned the user/group combination as specified by a generic user ( |
[global]
workgroup = DOCS
security = user
guest account = nobody # default value
map to guest = Bad user

[data]
comment = Data
path = /export
guest ok = yes
writeable = yes
force user = user
force group = group
The following /etc/samba/smb.conf file shows a sample configuration needed to implement an anonymous print server. Setting browseable to no as shown does not list the printer in Windows Network Neighborhood. Although hidden from browsing, configuring the printer explicitly is possible. By connecting to DOCS_SRV using NetBIOS, the client can have access to the printer if the client is also part of the DOCS workgroup. It is also assumed that the client has the correct local printer driver installed, as the use client driver directive is set to yes. In this case, the Samba server has no responsibility for sharing printer drivers to the client.
[global]
workgroup = DOCS
netbios name = DOCS_SRV
security = user
map to guest = Bad user
printing = cups

[printers]
comment = All Printers
path = /var/spool/samba
guest ok = yes
printable = yes
use client driver = yes
browseable = yes
The following /etc/samba/smb.conf file shows a sample configuration needed to implement a secure read/write file and print server. Setting the security directive to user forces Samba to authenticate client connections. Notice the [homes] share does not have a force user or force group directive as the [public] share does. The [homes] share uses the authenticated user details for any files created as opposed to the force user and force group in [public].
[global]
workgroup = DOCS
netbios name = DOCS_SRV
security = user
printcap name = cups
disable spools = yes
show add printer wizard = no
printing = cups

[homes]
comment = Home Directories
valid users = %S
read only = no
browseable = no

[public]
comment = Data
path = /export
force user = docsbot
force group = users
guest ok = yes

[printers]
comment = All Printers
path = /var/spool/samba
printer admin = john, ed, @admins
create mask = 0600
guest ok = yes
printable = yes
use client driver = yes
browseable = yes
Domain Member Server
A domain member, while similar to a stand-alone server, is logged into a domain controller (either Windows or Samba) and is subject to the domain’s security rules. An example of a domain member server would be a departmental server running Samba that has a machine account on the Primary Domain Controller (PDC). All of the department’s clients still authenticate with the PDC, and desktop profiles and all network policy files are included. The difference is that the departmental server has the ability to control printer and network shares.
To implement an Active Directory domain member server, follow procedure below:
-
Create the
/etc/samba/smb.confconfiguration file on a member server to be added to the Active Directory domain. Add the following lines to the configuration file:[global] realm = EXAMPLE.COM security = ADS encrypt passwords = yes # Optional. Use only if Samba cannot determine the Kerberos server automatically. password server = kerberos.example.com
With the above configuration, Samba authenticates users for services being run locally but is also a client of the Active Directory. Ensure that your kerberos
realmparameter is shown in all caps (for examplerealm = EXAMPLE.COM). Since Windows 2000/2003/2008 requires Kerberos for Active Directory authentication, therealmdirective is required. If Active Directory and Kerberos are running on different servers, thepassword serverdirective is required to help the distinction. -
Configure Kerberos on the member server. Create the
/etc/krb5.confconfiguration file with the following content:[logging] default = FILE:/var/log/krb5libs.log [libdefaults] default_realm = AD.EXAMPLE.COM dns_lookup_realm = true dns_lookup_kdc = true ticket_lifetime = 24h renew_lifetime = 7d rdns = false forwardable = false [realms] # Define only if DNS lookups are not working # AD.EXAMPLE.COM = { # kdc = server.ad.example.com # admin_server = server.ad.example.com # master_kdc = server.ad.example.com # } [domain_realm] # Define only if DNS lookups are not working # .ad.example.com = AD.EXAMPLE.COM # ad.example.com = AD.EXAMPLE.COMUncomment the
[realms]and[domain_realm]sections if DNS lookups are not working.For more information on Kerberos, and the /etc/krb5.conf file, see the Using Kerberos section of the Red Hat Enterprise Linux 7 System Level Authentication Guide.
-
To join an Active Directory server, type the following command as
rooton the member server:~]# net ads join -U administrator%password
The net command authenticates as
Administratorusing the NT LAN Manager (NTLM) protocol and creates the machine account. Then net uses the machine account credentials to authenticate with Kerberos.The security optionSince
security = adsand notsecurity = useris used, a local password back end such assmbpasswdis not needed. Older clients that do not supportsecurity = adsare authenticated as ifsecurity = domainhad been set. This change does not affect functionality and allows local users not previously in the domain.
The following /etc/samba/smb.conf file shows a sample configuration needed to implement a Windows NT4-based domain member server. Becoming a member server of an NT4-based domain is similar to connecting to an Active Directory. The main difference is NT4-based domains do not use Kerberos in their authentication method, making the /etc/samba/smb.conf file simpler. In this instance, the Samba member server functions as a pass through to the NT4-based domain server.
[global]
workgroup = DOCS
netbios name = DOCS_SRV
security = domain

[homes]
comment = Home Directories
valid users = %S
read only = no
browseable = no

[public]
comment = Data
path = /export
force user = docsbot
force group = users
guest ok = yes
Having Samba as a domain member server can be useful in many situations. There are times where the Samba server can have other uses besides file and printer sharing. It may be beneficial to make Samba a domain member server in instances where Linux-only applications are required for use in the domain environment. Administrators appreciate keeping track of all machines in the domain, even if not Windows-based. In the event the Windows-based server hardware is deprecated, it is quite easy to modify the /etc/samba/smb.conf file to convert the server to a Samba-based PDC. If Windows NT-based servers are upgraded to Windows 2000/2003/2008 the /etc/samba/smb.conf file is easily modifiable to incorporate the infrastructure change to Active Directory if needed.
|
Make sure you join the domain before starting Samba
After configuring the ~]# net rpc join -U administrator%password |
Note that the -S option, which specifies the domain server host name, does not need to be stated in the net rpc join command. Samba uses the host name specified by the workgroup directive in the /etc/samba/smb.conf file instead of it being stated explicitly.
Domain Controller
A domain controller in Windows NT is functionally similar to a Network Information Service (NIS) server in a Linux environment. Domain controllers and NIS servers both host user and group information databases as well as related services. Domain controllers are mainly used for security, including the authentication of users accessing domain resources. The service that maintains the user and group database integrity is called the Security Account Manager (SAM). The SAM database is stored differently between Windows and Linux Samba-based systems, therefore SAM replication cannot be achieved and platforms cannot be mixed in a PDC/BDC environment.
In a Samba environment, there can be only one PDC and zero or more BDCs.
|
A mixed Samba/Windows domain controller environment
Samba cannot exist in a mixed Samba/Windows domain controller environment (Samba cannot be a BDC of a Windows PDC or vice versa). Alternatively, Samba PDCs and BDCs can coexist. |
tdbsamThe simplest and most common implementation of a Samba PDC uses the new default tdbsam password database back end. Replacing the aging smbpasswd back end, tdbsam has numerous improvements that are explained in more detail in Samba Account Information Databases. The passdb backend directive controls which back end is to be used for the PDC.
The following /etc/samba/smb.conf file shows a sample configuration needed to implement a tdbsam password database back end.
tdbsam[global] workgroup = DOCS netbios name = DOCS_SRV passdb backend = tdbsam security = user add user script = /usr/sbin/useradd -m "%u" delete user script = /usr/sbin/userdel -r "%u" add group script = /usr/sbin/groupadd "%g" delete group script = /usr/sbin/groupdel "%g" add user to group script = /usr/sbin/usermod -G "%g" "%u" add machine script = /usr/sbin/useradd -s /bin/false -d /dev/null -g machines "%u" # The following specifies the default logon script # Per user logon scripts can be specified in the user # account using pdbedit logon script = logon.bat # This sets the default profile path. # Set per user paths with pdbedit logon drive = H: domain logons = yes os level = 35 preferred master = yes domain master = yes [homes] comment = Home Directories valid users = %S read only = no [netlogon] comment = Network Logon Service path = /var/lib/samba/netlogon/scripts browseable = no read only = no # For profiles to work, create a user directory under the # path shown. # mkdir -p /var/lib/samba/profiles/john [Profiles] comment = Roaming Profile Share path = /var/lib/samba/profiles read only = no browseable = no guest ok = yes profile acls = yes # Other resource shares ... ...
To provide a functional PDC system which uses tdbsam follow these steps:
-
Adjust the
smb.confconfiguration file as shown in An Example Configuration of Primary Domain Controller (PDC) Usingtdbsam. -
Add the
rootuser to the Samba password database. You will be prompted to provide a new Samba password for therootuser:~]# smbpasswd -a root New SMB password:
-
Start the
smbservice:~]# service smb start
-
Make sure all profile, user, and netlogon directories are created.
-
Add groups that users can be members of:
~]# groupadd -f users
~]# groupadd -f nobody
~]# groupadd -f ntadmins
-
Associate the UNIX groups with their respective Windows groups.
~]# net groupmap add ntgroup="Domain Users" unixgroup=users
~]# net groupmap add ntgroup="Domain Guests" unixgroup=nobody
~]# net groupmap add ntgroup="Domain Admins" unixgroup=ntadmins
-
Grant access rights to a user or a group. For example, to grant the right to add client machines to the domain on a Samba domain controller, to the members to the Domain Admins group, execute the following command:
~]# net rpc rights grant 'DOCS\Domain Admins' SetMachineAccountPrivilege -S PDC -U root
Keep in mind that Windows systems prefer to have a primary group which is mapped to a domain group such as Domain Users.
Windows groups and users use the same namespace thus not allowing the existence of a group and a user with the same name like in UNIX.
|
Limitations of the tdbsam authentication back end
If you need more than one domain controller or have more than 250 users, do not use the |
Although it is possible for Samba to be a member of an Active Directory, it is not possible for Samba to operate as an Active Directory domain controller.
Samba Security Modes
There are only two types of security modes for Samba, share-level and user-level, which are collectively known as security levels. Share-level security is deprecated and has been removed from Samba. Configurations containing this mode need to be migrated to use user-level security. User-level security can be implemented in one of three different ways. The different ways of implementing a security level are called security modes.
User-Level Security
User-level security is the default and recommended setting for Samba. Even if the security = user directive is not listed in the /etc/samba/smb.conf file, it is used by Samba. If the server accepts the client’s user name and password, the client can then mount multiple shares without specifying a password for each instance. Samba can also accept session-based user name and password requests. The client maintains multiple authentication contexts by using a unique UID for each logon.
In the /etc/samba/smb.conf file, the security = user directive that sets user-level security is:
[GLOBAL]
...
security = user
...
As mentioned above, share-level security mode is deprecated. To configure a Samba guest share without using the security = share parameter, follow the procedure below:
The following sections describe other implementations of user-level security.
In domain security mode, the Samba server has a machine account (domain security trust account) and causes all authentication requests to be passed through to the domain controllers. The Samba server is made into a domain member server by using the following directives in the /etc/samba/smb.conf file:
[GLOBAL]
...
security = domain
workgroup = MARKETING
...
If you have an Active Directory environment, it is possible to join the domain as a native Active Directory member. Even if a security policy restricts the use of NT-compatible authentication protocols, the Samba server can join an ADS using Kerberos. Samba in Active Directory member mode can accept Kerberos tickets.
In the /etc/samba/smb.conf file, the following directives make Samba an Active Directory member server:
[GLOBAL]
...
security = ADS
realm = EXAMPLE.COM
password server = kerberos.example.com
...
Share-Level Security
With share-level security, the server accepts only a password without an explicit user name from the client. The server expects a password for each share, independent of the user name. There have been recent reports that Microsoft Windows clients have compatibility issues with share-level security servers. This mode is deprecated and has been removed from Samba. Configurations containing security = share should be updated to use user-level security. Follow the steps in Configuring Samba Guest Shares to avoid using the security = share directive.
Samba Account Information Databases
The following is a list different back ends you can use with Samba. Other back ends not listed here may also be available.
- Plain Text
-
Plain text back ends are nothing more than the
/etc/passwdtype back ends. With a plain text back end, all user names and passwords are sent unencrypted between the client and the Samba server. This method is very insecure and is not recommended for use by any means. It is possible that different Windows clients connecting to the Samba server with plain text passwords cannot support such an authentication method. smbpasswd-
The
smbpasswdback end utilizes a plain ASCII text layout that includes the MS Windows LanMan and NT account, and encrypted password information. Thesmbpasswdback end lacks the storage of the Windows NT/2000/2003 SAM extended controls. Thesmbpasswdback end is not recommended because it does not scale well or hold any Windows information, such as RIDs for NT-based groups. Thetdbsamback end solves these issues for use in a smaller database (250 users), but is still not an enterprise-class solution. ldapsam_compat-
The
ldapsam_compatback end allows continued OpenLDAP support for use with upgraded versions of Samba. tdbsam-
The default
tdbsampassword back end provides a database back end for local servers, servers that do not need built-in database replication, and servers that do not require the scalability or complexity of LDAP. Thetdbsamback end includes all of thesmbpasswddatabase information as well as the previously-excluded SAM information. The inclusion of the extended SAM data allows Samba to implement the same account and system access controls as seen with Windows NT/2000/2003/2008-based systems.The
tdbsamback end is recommended for 250 users at most. Larger organizations should require Active Directory or LDAP integration due to scalability and possible network infrastructure concerns. ldapsam-
The
ldapsamback end provides an optimal distributed account installation method for Samba. LDAP is optimal because of its ability to replicate its database to any number of servers such as the Red Hat Directory Server or an OpenLDAP Server. LDAP databases are light-weight and scalable, and as such are preferred by large enterprises. Installation and configuration of directory servers is beyond the scope of this chapter. For more information on the Red Hat Directory Server, see the Red Hat Directory Server 10 Deployment Guide. For more information on LDAP, see OpenLDAP.If you are upgrading from a previous version of Samba to 3.0, note that the OpenLDAP schema file (
/usr/share/doc/samba-version/LDAP/samba.schema) and the Red Hat Directory Server schema file (/usr/share/doc/samba-version/LDAP/samba-schema-FDS.ldif) have changed. These files contain the attribute syntax definitions and objectclass definitions that theldapsamback end needs in order to function properly.As such, if you are using the
ldapsamback end for your Samba server, you will need to configureslapdto include one of these schema file. See Extending Schema for directions on how to do this.Make sure the openldap-servers package is installedYou need to have the openldap-servers package installed if you want to use the
ldapsamback end. To ensure that the package is installed, execute the following command asroots:~]# dnf install openldap-servers
Samba Network Browsing
Network browsing enables Windows and Samba servers to appear in the Windows Network Neighborhood. Inside the Network Neighborhood, icons are represented as servers and if opened, the server’s shares and printers that are available are displayed.
Network browsing capabilities require NetBIOS over TCP/IP. NetBIOS-based networking uses broadcast (UDP) messaging to accomplish browse list management. Without NetBIOS and WINS as the primary method for TCP/IP host name resolution, other methods such as static files (/etc/hosts) or DNS, must be used.
A domain master browser collates the browse lists from local master browsers on all subnets so that browsing can occur between workgroups and subnets. Also, the domain master browser should preferably be the local master browser for its own subnet.
Domain Browsing
By default, a Windows server PDC for a domain is also the domain master browser for that domain. A Samba server must not be set up as a domain master server in this type of situation.
For subnets that do not include the Windows server PDC, a Samba server can be implemented as a local master browser. Configuring the /etc/samba/smb.conf file for a local master browser (or no browsing at all) in a domain controller environment is the same as workgroup configuration (see Configuring a Samba Server).
WINS (Windows Internet Name Server)
Either a Samba server or a Windows NT server can function as a WINS server. When a WINS server is used with NetBIOS enabled, UDP unicasts can be routed which allows name resolution across networks. Without a WINS server, the UDP broadcast is limited to the local subnet and therefore cannot be routed to other subnets, workgroups, or domains. If WINS replication is necessary, do not use Samba as your primary WINS server, as Samba does not currently support WINS replication.
In a mixed NT/2000/2003/2008 server and Samba environment, it is recommended that you use the Microsoft WINS capabilities. In a Samba-only environment, it is recommended that you use only one Samba server for WINS.
The following is an example of the /etc/samba/smb.conf file in which the Samba server is serving as a WINS server:
[global]
wins support = yes
|
Using WINS
All servers (including Samba) should connect to a WINS server to resolve NetBIOS names. Without WINS, browsing only occurs on the local subnet. Furthermore, even if a domain-wide list is somehow obtained, hosts cannot be resolved for the client without WINS. |
Samba with CUPS Printing Support
Samba allows client machines to share printers connected to the Samba server. In addition, Samba also allows client machines to send documents built in Linux to Windows printer shares. Although there are other printing systems that function with Fedora, CUPS (Common UNIX Print System) is the recommended printing system due to its close integration with Samba.
Simple smb.conf Settings
The following example shows a very basic /etc/samba/smb.conf configuration for CUPS support:
[global]
load printers = yes
printing = cups
printcap name = cups
[printers]
comment = All Printers
path = /var/spool/samba
browseable = no
guest ok = yes
writable = no
printable = yes
printer admin = @ntadmins
[print$]
comment = Printer Drivers Share
path = /var/lib/samba/drivers
write list = ed, john
printer admin = ed, john
Other printing configurations are also possible. To add additional security and privacy for printing confidential documents, users can have their own print spooler not located in a public path. If a job fails, other users would not have access to the file.
The print$ directive contains printer drivers for clients to access if not available locally. The print$ directive is optional and may not be required depending on the organization.
Setting browseable to yes enables the printer to be viewed in the Windows Network Neighborhood, provided the Samba server is set up correctly in the domain or workgroup.
Samba Distribution Programs
.net
net <protocol> <function> <misc_options> <target_options>
The net utility is similar to the net utility used for Windows and MS-DOS. The first argument is used to specify the protocol to use when executing a command. The protocol option can be ads, rap, or rpc for specifying the type of server connection. Active Directory uses ads, Win9x/NT3 uses rap, and Windows NT4/2000/2003/2008 uses rpc. If the protocol is omitted, net automatically tries to determine it.
The following example displays a list of the available shares for a host named wakko:
~]$ net -l share -S wakko
Password:
Enumerating shared resources (exports) on remote server:
Share name   Type     Description
----------   ----     -----------
data         Disk     Wakko data share
tmp          Disk     Wakko tmp share
IPC$         IPC      IPC Service (Samba Server)
ADMIN$       IPC      IPC Service (Samba Server)
The following example displays a list of Samba users for a host named wakko:
~]$ net -l user -S wakko
root password:
User name             Comment
-----------------------------
andriusb              Documentation
joe                   Marketing
lisa                  Sales
nmblookupnmblookup <options> <netbios_name>
The nmblookup program resolves NetBIOS names into IP addresses. The program broadcasts its query on the local subnet until the target machine replies.
The following example displays the IP address of the NetBIOS name trek:
~]$ nmblookup trek
querying trek on 10.1.59.255
10.1.56.45 trek<00>
pdbeditpdbedit <options>
The pdbedit program manages accounts located in the SAM database. All back ends are supported including smbpasswd, LDAP, and the tdb database library.
The following are examples of adding, deleting, and listing users:
~]$ pdbedit -a kristin
new password:
retype new password:
Unix username:        kristin
NT username:
Account Flags:        [U          ]
User SID:             S-1-5-21-1210235352-3804200048-1474496110-2012
Primary Group SID:    S-1-5-21-1210235352-3804200048-1474496110-2077
Full Name: Home Directory:       \\wakko\kristin
HomeDir Drive:
Logon Script:
Profile Path:         \\wakko\kristin\profile
Domain:               WAKKO
Account desc:
Workstations: Munged
dial:
Logon time:           0
Logoff time:          Mon, 18 Jan 2038 22:14:07 GMT
Kickoff time:         Mon, 18 Jan 2038 22:14:07 GMT
Password last set:    Thu, 29 Jan 2004 08:29:28
GMT Password can change:  Thu, 29 Jan 2004 08:29:28 GMT
Password must change: Mon, 18 Jan 2038 22:14:07 GMT
~]$ pdbedit -v -L kristin
Unix username:        kristin
NT username:
Account Flags:        [U          ]
User SID:             S-1-5-21-1210235352-3804200048-1474496110-2012
Primary Group SID:    S-1-5-21-1210235352-3804200048-1474496110-2077
Full Name:
Home Directory:       \\wakko\kristin
HomeDir Drive:
Logon Script:
Profile Path:         \\wakko\kristin\profile
Domain:               WAKKO
Account desc:
Workstations: Munged
dial:
Logon time:           0
Logoff time:          Mon, 18 Jan 2038 22:14:07 GMT
Kickoff time:         Mon, 18 Jan 2038 22:14:07 GMT
Password last set:    Thu, 29 Jan 2004 08:29:28 GMT
Password can change:  Thu, 29 Jan 2004 08:29:28 GMT
Password must change: Mon, 18 Jan 2038 22:14:07 GMT
~]$ pdbedit -L
andriusb:505:
joe:503:
lisa:504:
kristin:506:
~]$ pdbedit -x joe
~]$ pdbedit -L
andriusb:505: lisa:504: kristin:506:
rpcclientrpcclient <server> <options>
The rpcclient program issues administrative commands using Microsoft RPCs, which provide access to the Windows administration graphical user interfaces (GUIs) for systems management. This is most often used by advanced users that understand the full complexity of Microsoft RPCs.
smbcaclssmbcacls <//server/share> <filename> <options>
The smbcacls program modifies Windows ACLs on files and directories shared by a Samba server or a Windows server.
smbclientsmbclient <//server/share> <password> <options>
The smbclient program is a versatile UNIX client which provides functionality similar to the ftp utility.
smbcontrolsmbcontrol -i <options>
smbcontrol <options> <destination> <messagetype> <parameters>
The smbcontrol program sends control messages to running smbd, nmbd, or winbindd daemons. Executing smbcontrol -i runs commands interactively until a blank line or a 'q' is entered.
smbpasswdsmbpasswd <options> <username> <password>
The smbpasswd program manages encrypted passwords. This program can be run by a superuser to change any user’s password and also by an ordinary user to change their own Samba password.
smbspoolsmbspool <job> <user> <title> <copies> <options> <filename>
The smbspool program is a CUPS-compatible printing interface to Samba. Although designed for use with CUPS printers, smbspool can work with non-CUPS printers as well.
smbstatussmbstatus <options>
The smbstatus program displays the status of current connections to a Samba server.
smbtarsmbtar <options>
The smbtar program performs backup and restores of Windows-based share files and directories to a local tape archive. Though similar to the tar utility, the two are not compatible.
testparmtestparm <options> <filename> <hostname IP_address>
The testparm program checks the syntax of the /etc/samba/smb.conf file. If your smb.conf file is in the default location (/etc/samba/smb.conf) you do not need to specify the location. Specifying the host name and IP address to the testparm program verifies that the hosts.allow and host.deny files are configured correctly. The testparm program also displays a summary of your smb.conf file and the server’s role (stand-alone, domain, etc.) after testing. This is convenient when debugging as it excludes comments and concisely presents information for experienced administrators to read. For example:
~]$ testparm
Load smb config files from /etc/samba/smb.conf
Processing section "[homes]"
Processing section "[printers]"
Processing section "[tmp]"
Processing section "[html]"
Loaded services file OK.
Server role: ROLE_STANDALONE
Press enter to see a dump of your service definitions
<enter>
# Global parameters
[global]
	workgroup = MYGROUP
	server string = Samba Server
	security = SHARE
	log file = /var/log/samba/%m.log
	max log size = 50
	socket options = TCP_NODELAY SO_RCVBUF=8192 SO_SNDBUF=8192
	dns proxy = no
[homes]
	comment = Home Directories
	read only = no
	browseable = no
[printers]
	comment = All Printers
	path = /var/spool/samba
	printable = yes
	browseable = no
[tmp]
	comment = Wakko tmp
	path = /tmp
	guest only = yes
[html]
	comment = Wakko www
	path = /var/www/html
	force user = andriusb
	force group = users
	read only = no
	guest only = yes
wbinfowbinfo <options>
The wbinfo program displays information from the winbindd daemon. The winbindd daemon must be running for wbinfo to work.
Additional Resources
The following sections give you the means to explore Samba in greater detail.
-
/usr/share/doc/samba-<version-number>/— All additional files included with the Samba distribution. This includes all helper scripts, sample configuration files, and documentation. -
See the following man pages for detailed information specific Samba features:
-
smb.conf(5)
-
samba(7)
-
smbd(8)
-
nmbd(8)
-
winbindd(8)
-
-
https://www.samba.org/ — Homepage for the Samba distribution and all official documentation created by the Samba development team. Many resources are available in HTML and PDF formats, while others are only available for purchase. Although many of these links are not Fedora specific, some concepts may apply.
-
https://wiki.samba.org/index.php/User_Documentation — Samba 4.x official documentation.
-
https://www.samba.org/samba/archives.html — Active email lists for the Samba community. Enabling digest mode is recommended due to high levels of list activity.
-
Samba newsgroups — Samba threaded newsgroups, such as www.gmane.org, that use the
NNTPprotocol are also available. This an alternative to receiving mailing list emails.
FTP
File Transfer Protocol (FTP) is one of the oldest and most commonly used protocols found on the Internet today. Its purpose is to reliably transfer files between computer hosts on a network without requiring the user to log directly into the remote host or have knowledge of how to use the remote system. It allows users to access files on remote systems using a standard set of simple commands.
This section outlines the basics of the FTP protocol, as well as configuration options for the primary FTP server shipped with Fedora, vsftpd.
The File Transfer Protocol
However, because FTP is so prevalent on the Internet, it is often required to share files to the public. System administrators, therefore, should be aware of the FTP protocol’s unique characteristics.
Multiple Ports, Multiple Modes
Unlike most protocols used on the Internet, FTP requires multiple network ports to work properly. When an FTP client application initiates a connection to an FTP server, it opens port 21 on the server — known as the command port. This port is used to issue all commands to the server. Any data requested from the server is returned to the client via a data port. The port number for data connections, and the way in which data connections are initialized, vary depending upon whether the client requests the data in active or passive mode.
The following defines these modes:
- active mode
-
Active mode is the original method used by the
FTPprotocol for transferring data to the client application. When an active mode data transfer is initiated by theFTPclient, the server opens a connection from port 20 on the server to theIPaddress and a random, unprivileged port (greater than 1024) specified by the client. This arrangement means that the client machine must be allowed to accept connections over any port above 1024. With the growth of insecure networks, such as the Internet, the use of firewalls to protect client machines is now prevalent. Because these client-side firewalls often deny incoming connections from active modeFTPservers, passive mode was devised. - passive mode
-
Passive mode, like active mode, is initiated by the
FTPclient application. When requesting data from the server, theFTPclient indicates it wants to access the data in passive mode and the server provides theIPaddress and a random, unprivileged port (greater than 1024) on the server. The client then connects to that port on the server to download the requested information.While passive mode resolves issues for client-side firewall interference with data connections, it can complicate administration of the server-side firewall. You can reduce the number of open ports on a server by limiting the range of unprivileged ports on the
FTPserver. This also simplifies the process of configuring firewall rules for the server. See Network Options for more information about limiting passive ports.
FTP Servers
Fedora ships with two different FTP servers:
-
proftpd - A fast, stable, and highly configurable FTP server.
-
vsftpd — A fast, secure
FTPdaemon which is the preferredFTPserver for Fedora. The remainder of this section focuses on vsftpd.
vsftpd
The Very Secure FTP Daemon (vsftpd) is designed from the ground up to be fast, stable, and, most importantly, secure. vsftpd is the only stand-alone FTP server distributed with Fedora, due to its ability to handle large numbers of connections efficiently and securely.
The security model used by vsftpd has three primary aspects:
-
Strong separation of privileged and non-privileged processes — Separate processes handle different tasks, and each of these processes run with the minimal privileges required for the task.
-
Tasks requiring elevated privileges are handled by processes with the minimal privilege necessary — By leveraging compatibilities found in the
libcaplibrary, tasks that usually require fullrootprivileges can be executed more safely from a less privileged process. -
Most processes run in a chroot jail — Whenever possible, processes are change-rooted to the directory being shared; this directory is then considered a chroot jail. For example, if the directory /var/ftp/ is the primary shared directory, vsftpd reassigns /var/ftp/ to the new root directory, known as /. This disallows any potential malicious hacker activities for any directories not contained below the new root directory.
Use of these security practices has the following effect on how vsftpd deals with requests:
-
The parent process runs with the least privileges required — The parent process dynamically calculates the level of privileges it requires to minimize the level of risk. Child processes handle direct interaction with the
FTPclients and run with as close to no privileges as possible. -
All operations requiring elevated privileges are handled by a small parent process — Much like the Apache
HTTPServer, vsftpd launches unprivileged child processes to handle incoming connections. This allows the privileged, parent process to be as small as possible and handle relatively few tasks. -
All requests from unprivileged child processes are distrusted by the parent process — Communication with child processes are received over a socket, and the validity of any information from child processes is checked before being acted on.
-
Most interaction with
FTPclients is handled by unprivileged child processes in a chroot jail — Because these child processes are unprivileged and only have access to the directory being shared, any crashed processes only allows the attacker access to the shared files.
Files Installed with vsftpd
The vsftpd RPM installs the daemon (/usr/sbin/vsftpd), its configuration and related files, as well as FTP directories onto the system. The following lists the files and directories related to vsftpd configuration:
-
/etc/rc.d/init.d/vsftpd— The initialization script (initscript) used by the systemctl command to start, stop, or reload vsftpd. See Starting and Stopping vsftpd for more information about using this script. -
/etc/pam.d/vsftpd— The Pluggable Authentication Modules (PAM) configuration file for vsftpd. This file specifies the requirements a user must meet to login to theFTPserver. For more information on PAM, refer to the Using Pluggable Authentication Modules (PAM) chapter of the Fedora 30 Managing Single Sign-On and Smart Cards guide. -
/etc/vsftpd/vsftpd.conf— The configuration file for vsftpd. See vsftpd Configuration Options for a list of important options contained within this file. -
/etc/vsftpd/ftpusers— A list of users not allowed to log into vsftpd. By default, this list includes theroot,bin, anddaemonusers, among others. -
/etc/vsftpd/user_list— This file can be configured to either deny or allow access to the users listed, depending on whether the userlist_deny directive is set to YES (default) or NO in/etc/vsftpd/vsftpd.conf. If/etc/vsftpd/user_listis used to grant access to users, the usernames listed must not appear in/etc/vsftpd/ftpusers. -
/var/ftp/— The directory containing files served by vsftpd. It also contains the/var/ftp/pub/directory for anonymous users. Both directories are world-readable, but writable only by therootuser.
Starting and Stopping vsftpd
The vsftpd RPM installs the /etc/rc.d/init.d/vsftpd script, which can be accessed using the systemctl command.
To start the server, as root type:
systemctl start vsftpd.service
To stop the server, as root type:
systemctl stop vsftpd.service
The restart option is a shorthand way of stopping and then starting vsftpd. This is the most efficient way to make configuration changes take effect after editing the configuration file for vsftpd.
To restart the server, as root type:
systemctl restart vsftpd.service
The condrestart (conditional restart) option only starts vsftpd if it is currently running. This option is useful for scripts, because it does not start the daemon if it is not running.
To conditionally restart the server, as root type:
systemctl condrestart vsftpd.service
By default, the vsftpd service does not start automatically at boot time. To configure the vsftpd service to start at boot time, use a service manager such as systemctl. See Services and Daemons for more information on how to configure services in Fedora.
Configuring the Firewall for FTP
By default, firewalld blocks incoming FTP connections. To allow FTP connections, as root type:
firewall-cmd --add-service=ftp
The change will be applied immediately, but will be lost next time firewalld is reloaded or the system restarted. To make it permanent, type:
firewall-cmd --permanent --add-service=ftp
For more information on configuring firewalld, see the Red Hat Enterprise Linux 7 Security Guide.
Starting Multiple Copies of vsftpd
Sometimes one computer is used to serve multiple FTP domains. This is a technique called multihoming. One way to multihome using vsftpd is by running multiple copies of the daemon, each with its own configuration file.
To do this, first assign all relevant IP addresses to network devices or alias network devices on the system. For more information about configuring network devices, device aliases, and additional information about network configuration scripts, refer to the Fedora Networking Guide.
Next, the DNS server for the FTP domains must be configured to reference the correct machine. For information about BIND and its configuration files, refer to the Fedora Networking Guide.
If there is more configuration files present in the /etc/vsftpd directory, calling systemctl start vsftpd.service results in the /etc/rc.d/init.d/vsftpd initscript starting the same number of processes as the number of configuration files. Each configuration file must have a unique name in the /etc/vsftpd/ directory and must be readable and writable only by root.
vsftpd Configuration Options
Although vsftpd may not offer the level of customization other widely available FTP servers have, it offers enough options to fill most administrator’s needs. The fact that it is not overly feature-laden limits configuration and programmatic errors.
All configuration of vsftpd is handled by its configuration file, /etc/vsftpd/vsftpd.conf. Each directive is on its own line within the file and follows the following format:
directive=value
For each directive, replace directive with a valid directive and value with a valid value.
|
Do not use spaces
There must not be any spaces between the directive, equal symbol, and the value in a directive. |
Comment lines must be preceded by a hash sign (#) and are ignored by the daemon.
For a complete list of all directives available, refer to the man page for vsftpd.conf.
|
Securing the vsftpd service
For an overview of ways to secure vsftpd, see the Red Hat Enterprise Linux 7 Security Guide. |
The following is a list of some of the more important directives within /etc/vsftpd/vsftpd.conf. All directives not explicitly found or commented out within vsftpd's configuration file are set to their default value.
Daemon Options
The following is a list of directives which control the overall behavior of the vsftpd daemon.
-
listen — When enabled, vsftpd runs in stand-alone mode. Fedora sets this value to YES. This directive cannot be used in conjunction with the listen_ipv6 directive.
The default value is NO.
-
listen_ipv6 — When enabled, vsftpd runs in stand-alone mode, but listens only to
IPv6sockets. This directive cannot be used in conjunction with the listen directive.The default value is NO.
-
session_support — When enabled, vsftpd attempts to maintain login sessions for each user through Pluggable Authentication Modules (PAM). For more information, refer to the Using Pluggable Authentication Modules (PAM) chapter of the Red Hat Enterprise Linux 6 Managing Single Sign-On and Smart Cards and the PAM man pages. . If session logging is not necessary, disabling this option allows vsftpd to run with less processes and lower privileges.
The default value is YES.
Log In Options and Access Controls
The following is a list of directives which control the login behavior and access control mechanisms.
-
anonymous_enable — When enabled, anonymous users are allowed to log in. The usernames
anonymousandftpare accepted.The default value is YES.
See Anonymous User Options for a list of directives affecting anonymous users.
-
banned_email_file — If the deny_email_enable directive is set to YES, this directive specifies the file containing a list of anonymous email passwords which are not permitted access to the server.
The default value is
/etc/vsftpd/banned_emails. -
banner_file — Specifies the file containing text displayed when a connection is established to the server. This option overrides any text specified in the ftpd_banner directive.
There is no default value for this directive.
-
cmds_allowed — Specifies a comma-delimited list of
FTPcommands allowed by the server. All other commands are rejected.There is no default value for this directive.
-
deny_email_enable — When enabled, any anonymous user utilizing email passwords specified in the
/etc/vsftpd/banned_emailsare denied access to the server. The name of the file referenced by this directive can be specified using the banned_email_file directive.The default value is NO.
-
ftpd_banner — When enabled, the string specified within this directive is displayed when a connection is established to the server. This option can be overridden by the banner_file directive.
By default vsftpd displays its standard banner.
-
local_enable — When enabled, local users are allowed to log into the system.
The default value is YES.
See Local User Options for a list of directives affecting local users.
-
pam_service_name — Specifies the PAM service name for vsftpd.
The default value is ftp. Note, in Fedora, the value is set to vsftpd.
-
The default value is NO. Note, in Fedora, the value is set to YES.
-
userlist_deny — When used in conjunction with the userlist_enable directive and set to NO, all local users are denied access unless the username is listed in the file specified by the userlist_file directive. Because access is denied before the client is asked for a password, setting this directive to NO prevents local users from submitting unencrypted passwords over the network.
The default value is YES.
-
userlist_enable — When enabled, the users listed in the file specified by the userlist_file directive are denied access. Because access is denied before the client is asked for a password, users are prevented from submitting unencrypted passwords over the network.
The default value is NO, however under Fedora the value is set to YES.
-
userlist_file — Specifies the file referenced by vsftpd when the userlist_enable directive is enabled.
The default value is /etc/vsftpd/user_list and is created during installation.
Anonymous User Options
The following lists directives which control anonymous user access to the server. To use these options, the anonymous_enable directive must be set to YES.
-
anon_mkdir_write_enable — When enabled in conjunction with the write_enable directive, anonymous users are allowed to create new directories within a parent directory which has write permissions.
The default value is NO.
-
anon_root — Specifies the directory vsftpd changes to after an anonymous user logs in.
There is no default value for this directive.
-
anon_upload_enable — When enabled in conjunction with the write_enable directive, anonymous users are allowed to upload files within a parent directory which has write permissions.
The default value is NO.
-
anon_world_readable_only — When enabled, anonymous users are only allowed to download world-readable files.
The default value is YES.
-
ftp_username — Specifies the local user account (listed in
/etc/passwd) used for the anonymousFTPuser. The home directory specified in/etc/passwdfor the user is the root directory of the anonymousFTPuser.The default value is ftp.
-
no_anon_password — When enabled, the anonymous user is not asked for a password.
The default value is NO.
-
secure_email_list_enable — When enabled, only a specified list of email passwords for anonymous logins are accepted. This is a convenient way to offer limited security to public content without the need for virtual users.
Anonymous logins are prevented unless the password provided is listed in /etc/vsftpd/email_passwords. The file format is one password per line, with no trailing white spaces.
The default value is NO.
Local User Options
The following lists directives which characterize the way local users access the server. To use these options, the local_enable directive must be set to YES.
-
chmod_enable — When enabled, the
FTPcommand SITE CHMOD is allowed for local users. This command allows the users to change the permissions on files.The default value is YES.
-
chroot_list_enable — When enabled, the local users listed in the file specified in the chroot_list_file directive are placed in a chroot jail upon log in.
If enabled in conjunction with the chroot_local_user directive, the local users listed in the file specified in the chroot_list_file directive are not placed in a chroot jail upon log in.
The default value is NO.
-
chroot_list_file — Specifies the file containing a list of local users referenced when the chroot_list_enable directive is set to YES.
The default value is /etc/vsftpd/chroot_list.
-
chroot_local_user — When enabled, local users are change-rooted to their home directories after logging in.
The default value is NO.
Avoid enabling the chroot_local_user optionEnabling chroot_local_user opens up a number of security issues, especially for users with upload privileges. For this reason, it is not recommended.
-
guest_enable — When enabled, all non-anonymous users are logged in as the user guest, which is the local user specified in the guest_username directive.
The default value is NO.
-
guest_username — Specifies the username the guest user is mapped to.
The default value is ftp.
-
local_root — Specifies the directory vsftpd changes to after a local user logs in.
There is no default value for this directive.
-
local_umask — Specifies the umask value for file creation. Note that the default value is in octal form (a numerical system with a base of eight), which includes a "0" prefix. Otherwise the value is treated as a base-10 integer.
The default value is 022.
-
passwd_chroot_enable — When enabled in conjunction with the chroot_local_user directive, vsftpd change-roots local users based on the occurrence of the /./ in the home directory field within
/etc/passwd.The default value is NO.
-
user_config_dir — Specifies the path to a directory containing configuration files bearing the name of local system users that contain specific setting for that user. Any directive in the user’s configuration file overrides those found in
/etc/vsftpd/vsftpd.conf.There is no default value for this directive.
Directory Options
The following lists directives which affect directories.
-
dirlist_enable — When enabled, users are allowed to view directory lists.
The default value is YES.
-
dirmessage_enable — When enabled, a message is displayed whenever a user enters a directory with a message file. This message resides within the current directory. The name of this file is specified in the message_file directive and is
.messageby default.The default value is NO. Note, in Fedora, the value is set to YES.
-
force_dot_files — When enabled, files beginning with a dot (
.) are listed in directory listings, with the exception of the.and..files.The default value is NO.
-
hide_ids — When enabled, all directory listings show
ftpas the user and group for each file.The default value is NO.
-
message_file — Specifies the name of the message file when using the dirmessage_enable directive.
The default value is .message.
-
text_userdb_names — When enabled, text usernames and group names are used in place of UID and GID entries. Enabling this option may slow performance of the server.
The default value is NO.
-
use_localtime — When enabled, directory listings reveal the local time for the computer instead of GMT.
The default value is NO.
File Transfer Options
The following lists directives which affect directories.
-
download_enable — When enabled, file downloads are permitted.
The default value is YES.
-
chown_uploads — When enabled, all files uploaded by anonymous users are owned by the user specified in the chown_username directive.
The default value is NO.
-
chown_username — Specifies the ownership of anonymously uploaded files if the chown_uploads directive is enabled.
The default value is root.
-
write_enable — When enabled,
FTPcommands which can change the file system are allowed, such as DELE, RNFR, and STOR.The default value is YES.
Logging Options
The following lists directives which affect vsftpd's logging behavior.
-
dual_log_enable — When enabled in conjunction with xferlog_enable, vsftpd writes two files simultaneously: a wu-ftpd-compatible log to the file specified in the xferlog_file directive (
/var/log/xferlogby default) and a standard vsftpd log file specified in the vsftpd_log_file directive (/var/log/vsftpd.logby default).The default value is NO.
-
log_ftp_protocol — When enabled in conjunction with xferlog_enable and with xferlog_std_format set to NO, all
FTPcommands and responses are logged. This directive is useful for debugging.The default value is NO.
-
syslog_enable — When enabled in conjunction with xferlog_enable, all logging normally written to the standard vsftpd log file specified in the vsftpd_log_file directive (
/var/log/vsftpd.logby default) is sent to the system logger instead under theFTPDfacility.The default value is NO.
-
vsftpd_log_file — Specifies the vsftpd log file. For this file to be used, xferlog_enable must be enabled and xferlog_std_format must either be set to NO or, if xferlog_std_format is set to YES, dual_log_enable must be enabled. It is important to note that if syslog_enable is set to YES, the system log is used instead of the file specified in this directive.
The default value is
/var/log/vsftpd.log. -
xferlog_enable — When enabled, vsftpd logs connections (vsftpd format only) and file transfer information to the log file specified in the vsftpd_log_file directive (
/var/log/vsftpd.logby default). If xferlog_std_format is set to YES, file transfer information is logged but connections are not, and the log file specified in xferlog_file (/var/log/xferlogby default) is used instead. It is important to note that both log files and log formats are used if dual_log_enable is set to YES.The default value is NO. Note, in Fedora, the value is set to YES.
-
xferlog_file — Specifies the wu-ftpd-compatible log file. For this file to be used, xferlog_enable must be enabled and xferlog_std_format must be set to YES. It is also used if dual_log_enable is set to YES.
The default value is
/var/log/xferlog. -
xferlog_std_format — When enabled in conjunction with xferlog_enable, only a wu-ftpd-compatible file transfer log is written to the file specified in the xferlog_file directive (
/var/log/xferlogby default). It is important to note that this file only logs file transfers and does not log connections to the server.The default value is NO. Note, in Fedora, the value is set to YES.
|
Maintaining compatibility with older log file formats
To maintain compatibility with log files written by the older wu-ftpd To both log connections in vsftpd format and maintain a wu-ftpd-compatible file transfer log, set dual_log_enable to YES. If maintaining a wu-ftpd-compatible file transfer log is not important, either set xferlog_std_format to NO, comment the line with a hash sign (#), or delete the line entirely. |
Network Options
The following lists directives which affect how vsftpd interacts with the network.
-
accept_timeout — Specifies the amount of time for a client using passive mode to establish a connection.
The default value is 60.
-
anon_max_rate — Specifies the maximum data transfer rate for anonymous users in bytes per second.
The default value is 0, which does not limit the transfer rate.
-
connect_from_port_20 When enabled, vsftpd runs with enough privileges to open port 20 on the server during active mode data transfers. Disabling this option allows vsftpd to run with less privileges, but may be incompatible with some
FTPclients.The default value is NO. Note, in Fedora, the value is set to YES.
-
connect_timeout — Specifies the maximum amount of time a client using active mode has to respond to a data connection, in seconds.
The default value is 60.
-
data_connection_timeout — Specifies maximum amount of time data transfers are allowed to stall, in seconds. Once triggered, the connection to the remote client is closed.
The default value is 300.
-
ftp_data_port — Specifies the port used for active data connections when connect_from_port_20 is set to YES.
The default value is 20.
-
idle_session_timeout — Specifies the maximum amount of time between commands from a remote client. Once triggered, the connection to the remote client is closed.
The default value is 300.
-
listen_address — Specifies the
IPaddress on which vsftpd listens for network connections.There is no default value for this directive.
Running multiple copies of vsftpdIf running multiple copies of vsftpd serving different
IPaddresses, the configuration file for each copy of the vsftpd daemon must have a different value for this directive. See Starting Multiple Copies of vsftpd for more information about multihomedFTPservers. -
listen_address6 — Specifies the
IPv6address on which vsftpd listens for network connections when listen_ipv6 is set to YES.There is no default value for this directive.
Running multiple copies of vsftpdIf running multiple copies of vsftpd serving different
IPaddresses, the configuration file for each copy of the vsftpd daemon must have a different value for this directive. See Starting Multiple Copies of vsftpd for more information about multihomedFTPservers. -
listen_port — Specifies the port on which vsftpd listens for network connections.
The default value is 21.
-
local_max_rate — Specifies the maximum rate data is transferred for local users logged into the server in bytes per second.
The default value is 0, which does not limit the transfer rate.
-
max_clients — Specifies the maximum number of simultaneous clients allowed to connect to the server when it is running in standalone mode. Any additional client connections would result in an error message.
The default value is 0, which does not limit connections.
-
max_per_ip — Specifies the maximum of clients allowed to connected from the same source
IPaddress.The default value is 0, which does not limit connections.
-
pasv_address — Specifies the
IPaddress for the public facingIPaddress of the server for servers behind Network Address Translation (NAT) firewalls. This enables vsftpd to hand out the correct return address for passive mode connections.There is no default value for this directive.
-
pasv_enable — When enabled, passive mode connects are allowed.
The default value is YES.
-
pasv_max_port — Specifies the highest possible port sent to the
FTPclients for passive mode connections. This setting is used to limit the port range so that firewall rules are easier to create.The default value is 0, which does not limit the highest passive port range. The value must not exceed 65535.
-
pasv_min_port — Specifies the lowest possible port sent to the
FTPclients for passive mode connections. This setting is used to limit the port range so that firewall rules are easier to create.The default value is 0, which does not limit the lowest passive port range. The value must not be lower 1024.
-
pasv_promiscuous — When enabled, data connections are not checked to make sure they are originating from the same
IPaddress. This setting is only useful for certain types of tunneling.Avoid enabling the pasv_promiscuous optionDo not enable this option unless absolutely necessary as it disables an important security feature which verifies that passive mode connections originate from the same
IPaddress as the control connection that initiates the data transfer.The default value is NO.
-
port_enable — When enabled, active mode connects are allowed.
The default value is YES.
Additional Resources
For more information about vsftpd, refer to the following resources.
Installed Documentation
-
The
/usr/share/doc/vsftpd/directory — This directory contains aREADMEwith basic information about the software. TheTUNINGfile contains basic performance tuning tips and theSECURITY/directory contains information about the security model employed by vsftpd. -
vsftpd related man pages — There are a number of man pages for the daemon and configuration files. The following lists some of the more important man pages.
- Server Applications
-
-
man vsftpd — Describes available command line options for vsftpd.
-
- Configuration Files
-
-
man vsftpd.conf — Contains a detailed list of options available within the configuration file for vsftpd.
-
man 5 hosts_access — Describes the format and options available within the TCP wrappers configuration files:
hosts.allowandhosts.deny.
-
Useful Websites
-
https://security.appspot.com/vsftpd.html — The vsftpd project page is a great place to locate the latest documentation and to contact the author of the software.
-
https://slacksite.com/other/ftp.html — This website provides a concise explanation of the differences between active and passive mode
FTP. -
https://www.ietf.org/rfc/rfc0959.txt — The original Request for Comments (RFC) of the
FTPprotocol from the IETF.
Printer Configuration
The Printers configuration tool serves for printer configuring, maintenance of printer configuration files, print spool directories and print filters, and printer classes management.
The tool is based on the Common Unix Printing System (CUPS). If you upgraded the system from a previous Fedora version that used CUPS, the upgrade process preserved the configured printers.
|
Using the CUPS web application or command-line tools
You can perform the same and additional operations on printers directly from the CUPS web application or command line. To access the application, in a web browser, go to http://localhost:631/. For CUPS manuals refer to the links on the |
Starting the Printers Configuration Tool
With the Printers configuration tool you can perform various operations on existing printers and set up new printers. You can also use CUPS directly (go to http://localhost:631/ to access the CUPS web application).
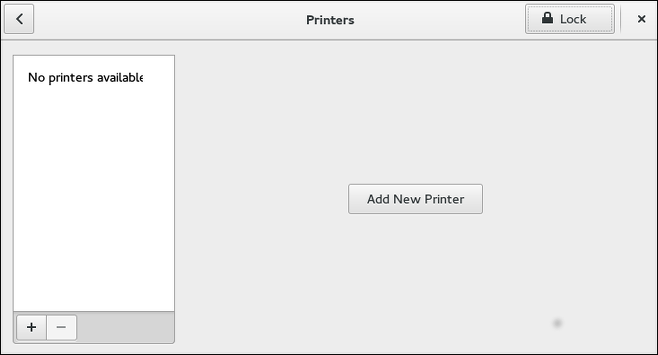
To start the Printers configuration tool if using the GNOME desktop, press the Super key to enter the Activities Overview, type Printers, and then press Enter. The Printers configuration tool appears. The Super key appears in a variety of guises, depending on the keyboard and other hardware, but often as either the Windows or Command key, and typically to the left of the Spacebar.
The Printers window depicted in Printers Configuration window appears.
Starting Printer Setup
Printer setup process varies depending on the printer queue type.
If you are setting up a local printer connected with USB, the printer is discovered and added automatically. You will be prompted to confirm the packages to be installed and provide an administrator or the root user password. Local printers connected with other port types and network printers need to be set up manually.
Follow this procedure to start a manual printer setup:
-
Start the Printers configuration tool (refer to Starting the Printers Configuration Tool).
-
Select
Unlockto enable changes to be made. In theAuthentication Requiredbox, type an administrator or therootuser password and confirm. -
Select the plus sign to open the
Add a New Printerdialog. Select the printer from the list or enter its address below.
Adding a Local Printer
Follow this procedure to add a local printer connected with other than a serial port:
-
Open the
Add a New Printerdialog (refer to Starting Printer Setup). -
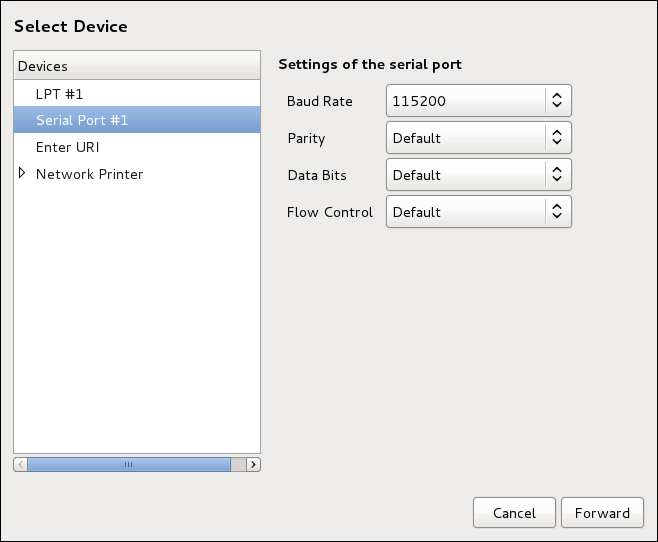
If the device does not appear automatically, select the port to which the printer is connected in the list on the left (such as
Serial Port #1orLPT #1). -
On the right, enter the connection properties:
- for
Enter URI -
URI(for example file:/dev/lp0) - for
Serial Port -
Baud Rate
- for
Parity
Data Bits
Flow Control
-
Click Forward.
-
Select the printer model. See Selecting the Printer Model and Finishing for details.
Adding an AppSocket/HP JetDirect printer
Follow this procedure to add an AppSocket/HP JetDirect printer:
-
Open the
Add a New Printerdialog (refer to Starting the Printers Configuration Tool). -
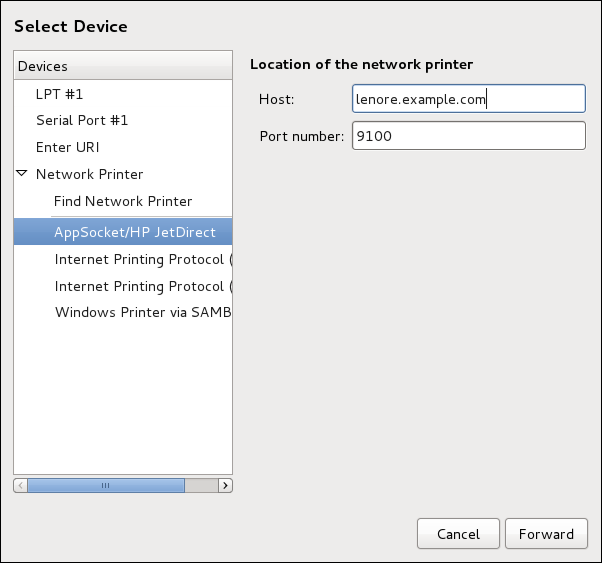
In the list on the left, select .
-
On the right, enter the connection settings:
Hostname-
Printer host name or
IPaddress. Port Number-
Printer port listening for print jobs (
9100by default).
-
Click Forward.
-
Select the printer model. See Selecting the Printer Model and Finishing for details.
Adding an IPP Printer
An IPP printer is a printer attached to a different system on the same TCP/IP network. The system this printer is attached to may either be running CUPS or simply configured to use IPP.
If a firewall is enabled on the printer server, then the firewall must be configured to allow incoming TCP connections on port 631. Note that the CUPS browsing protocol allows client machines to discover shared CUPS queues automatically. To enable this, the firewall on the client machine must be configured to allow incoming UDP packets on port 631.
Follow this procedure to add an IPP printer:
-
Open the
Printersdialog (refer to Starting Printer Setup). -
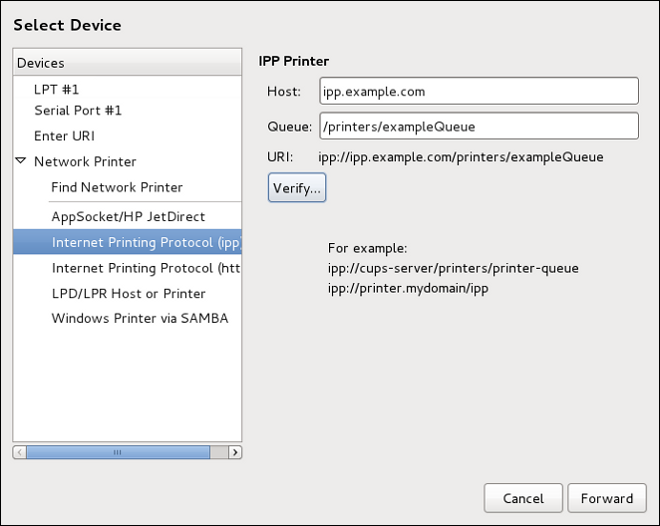
In the list of devices on the left, select Network Printer and
Internet Printing Protocol (ipp)orInternet Printing Protocol (https). -
On the right, enter the connection settings:
Host-
The host name of the
IPPprinter. Queue-
The queue name to be given to the new queue (if the box is left empty, a name based on the device node will be used).
-
Optionally, click Verify to detect the printer.
-
Click Forward to continue.
-
Select the printer model. See Selecting the Printer Model and Finishing for details.
Adding an LPD/LPR Host or Printer
Follow this procedure to add an LPD/LPR host or printer:
-
Open the
New Printerdialog (refer to Starting Printer Setup). -
In the list of devices on the left, select .
-
On the right, enter the connection settings:
Host-
The host name of the LPD/LPR printer or host.
Optionally, click Probe to find queues on the LPD host.
Queue-
The queue name to be given to the new queue (if the box is left empty, a name based on the device node will be used).
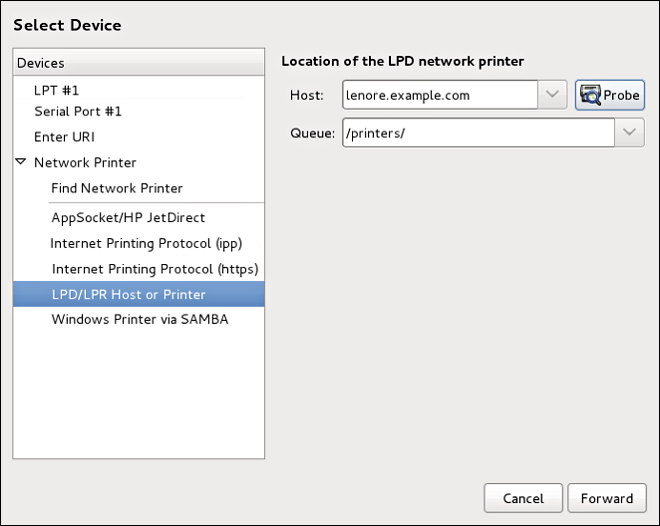
-
Click Forward to continue.
-
Select the printer model. See Selecting the Printer Model and Finishing for details.
Adding a Samba (SMB) printer
Follow this procedure to add a Samba printer:
|
Installing the samba-client package
Note that in order to add a Samba printer, you need to have the samba-client package installed. You can do so by running, as dnf install samba-client
For more information on installing packages with DNF, refer to Installing Packages. |
-
Open the
New Printerdialog (refer to Starting Printer Setup). -
In the list on the left, select .
-
Enter the SMB address in the
smb://field. Use the format computer name/printer share. In Adding a SMB printer, the computer name is dellbox and the printer share is r2.
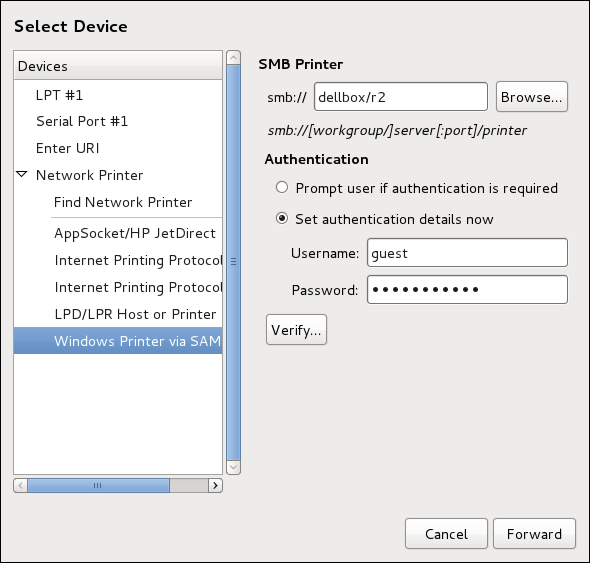
-
Click Browse to see the available workgroups/domains. To display only queues of a particular host, type in the host name (NetBios name) and click Browse.
-
Select either of the options:
-
Prompt user if authentication is required: user name and password are collected from the user when printing a document. -
Set authentication details now: provide authentication information now so it is not required later. In theUsernamefield, enter the user name to access the printer. This user must exist on the SMB system, and the user must have permission to access the printer. The default user name is typicallyguestfor Windows servers, ornobodyfor Samba servers.
-
-
Enter the
Password(if required) for the user specified in theUsernamefield.
|
Be careful when choosing a password
Samba printer user names and passwords are stored in the printer server as unencrypted files readable by Therefore, when you choose a user name and password to access a Samba printer, it is advisable that you choose a password that is different from what you use to access your local Fedora system. If there are files shared on the Samba print server, it is recommended that they also use a password different from what is used by the print queue. |
-
Click Verify to test the connection. Upon successful verification, a dialog box appears confirming printer share accessibility.
-
Click Forward.
-
Select the printer model. See Selecting the Printer Model and Finishing for details.
Selecting the Printer Model and Finishing
Once you have properly selected a printer connection type, the system attempts to acquire a driver. If the process fails, you can locate or search for the driver resources manually.
Follow this procedure to provide the printer driver and finish the installation:
-
In the window displayed after the automatic driver detection has failed, select one of the following options:
-
Select printer from database— the system chooses a driver based on the selected make of your printer from the list ofMakes. If your printer model is not listed, chooseGeneric. -
Provide PPD file— the system uses the provided PostScript Printer Description (PPD) file for installation. A PPD file may also be delivered with your printer as being normally provided by the manufacturer. If the PPD file is available, you can choose this option and use the browser bar below the option description to select the PPD file. -
Search for a printer driver to download— enter the make and model of your printer into theMake and modelfield to search on OpenPrinting.org for the appropriate packages.
-
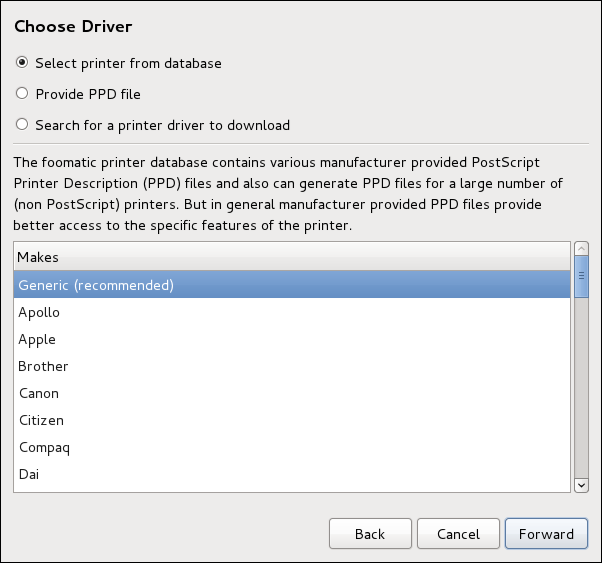
-
Depending on your previous choice provide details in the area displayed below:
-
Printer brand for the
Select printer from databaseoption. -
PPD file location for the
Provide PPD fileoption. -
Printer make and model for the
Search for a printer driver to downloadoption.
-
-
Click Forward to continue.
-
If applicable for your option, window shown in Selecting a printer model appears. Choose the corresponding model in the
Modelscolumn on the left.
|
Selecting a printer driver
On the right, the recommended printer driver is automatically selected; however, you can select another available driver. The print driver processes the data that you want to print into a format the printer can understand. Since a local printer is attached directly to your computer, you need a printer driver to process the data that is sent to the printer. |
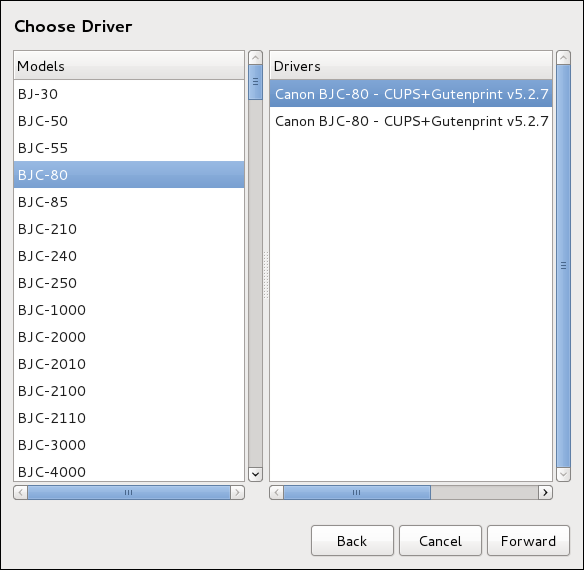
-
Click Forward.
-
Under the
Describe Printerenter a unique name for the printer in thePrinter Namefield. The printer name can contain letters, numbers, dashes (-), and underscores (_); it must not contain any spaces. You can also use theDescriptionandLocationfields to add further printer information. Both fields are optional, and may contain spaces.
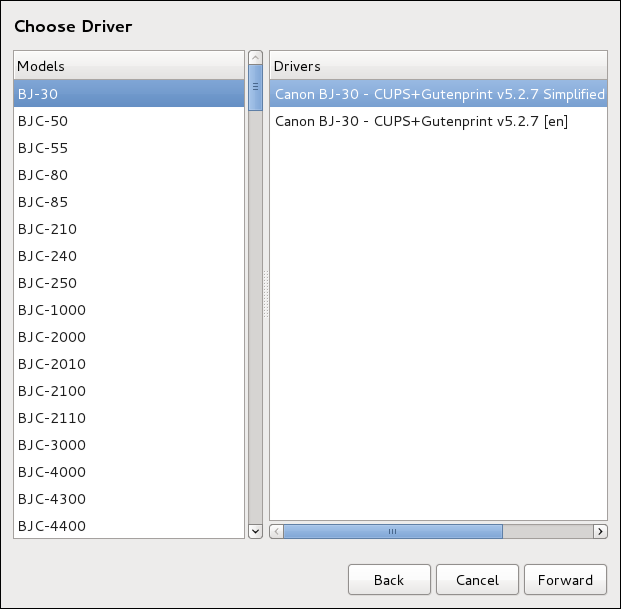
-
Click Apply to confirm your printer configuration and add the print queue if the settings are correct. Click Back to modify the printer configuration.
-
After the changes are applied, a dialog box appears allowing you to print a test page. Click Print Test Page to print a test page now. Alternatively, you can print a test page later as described in Printing a Test Page.
Printing a Test Page
After you have set up a printer or changed a printer configuration, print a test page to make sure the printer is functioning properly:
-
Right-click the printer in the
Printingwindow and clickProperties. -
In the Properties window, click
Settingson the left. -
On the displayed
Settingstab, click the Print Test Page button.
Modifying Existing Printers
To delete an existing printer, in the Printer configuration window, select the printer and go to . Confirm the printer deletion. Alternatively, press the Delete key.
To set the default printer, right-click the printer in the printer list and click the Set As Default button in the context menu.
The Settings Page
To change printer driver configuration, double-click the corresponding name in the Printer list and click the Settings label on the left to display the Settings page.
You can modify printer settings such as make and model, print a test page, change the device location (URI), and more.
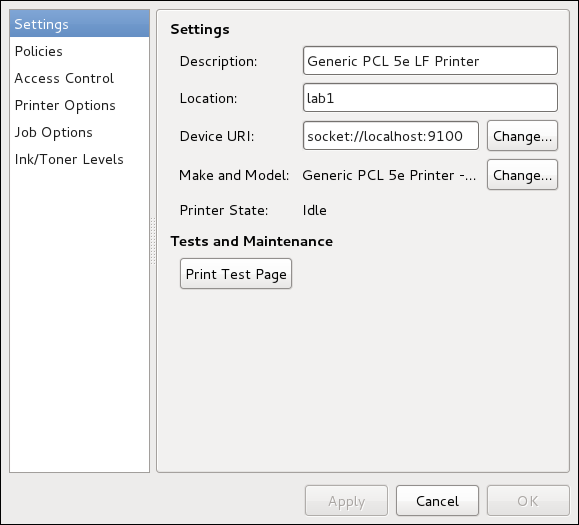
The Policies Page
Click the Policies button on the left to change settings in printer state and print output.
You can select the printer states, configure the Error Policy of the printer (you can decide to abort the print job, retry, or stop it if an error occurs).
You can also create a banner page (a page that describes aspects of the print job such as the originating printer, the user name from the which the job originated, and the security status of the document being printed): click the Starting Banner or Ending Banner drop-down menu and choose the option that best describes the nature of the print jobs (for example, confidential).
On the Policies page, you can mark a printer as shared: if a printer is shared, users published on the network can use it. To allow the sharing function for printers, go to and select Publish shared printers connected to this system.
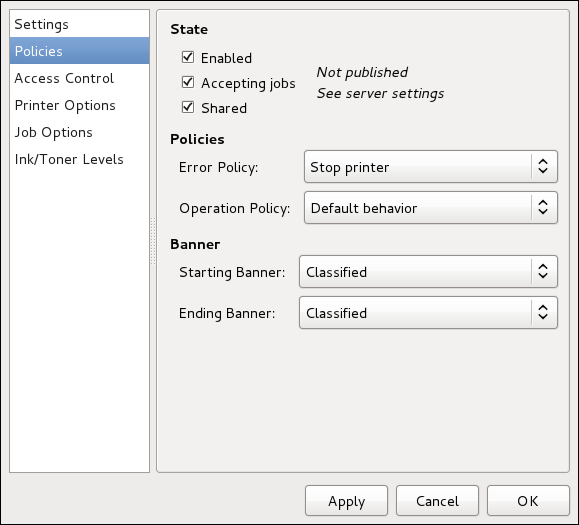
Make sure that the firewall allows incoming TCP connections to port 631, the port for the Network Printing Server (IPP) protocol. To allow IPP traffic through the firewall on Fedora 30, make use of firewalld's IPP service. To do so, proceed as follows:
-
To start the graphical firewall-config tool, press the Super key to enter the Activities Overview, type firewall and then press Enter. The
Firewall Configurationwindow opens. You will be prompted for an administrator orrootpassword.
Alternatively, to start the graphical firewall configuration tool using the command line, enter the following command as root user:
~]# firewall-config
The Firewall Configuration window opens.
Look for the word "Connected" in the lower left corner. This indicates that the firewall-config tool is connected to the user space daemon, firewalld.
To immediately change the current firewall settings, ensure the drop-down selection menu labeled Configuration is set to Runtime. Alternatively, to edit the settings to be applied at the next system start, or firewall reload, select Permanent from the drop-down list.
-
Select the
Zonestab and then select the firewall zone to correspond with the network interface to be used. The default is thepubliczone. TheInterfacestab shows what interfaces have been assigned to a zone. -
Select the
Servicestab and then select theippservice to enable sharing. Theipp-clientservice is required for accessing network printers. -
Close the firewall-config tool.
You can change user-level access to the configured printer on the Access Control page. Click the Access Control label on the left to display the page. Select either Allow printing for everyone except these users or Deny printing for everyone except these users and define the user set below: enter the user name in the text box and click the Add button to add the user to the user set.
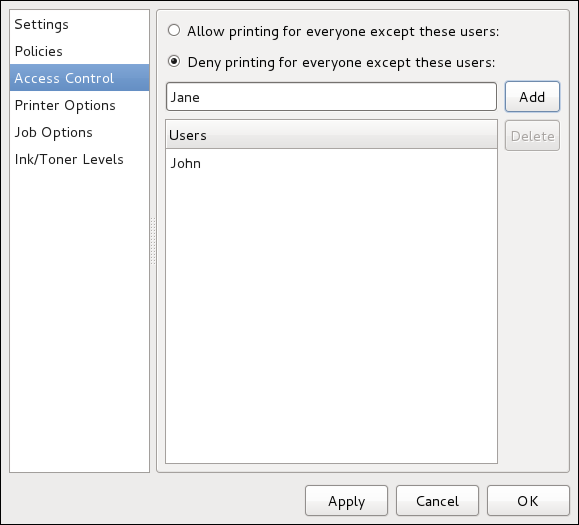
The Printer Options page contains various configuration options for the printer media and output, and its content may vary from printer to printer. It contains general printing, paper, quality, and printing size settings.

On the Job Options page, you can detail the printer job options. Click the Job Options label on the left to display the page. Edit the default settings to apply custom job options, such as number of copies, orientation, pages per side, scaling (increase or decrease the size of the printable area, which can be used to fit an oversize print area onto a smaller physical sheet of print medium), detailed text options, and custom job options.
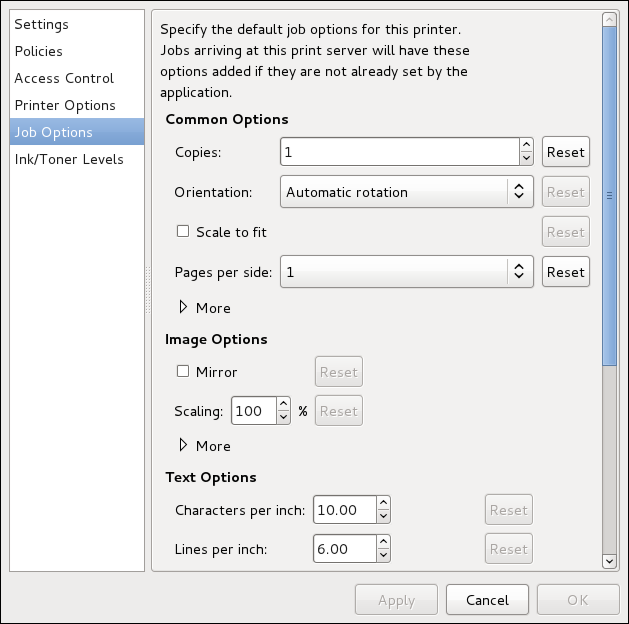
The Ink/Toner Levels page contains details on toner status if available and printer status messages. Click the Ink/Toner Levels label on the left to display the page.
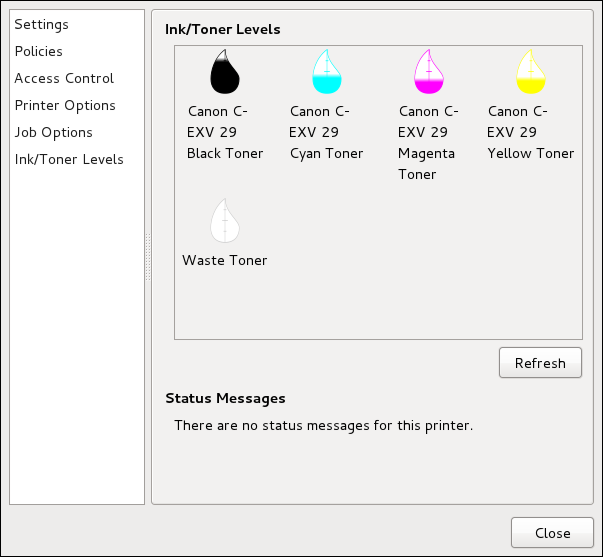
Managing Print Jobs
When you send a print job to the printer daemon, such as printing a text file from Emacs or printing an image from GIMP, the print job is added to the print spool queue. The print spool queue is a list of print jobs that have been sent to the printer and information about each print request, such as the status of the request, the job number, and more.
During the printing process, messages informing about the process appear in the notification area.

To cancel, hold, release, reprint or authenticate a print job, select the job in the GNOME Print Status and on the Job menu, click the respective command.
To view the list of print jobs in the print spool from a shell prompt, type the command lpstat -o. The last few lines look similar to the following:
$ lpstat -o
Charlie-60              twaugh            1024   Tue 08 Feb 2011 16:42:11 GMT
Aaron-61                twaugh            1024   Tue 08 Feb 2011 16:42:44 GMT
Ben-62                  root              1024   Tue 08 Feb 2011 16:45:42 GMT
If you want to cancel a print job, find the job number of the request with the command lpstat -o and then use the command cancel job number. For example, cancel 60 would cancel the print job in Example of lpstat -o output. You cannot cancel print jobs that were started by other users with the cancel command. However, you can enforce deletion of such job by issuing the cancel -U root job_number command. To prevent such canceling, change the printer operation policy to Authenticated to force root authentication.
You can also print a file directly from a shell prompt. For example, the command lp sample.txt prints the text file sample.txt. The print filter determines what type of file it is and converts it into a format the printer can understand.
Additional Resources
To learn more about printing on Fedora, see the following resources.
Installed Documentation
- man lp
-
The manual page for the lpr command that allows you to print files from the command line.
- man cancel
-
The manual page for the command-line utility to remove print jobs from the print queue.
- man mpage
-
The manual page for the command-line utility to print multiple pages on one sheet of paper.
- man cupsd
-
The manual page for the CUPS printer daemon.
- man cupsd.conf
-
The manual page for the CUPS printer daemon configuration file.
- man classes.conf
-
The manual page for the class configuration file for CUPS.
- man lpstat
-
The manual page for the lpstat command, which displays status information about classes, jobs, and printers.
Useful Websites
- https://wiki.linuxfoundation.org/openprinting/start
-
Open Printing contains a large amount of information about printing in Linux.
- https://www.cups.org/
-
Documentation, FAQs, and newsgroups about CUPS.
Want to help? Learn how to contribute to Fedora Docs ›
