ImageFactory – How to Create a Virtual Machine Disk Image
The objective here is to learn to create a standard Fedora Server Edition bootable virtual disk image to be used as a base for further customization. The tool chain is the same as used by Fedora release engineering team. It ensures compatibility as much as possible and is making the installation as simple and speedy as possible.
The goal is to set up a working environment to create customized, bootable and ready to be used Fedora Server virtual machine disk images. The tool to be used, ImageFactory, is a bit of a challenge. Therefore, we start with setting up a complete and known to work base setting. On this solid basis, they can then start modifying and adapting the configuration to their needs. That way, in case of bugs, it is quite easy to locate the probable cause.
Why ImageFactory
There are many tools to create a VM virtual disk image. ImageFactory is probably one of the oldest and not necessarily in the best of shape. Its key advantage is that it is also used for building Fedora releases. You can use a variety of resources maintained by the Fedora Release Engineering team. This greatly facilitates the work and makes up for the aforementioned disadvantage.
Requirements
There are some items to take into account.
-
You use ImageFactory exclusively via CLI. There is no graphical interface. So you should be familiar with the terminal.
-
We use Fedora Server here, but in principle any of the Fedora desktop systems is usable as well.
-
In this example, you need root permissions to execute the build process (sudo is sufficient, of course).
-
ImageFactory is completely based on a "Kickstart" file that controls the whole process. We provide a Kickstart file for download in the appendix, which creates a complete Fedora Server Edition VM. It serves here as a “Hello World” example, but is also suitable as a starting point for your own development.
Getting a Kickstart file to work correctly according to your goals is the hardest (and only) challenge to meet.
-
And it requires a template file that provides metadata about the image to be created. The content is pretty standard and doesn’t need any special attention. We provide a template file for download in the appendix.
Preparation
Create a working environment
ImageFactory uses a virtual machine to tailor the image, so you need virtualization capabilities. If you work directly with your host (i.e. on hardware), you need to install Virtualisation. Furthermore, ImageFactory installs a variety of software that an admin would not necessarily want to see in the everyday working environment. It is therefore recommended to create a dedicated virtual machine for this purpose if possible and use nested virtualization in it.
-
On your host (on hardware) if not already done: Add virtualization capability as described in Adding Virtualization Support.
-
Optional: Install a dedicated Fedora Server virtual machine, follow the steps as described in Creating a virtual machine using Fedora Server Edition disk image and add virtualization capability as described in Adding Virtualization Support, too.
Nested virtualization should already work in Fedora, check as described in Setting up Nested Virtualization.
-
Ensure the Guestfish suite is installed to get the utilities to access and modify generated disk image files. If you follow Adding Virtualization Support exactly, it is. Otherwise install it.
[…]$ sudo dnf install guestfs-toolsCheck to really install
guestfs-tools, notlibguestfs-tools(unless you need additional windows guests related software). -
Ensure that you have at least about 25 GB space available in your working environment.
-
If you want to make use of Fedora Kickstart files you need to have
gitinstalled.
Install ImageFactory
ImageFactory includes the base package and various plugins for different target platforms. To be able to use ImageFactory practically, all plugins should be installed, regardless of the target format. Additionally, the package pykickstart provides several helper programs, among others ksflatten to check and optimize the kickstart file.
-
Create logical volumes for ImageFactory working files. To make it easy use Cockpit.
-
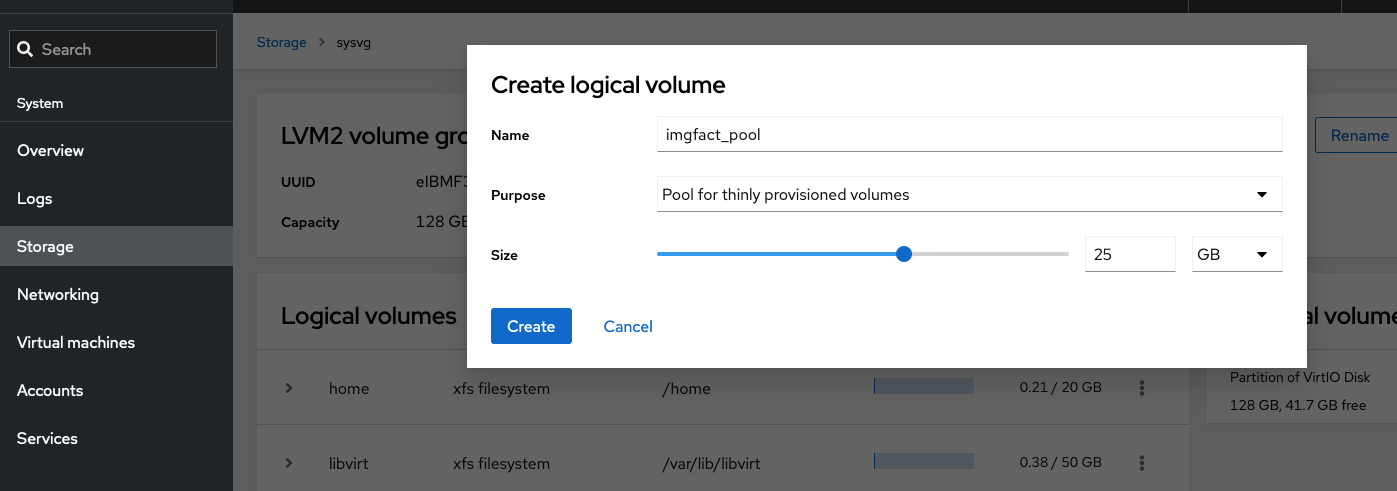
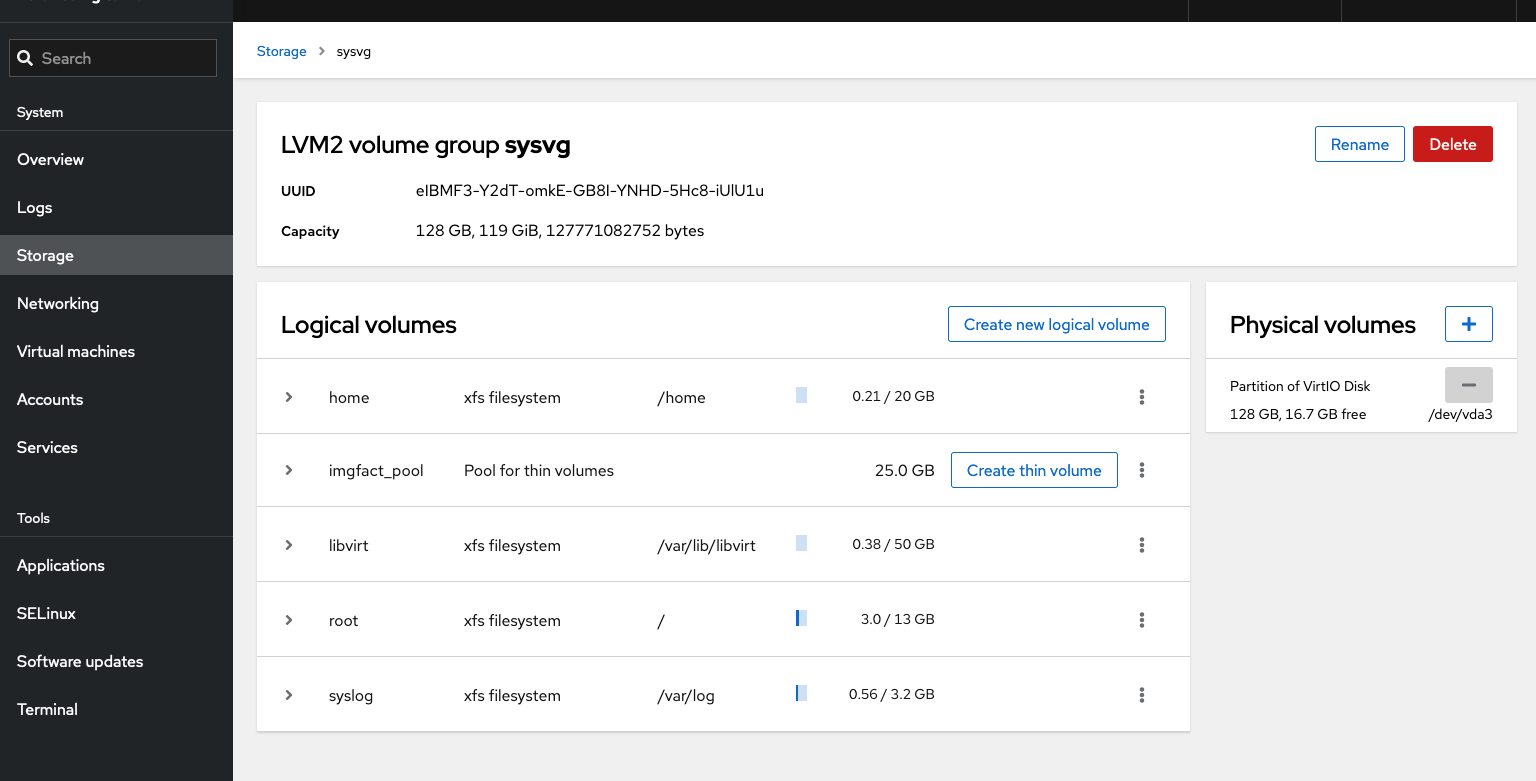
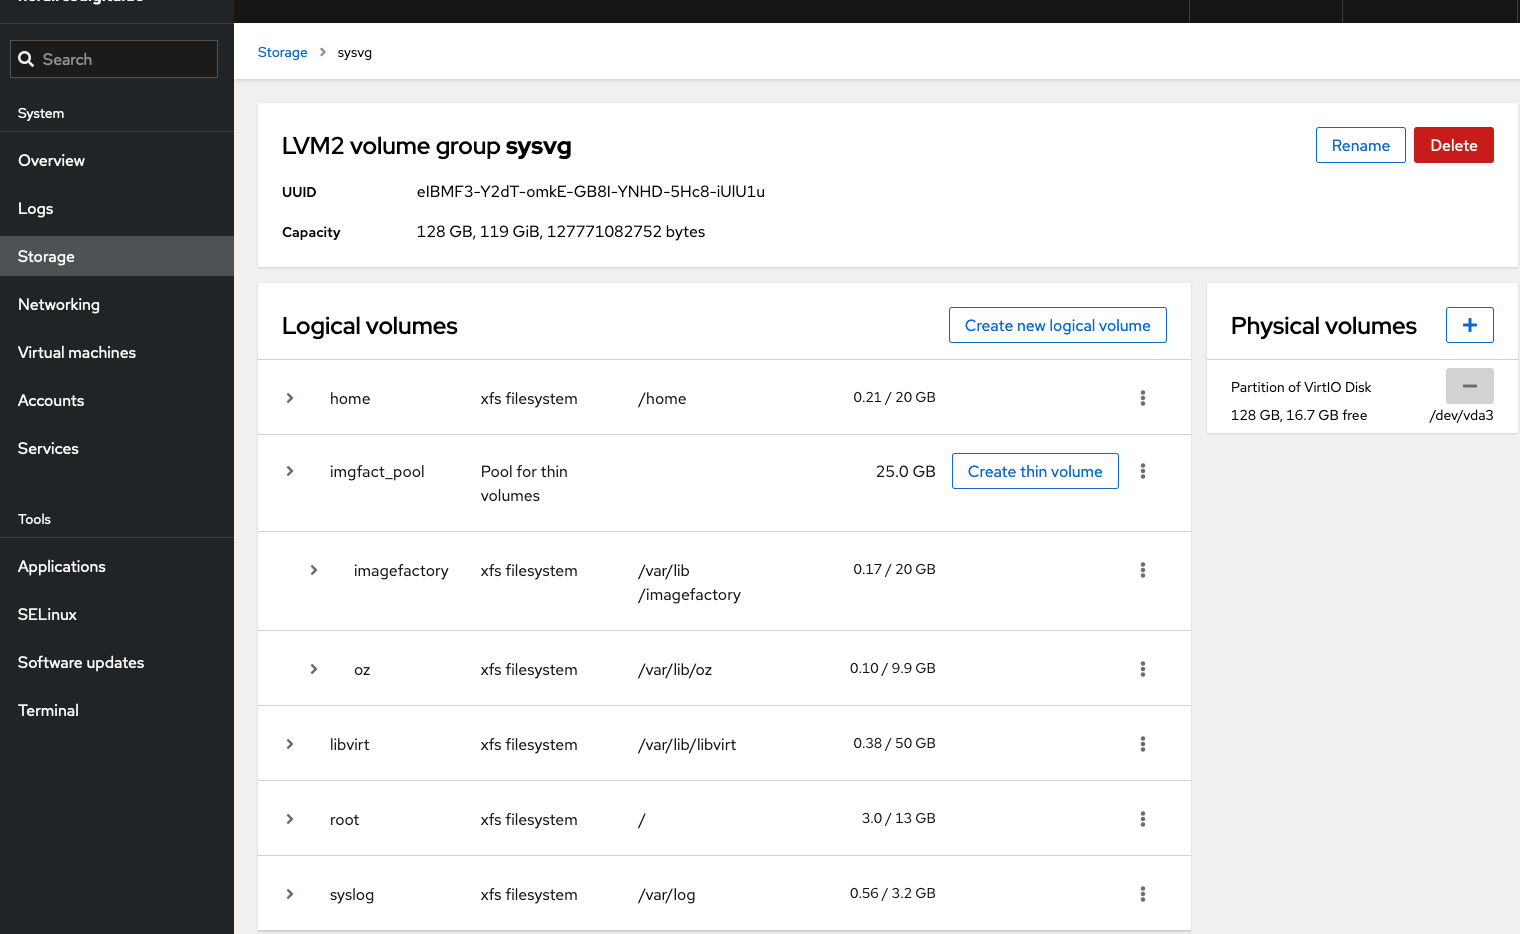
First create a thin image pool of about 25 G wherein you can create the file systems actually to be used. This allows you to use the available space flexibly. In the Storage tab select the system volume group in the Devices box on the right side. In the list of Logical volumes select Create new logical volume.
The list of logical volumes show a thin pool and a button to create thin volumes inside.
-
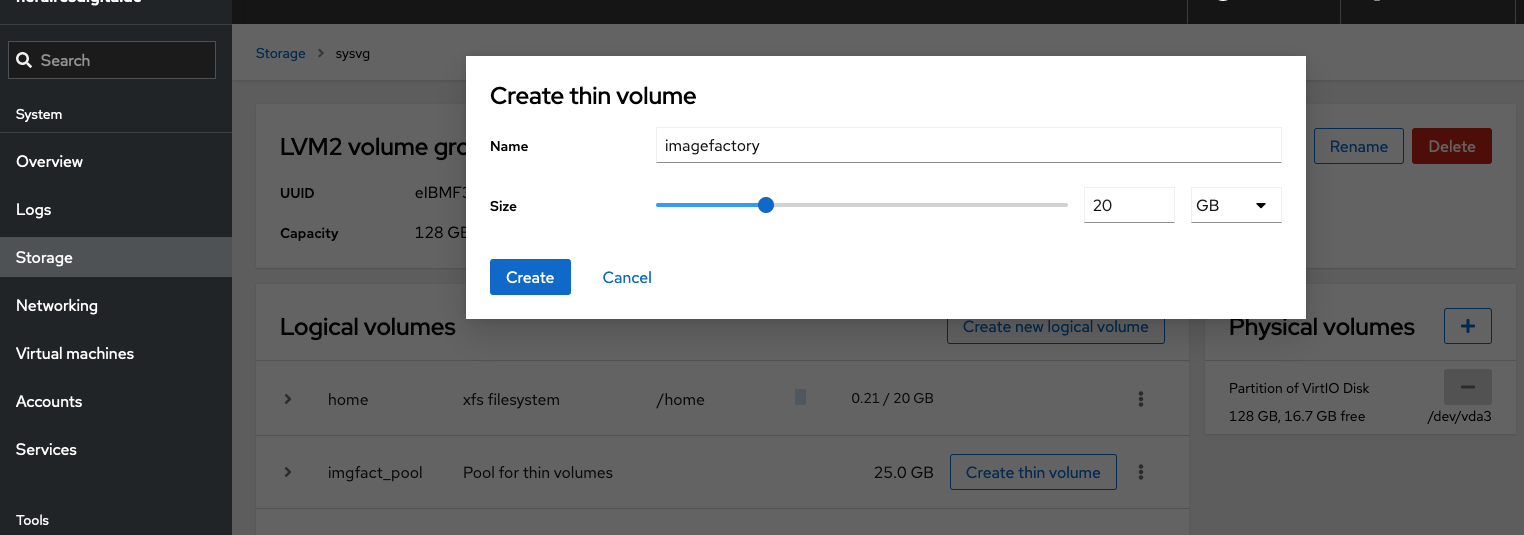
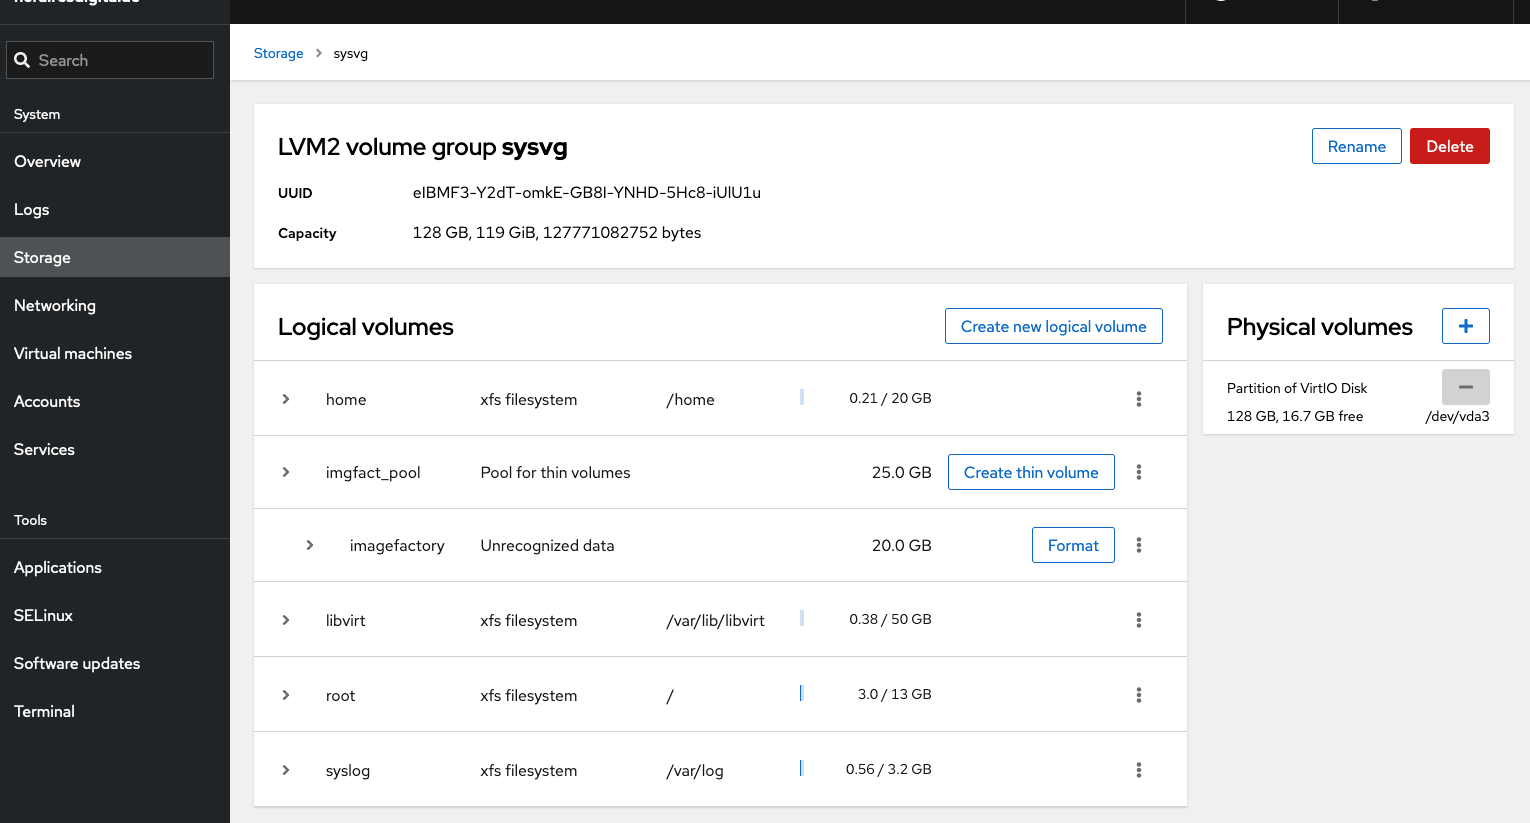
Create a thin volume named imagefactory of max. 20 G for the working directory of ImageFactory and format an XFS filesystem to be mounted at /var/lib/imagefactory.
Now, the list of logical volumes includes a new volume below imgfact_pool
-
Repeat the step b to create a logical volume of maximal 10 G named oz to be mounted at /var/lib/oz
-
-
Install Imagefactory
[…]$ sudo dnf install imagefactory imagefactory-plugins* pykickstartThis installs about 209 packages (in F38). To be sure, check and restore the SELinux labels for the installation directories.
[…]$ sudo /sbin/restorecon -R -vF /var/lib/imagefactory […]$ sudo /sbin/restorecon -R -vF /var/lib/oz -
Adjust Imagefactory configuration
-
Enlarge the amount of working memory for OZ, the backend used by ImageFactory.
[…]$ sudo sed -i -e 's/# memory = 1024/memory = 2048/' /etc/oz/oz.cfg -
Optional: Switch the image output format from the default "raw" type to qcow2 to save disk space. If you have plenty thereof, leave it as is.
[…]$ sudo vim /etc/oz/oz.cfg
(edit)
#image_type = raw
image_type = qcow2
-
Set up a working directory
At a convenient location, create a directory where you will store all your working files, for example, in your home directory.
[…]$mkdir ~/imagefactoryIt will primarly used to store the kickstart and the template files. You may use your personal accout and use sudo for all commands. However, it is more convenient to work as root. However, this is only advisable in a dedicated VM as explained above.
The kickstart file
The kickstart file describes the content of the disk image to create. Fetch the basic kickstart file "fedora-server-kvm-dev.ks". Probably it is a good idea to clone the Fedora kickstart repository as well. It may be advantageous to check for a file with a similiar target you want to create and start with that. In any case, a look at the various Kickstart files can give you ideas on how to achieve your goal.
-
Fetch the basic kickstart file and store it into this working directory. In many cases klicking the link stores the file into you default download directory, ~/Downloads in case of Fedora desktops or Macs.
[…]$ mv ~/Downloads/fedora-server-kvm-dev.ks ~/imagefactory/ -
Optional: Clone the Fedora kickstart repository for easy access to reference material.
[…]$ mkdir ~/imagefactory/FedoraKickstarts
[…]$ git  clone https://pagure.io/fedora-kickstarts.git -o upstream ~/imagefactory/FedoraKickstarts
If you are planning to contribute your VM you should create a fork, too, so you can provide a pull request.
The download URL helper file
ImageFactory uses Anaconda to create the disk image. It uses the network installatin method and needs appropriate URLs for Download. Anaconda expects this information as part of the installation specification, i.e. within the corresponding section of the Kickstat file. To simplify the management of the download URLs, they are offloaded to an include file named "fedora-repo.ks". In this file you can easily manage different Fedora versions and download sources without disturbing the flow in the Kickstart file.
You have to create this file in your working directoy. In this example we name it fedora-repo.ks which is the same name as Fedora is using. This way you can contribute your work as you go.
The exact content depends entirely on local conditions. The basis is the following sample:
[…]$ vim ~/imagefactory/fedora-repo.ks

# Include the appropriate repo definitions
# uncomment the repo specification to use.

# Fedora Release mirrors
#repo --name=fedora  --mirrorlist=https://mirrors.fedoraproject.org/mirrorlist?repo=fedora-37&arch=x86_64
#repo --name=updates --mirrorlist=https://mirrors.fedoraproject.org/mirrorlist?repo=updates-released-f37&arch=x86_64
#url                 --mirrorlist=https://mirrors.fedoraproject.org/mirrorlist?repo=fedora-37&arch=x86_64


## Regional Fedora release mirror (F37 / x86_64)
#repo --name="fedora-rwth"  --baseurl=http://ftp.halifax.rwth-aachen.de/fedora/linux/releases/37/Server/x86_64/os
#repo --name="updates-rwth"  --baseurl=http://ftp.halifax.rwth-aachen.de/fedora/linux/updates/37/Everything/x86_64/
# Use network installation
#url --url="http://ftp.halifax.rwth-aachen.de/fedora/linux/releases/37/Everything/x86_64/os/"


## Koji image creation (branched development tree)
repo --name="koji-override-0" --baseurl=https://kojipkgs.fedoraproject.org/compose/branched/Fedora-38-20230312.n.0/compose/Everything/x86_64/os
repo --name="koji-override-1" --baseurl=https://kojipkgs.fedoraproject.org/compose/branched/Fedora-38-20230312.n.0/compose/Server/x86_64/os
# Use network installation
url --url="https://kojipkgs.fedoraproject.org/compose/branched/Fedora-38-20230312.n.0/compose/Everything/x86_64/os"
The template file
The template file describes meta data of the disk image to create. That includes the repository to download and the size of the disk image. Don’t worry too much about the download URL. It will be overwritten by the kickstart file.
Fetch the corresponding basic template file and store it into the working directory. In many cases klicking the link stores the file into you default download directory, ~/Downloads in case of Fedora desktops or Macs.
[…]$ mv ~/Downloads/fedora-server-kvm-dev.tdl ~/imagefactory/The version number inside the template file (22) is not necessarily the Fedora target version. For some reason it is best to leave it untouched! But you have to adjust the download URL!
Working with FactoryImage
Create an image file
-
prepare and optimize kickstart file with ksflatten:
[…]$ ksflatten -c fedora-server-kvm-dev.ks -o fedora-server-kvm-dev-fl.ks -
Check using ksvalidator
[…]$ ksvalidator -i fedora-server-kvm-dev-fl.ks -
Create the image
Using a vm and guestfs-tools to adapt the image. This is the preferred operation mode.
[…]$ sudo imagefactory --debug base_image --file-parameter install_script \
     fedora-server-kvm-dev-fl.ks  fedora-server-kvm-dev.tdl \
     --parameter offline_icicle true
The creation process takes some time. Therefore, the debug option provides some feedback about the progress.
ImageFactory creates a non-system temporary VM to build the image, which is visible in Cockpit’s VM list. It is usefull to watch the terminal window of this instance during the build. It shows a log of all the building steps and specifically errors or warnings. Unfortunately, the VM gets destroyed when Imagefactory finishes.
Additionally, you find loging output in the /var/lib/oz directory. Often specifically useful are the (virtual) screenshots in the respective subdirectory.
-
Output in case of a successful generation
============ Final Image Details ============
UUID: 4ebde351-e81b-427f-96b7-5acd5680013d
Type: base_image
Image filename: /var/lib/imagefactory/storage/4ebde351-e81b-427f-96b7-5acd5680013d.body
Image build completed SUCCESSFULLY!
Check out a created image file
To access the filesystem inside a generated image, use guestfs-tools. Ensure that the image in not used in an active VM.
-
Copy the generated vm into the libvirt installation media pool
[…]# qemu-img convert -c -O qcow2 /var/lib/imagefactory/storage/xxx-yyy-zzz.body /var/lib/libvirt/boot/fedora-server-kvm-dev.qcow2 -
Check and analyze the file system
[…]# cd /var/lib/libvirt/boot […]# guestfish -a fedora-server-kvm-dev.qcow2 Welcome …. ><fs> run ...(wait) ><fs> list-filesystems /dev/... ><fs> quit -
Mount the file system(s)
Following the list of file systems above, mount each filesystem and check
[…]# mkdir /mnt/test […]# guestmount -a fedora-server-kvm-dev.qcow2 -m /dev/xxx/yyy /mnt/test -
Clean up
[…]# mkdir /mnt/test
[…]# guestmount -a fedora-server-kvm-dev.qcow2  -m /dev/xxx/yyy  /mnt/test
Instantiate and test a created image
-
Copy the generated vm into the libvirt disk image pool
[…]# cp /var/lib/libvirt/boot/fedora-server-kvm-dev.qcow2 /var/lib/libvirt/images/vm-test.qcow2 -
Instantiate a VM
[…]# virt-install  --name vm-test \
     --memory 4096  --cpu host --vcpus 2 --graphics none\
     --os-variant fedora-unknown\
     --import  \
     --disk /var/lib/libvirt/images/vm-test.qcow2,format=qcow2,bus=virtio \
     --network type=direct,source=enp1s0,source_mode=bridge,model=virtio \
     --network bridge=virbr0,model=virtio
Follow the steps as specified in Creating a virtual machine using Fedora Server Edition disk image – Minimal initial configuration.
Want to help? Learn how to contribute to Fedora Docs ›