Instalación Usando VNC
La interfaz gráfica de instalación es el método recomendado de instalación de Fedora.Sin embargo, en algunos casos, acceder directamente a la interfaz gráfica es difícil o imposible. Algunos sistemas carecen de la capacidad de conectar un monitor y un teclado, haciendo de VNC una necesidad para las instalaciones manuales (no Kickstart).
Para permitir las instalaciones manuales sobre sistemas sin cabeza (sistemas sin una pantalla, un teclado y un ratón directamente conectados), el programa de instalación Anaconda incluye un modo Procesamiento en Red Virtual (VNC) que permite que el modo gráfico del programa de instalación corra localmente pero se muestra en otro sistema conectado a la red. La instalación VNC le proporciona la gama completa de opciones de instalación.
Este capítulo proporciona instrucciones sobre la activación del modo VNC en la instalación del sistema y la conexión usando un visualizador VNC.
Instalando un Visualizador VNC
Llevar a cabo una instalación VNC requiere un visualizador VNC corriendo en su estación de trabajo u otro ordenador terminal. Los visualizadores VNC están disponibles en los repositorios de las mayoría de las distribuciones Linux; visualizadores VNC libres están también disponibles para otros sistemas operativos como Windows. En los sistemas Linux, use su administrador de paquetes para buscar un visualizador para su distribución.
En Fedora están disponibles los siguientes visualizadores VNC:
-
TigerVNC - Un visualizador básico independiente de su entorno de escritorio. Instalado como paquete tigervnc.
-
Vinagre - Un visualizador para el entorno de escritorio GNOME. Instalado como el paquete vinagre.
-
KRDC - Un visualizador integrado con el entorno de escritorio KDE. Instalado como el paquete kdenetwork-krdc.
Para instalar cualquier de los visualizadores listados arriba, ejecute como root el siguiente comando:
# dnf install package
Remplace package con el nombre del paquete del visualizados que desee usar (por ejemplo, tigervnc).
|
Los procedimientos en este capítulo asumen que esta usando TigerVNC como su visualizador VNC. las instrucciones específicas para otros visualizadores pueden diferir, pero los principios generales aún se aplican. |
Llevar a cabo una instalación VNC
El programa de instalación Anaconda ofrece dos modos para la instalación VNC: Modo directo y Modo conectado. Los modo se diferencian en la manera en que la conexión entre el servidor y el visualizador se establece. Después de que conecte con éxito, la instalación progresará del mismo modo sea cual sea el modo que haya usado.
- Modo Directo
-
En este modo, Anaconda está configurado para iniciar la instalación y esperar una conexión entrante desde el visualizador VNC antes de proceder. Mientras espera por una conexión entrante, la dirección IP y el puerto del sistema en el que el instalador espera la conexión se muestra en la pantalla o en la consola si está disponible; esto implica que usted necesita al menos una consola serie para conectar usando este modo, pero puede superar esta limitación si sabe el puerto VNC predeterminado y la dirección IP del sistema.
- Modo Conectado
-
En este modo, el visualizador VNC se arranca en el sistema remoto en modo de escucha. El visusalizador VNC espera una conexión entrante en un puerto especificado. Entonces, Anaconda se inicia y el nombre de equipo/dirección IP y número de puerto del visualizador son proporcionados usando una opción de arranque o un comando Kickstart. Cuando empieza la instalación, el programa de instalación establece una conexión con el visualizador VNC a la escucha usando el nombre de equipo/dirección IP y número de puerto especificados. El modo de conexión es, por lo tanto, más fácil para usar sobre sistemas sin pantalla local o consola, pero también puede requerir una preparación adicional, porque el sistema visualizador debe ser capaz de aceptar conexiones entrantes sobre el puerto especificado, lo que normalmente requiere cambios en los ajustes del cortafuegos.
Elegir un Modo de Instalación VNC
-
Acceso visual e interactivo al sistema
-
Si el acceso visual e interactivo al sistema que se quiere instalar no está disponible, entonces debería usar el Connect Mode (Modo Conexión).
-
-
Reglas de Conexión a Red y Cortafuegos
-
Si el sistema que se esta conectando no admite conexiones entrantes por un cortafuegos, entonces usted debe usar el Connect Mode o deshabilitar el cortafuegos. Deshabilitar el cortafuegos puede tener implicaciones de seguridad.
-
Si el sistema remoto ejecutando el visualizador VNC no tiene permitidas las conexiones entrantes por un cortafuegos, entonces debe usar el Direct Mode (Modo Directo) o deshabilitar el cortafuegos. Deshabilitar el cortafuegos puede tener implicaciones de seguridad.
-
Instalar en VNC Direct Mode
VNC Direct Mode is when the VNC viewer initiates a connection to the system being installed. Anaconda will tell you when to initiate this connection.
-
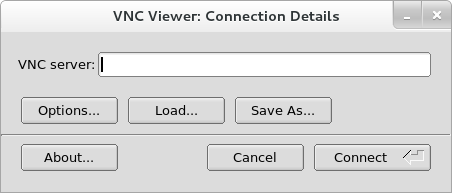
Open the VNC viewer (for example, TigerVNC) on the workstation you will be using to connect to the system being installed. A window similar to TigerVNC Connection Details will be displayed with an input field allowing you to specify an IP address.
 Figura 1. TigerVNC Connection Details
 -
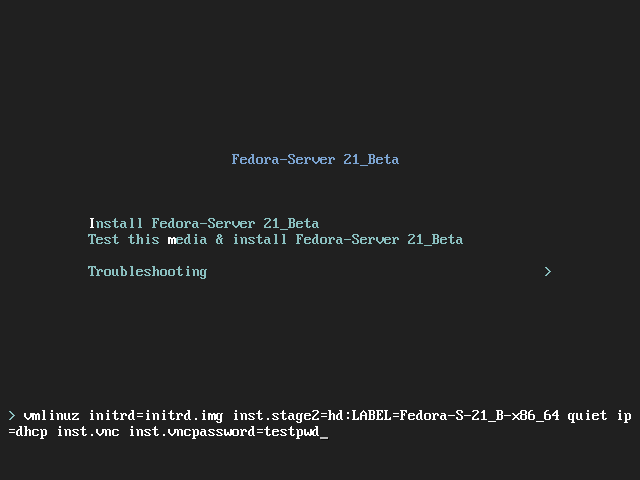
Boot the installation system and wait for the boot menu to appear. In the menu, edit boot options (see The Boot Menu) and append the inst.vnc option to the end of the command line.
Optionally, if you want to restrict VNC access to the installation system, add the inst.vncpassword=PASSWORD boot option as well. Replace PASSWORD with the password you want to use for the installation. The VNC password must be between 6 and 8 characters long.
Use a temporary password for the inst.vncpassword= option. It should not be a real or root password you use on any system.
 Figura 2. Adding VNC Boot Options
 -
Start the installation using the edited options. The system will initialize the installation program and start the necessary services. When the system is ready, you will see a message on the screen similar to the following:
13:14:47 Please manually connect your VNC viewer to 192.168.100.131:5901 to begin the install.Note the IP address and port number (in the above example,
192.168.100.131:5901). -
On the system running the VNC Viewer, enter the IP address and port number obtained in the previous step into the
Connection Detailsdialog in the same format as it was displayed on the screen by the installer. Then, clickConnect. The VNC viewer will now connect to the installation system. If you set up a VNC password, enter it when prompted and pressOK.
When the connection is successfully established, a new window will open on the system running the VNC viewer, displaying the installation menu. This window will provide full remote access to the installer until the installation finishes and the system reboots for the first time.
You can then proceed with Installing Using Anaconda.
Installing in VNC Connect Mode
VNC connect mode is when the system being installed initiates a connection to the VNC viewer running on a remote system. Before you start, make sure the remote system is configured to accept incoming connection on the port you want to use for VNC. The exact way to make sure the connection will not be blocked depends on your network and on your workstation’s configuration. Information about configuring the firewall in Fedora is available in the Fedora Security Guide, available at https://docs.fedoraproject.org/.
-
Start the VNC viewer on the client system in listening mode. For example, on Fedora using TigerVNC, execute the following command:
$ vncviewer -listen PORTReplace PORT with the port number you want to use for the connection.
The terminal will display a message similar to the following example:
Ejemplo 1. TigerVNC Viewer ListeningTigerVNC Viewer 64-bit v1.3.0 (20130924) Built on Sep 24 2013 at 16:32:56 Copyright (C) 1999-2011 TigerVNC Team and many others (see README.txt) See https://tigervnc.org/ for information on TigerVNC. Thu Feb 20 15:23:54 2014 main: Listening on port 5901
When this message is displayed, the VNC viewer is ready and waiting for an incoming connection from the installation system.
-
Boot the installation system and wait for the boot menu to appear. In the menu, edit boot options (see The Boot Menu) and append the following options to the end of the command line:
inst.vnc inst.vncconnect=HOST:PORTReplace HOST with the IP address of the system running the listening VNC viewer, and PORT with the port number that the VNC viewer is listening on.
-
Start the installation. The system will initialize the installation program and start the necessary services. Once the initialization is finished, Anaconda will attempt to connect to the IP address and port you provided in the previous step.
When the connection is successfully established, a new window will open on the system running the VNC viewer, displaying the installation menu. This window will provide full remote access to the installer until the installation finishes and the system reboots for the first time.
You can then proceed with Installing Using Anaconda.
Kickstart Considerations
Commands for using a VNC installation are also available in Kickstart installations. Using just the vnc command will set up an installation using Direct Mode. Options are available to set up an installation using Connect Mode. For more information about the vnc command and options used in Kickstart files, see Kickstart Syntax Reference.
Considerations for Headless Systems
When installing headless systems, the only choices are an automated Kickstart installation or an interactive VNC installation using connect mode. For more information about automated Kickstart installation, see Kickstart Syntax Reference. The general process for an interactive VNC installation is described below.
-
Set up a PXE server that will be used to start the installation. Information about installing and performing basic configurating of a PXE server can be found in Setting Up an Installation Server.
-
Configure the PXE server to use the boot options for a connect mode VNC installation. For information on these boot options, see Installing in VNC Connect Mode.
-
Follow the procedure for a VNC Installation using connect mode as described in the Starting VNC in Connect Mode. However, when directed to boot the system, boot it from the PXE server.
Want to help? Learn how to contribute to Fedora Docs ›