查看和管理日志文件
Log files 是包含系统信息的文件,包括内核、服务和运行在系统上的应用程序。 不同的信息有不同的日志文件。 例如,有一个默认的系统日志文件、一个专门用于安全消息的日志文件和一个用于cron任务的日志文件。
当试图排除系统问题时,如试图加载内核驱动程序或寻找未经授权的系统登录尝试,日志文件可能非常有用。 本章讨论到哪里查找日志文件,如何查看日志文件,以及在日志文件中查找什么。 某些日志文件由守护进程 rsyslogd 控制。rsyslogd 守护进程是对 sysklogd 的一个增强的替代,并提供了扩展的消息过滤、加密保护、各种配置选项、输入和输出模块,支持通过 TCP 或 UDP 协议传输。请注意, rsyslog 与 sysklogd 兼容。
日志文件也可以由 systemd 的组件 journald 守护进程管理 。 journald 守护进程捕获Syslog消息、内核日志消息、初始RAM磁盘和早期引导消息,以及所有服务写入标准输出和标准错误输出的消息,对它们进行索引,并让用户可以使用这些消息。本机日志文件格式是结构化和索引的二进制文件,它改进了搜索并提供了更快的操作,还存储了时间戳或用户id等元数据信息。由 journald 生成的日志文件默认情况下是不持久的,日志文件只存储在内存中或 /run/Log/journal/ 目录下的一个小的循环缓冲区中。日志数据的数量取决于可用内存,当您达到容量限制时,最老的条目将被删除。但是,这个设置可以被修改,参阅 Enabling Persistent Storage。有关日志的更多信息,请参阅 Using the Journal。
By default, these two logging tools coexist on your system. The journald daemon is the primary tool for troubleshooting. It also provides additional data necessary for creating structured log messages. Data acquired by journald is forwarded into the /run/systemd/journal/syslog socket that may be used by rsyslogd to process the data further. However, rsyslog does the actual integration by default via the imjournal input module, thus avoiding the aforementioned socket. You can also transfer data in the opposite direction, from rsyslogd to journald with use of omjournal module. See Interaction of Rsyslog and Journal for further information. The integration enables maintaining text-based logs in a consistent format to ensure compatibility with possible applications or configurations dependent on rsyslogd. Also, you can maintain rsyslog messages in a structured format (see Structured Logging with Rsyslog).
定位日志文件
在 /etc/rsyslog.conf 配置文件中可以找到由 rsyslogd 维护的日志文件列表。大多数日志文件位于 /var/log/ 目录下。一些应用程序,如 httpd 和 samba 在 /var/log/ 中有一个目录来存放它们的日志文件。 你可能会注意到 /var/log/ 目录下有多个文件后面都有数字(例如,cron-20100906)。这些数字表示已添加到轮换日志文件中的时间戳。日志文件被轮转,因此它们的文件大小不会变得太大。logrotate 包,包含一个cron任务,该任务根据 /etc/logrotate.conf 配置文件和 /etc/logrotate.d/ 目录中的配置文件自动轮换日志文件。
Rsyslog 的基本配置
rsyslog 的主要配置文件是 /etc/rsyslog.conf 。在这里,您可以指定由 filter 和 action 部分组成的 global directives、modules 和 rules。此外,您可以在井号 (#) 后以文本形式添加注释。
过滤器
规则由 filter 部分指定,它选择 syslog 消息的子集,以及用选定的消息做什么的 action 部分。要在 /etc/rsyslog.conf 配置文件中定义规则,请在一行上定义过滤器和操作,并用一个或多个空格或制表符分隔它们。
rsyslog 提供了多种方法来根据选定的属性过滤 syslog 消息。可用的过滤方法可分为 Facility/Priority-based、Property-based 和 Expression-based 过滤器。
- 基于设施/优先级的过滤器
-
过滤系统日志消息最常用和众所周知的方法是使用基于设施/优先级的过滤器,它根据两个条件过滤系统日志消息:facility 和 priority 用点分隔。要创建选择器,请使用以下语法:
FACILITY.PRIORITY
其中:
-
FACILITY 指定产生特定系统日志消息的子系统。例如,mail 子系统处理所有与邮件相关的系统日志消息。FACILITY 可以由以下关键字(或数字代码)之一表示:kern (0)、user (1)、mail (2)、daemon (3), auth (4), syslog (5), lpr (6), news (7), uucp (8), cron (9), authpriv (10), ftp (11), ntp (12), logaudit (13)、logalert (14)、clock (15) 和 local0 到 local7 (16 - 23)。
-
PRIORITY 指定系统日志消息的优先级。PRIORITY 可以由以下关键字(或数字)之一表示:debug (7)、info (6)、notice (5)、[command] warning (4)、err (3)、crit (2)、alert (1) 和 emerg (0)。
上述语法选择具有定义或 更高 优先级的系统日志消息。通过在任何优先级关键字前面加上等号 (=),您可以指定仅选择具有指定优先级的系统日志消息。所有其他优先级将被忽略。相反,在优先级关键字前面加上感叹号 (!) 会选择除具有已定义优先级的消息之外的所有 syslog 消息。
除了上面指定的关键字之外,您还可以使用星号 (*) 来定义所有设施或优先级(取决于您把星号放在逗号之前或之后)。指定优先级关键字“none”用于没有给定优先级的设施。设施条件和优先级条件都不区分大小写。
要定义多个设施和优先级,请用逗号 (,) 分隔它们。要在一行上定义多个选择器,请用分号 (;) 分隔它们。请注意,选择器字段中的每个选择器都能够覆盖前面的选择器,这可以从模式中排除一些优先级。
以下是一些简单的基于设施/优先级的过滤器示例,可以在 /etc/rsyslog.conf 中指定。要选择具有任何优先级的所有内核系统日志消息,请将以下文本添加到配置文件中:
kern.*
要选择具有优先级 crit 和更高优先级的所有邮件系统日志消息,请使用此表单:
mail.crit
要选择除具有 info 或 debug 优先级的消息之外的所有 cron syslog 消息,请设置如下配置:
cron.!info,!debug
- 基于优先级的过滤器
-
基于属性的过滤器允许您按任何属性过滤系统日志消息,例如
timegenerated或syslogtag。有关属性的详细信息,请参阅:Properties。您可以使用 Property-based compare-operations 中列出的比较操作之一将每个指定属性与特定值进行比较。属性名称和比较操作都区分大小写。
基于属性的过滤器必须以冒号 (:) 开头。要定义过滤器,请使用以下语法:
:PROPERTY, [!]COMPARE_OPERATION, "STRING"
其中:
-
PROPERTY 属性指定所需的属性。
-
可选的感叹号 (
!) 否定比较操作的输出。基于属性的过滤器目前不支持其他布尔运算符。 -
COMPARE_OPERATION 属性指定参照 Property-based compare-operations 中列出的比较操作之一。
-
STRING 属性指定与属性提供的文本进行比较的值。该值必须用引号引起来。要转义字符串中的某些字符(例如引号 (
")),请使用反斜杠字符 (\)。
| 比较操作 | 描述 |
|---|---|
|
检查提供的字符串是否与属性提供的文本的任何部分匹配。要执行不区分大小写的比较,请使用 |
|
将提供的字符串与属性提供的所有文本进行比较。这两个值必须完全相等才能匹配。 |
|
检查提供的字符串是否恰好位于属性提供的文本的开头。要执行不区分大小写的比较,请使用 |
|
将提供的 POSIX BRE(基本正则表达式)与属性提供的文本进行比较。 |
|
将提供的 POSIX ERE(扩展正则表达式)正则表达式与属性提供的文本进行比较。 |
|
检查属性是否为空。该值被丢弃。这在处理规范化数据时特别有用,其中某些字段可能会根据规范化结果填充。 |
下面是一些可以在 /etc/rsyslog.conf 中指定的基于属性的过滤器的例子。要选择消息文本中包含字符串 error 的 syslog 消息,请使用:
:msg, contains, "error"
以下过滤器选择从主机名为 host1 的主机接收的 syslog 消息:
:hostname, isequal, "host1"
要选择不包含任何提及 fatal 和 error 且它们之间有或没有任何文本的系统日志消息(例如,fatal lib error),请键入:
:msg, !regex, "fatal .* error"
- 基于表达式的过滤器
-
基于表达式的过滤器根据定义的算术、布尔或字符串操作选择系统日志消息。基于表达式的过滤器使用 rsyslog 自己的脚本语言 RainerScript 来构建复杂的过滤器。
基于表达式的过滤器的基本语法如下所示:
if EXPRESSION then ACTION else ACTION
其中:
-
EXPRESSION 属性表示要评估的表达式,例如:
$msg startswith 'DEVNAME'或$syslogfacility-text == 'local0'。您可以使用and和or运算符在单个过滤器中指定多个表达式。 -
ACTION 属性表示如果表达式返回值
true时要执行的操作。这可以是单个操作,也可以是用大括号括起来的任意复杂脚本。 -
新行开头的 if 关键字指示基于表达式的过滤器。then 关键字将 EXPRESSION 与 ACTION 分开。您可以选择使用 else 关键字来指定在不满足条件时要执行的操作。
使用基于表达式的过滤器,您可以使用用大括号括起来的脚本来嵌套条件,如 Expression-based Filters 中所示。该脚本允许您在表达式中使用 facility/priority-based 过滤器。另一方面,这里不推荐使用 property-based 过滤器。RainerScript 支持具有专用函数 re_match() 和 re_extract() 的正则表达式。
以下表达式包含两个嵌套条件。由名为 prog1 的程序创建的日志文件根据消息中“test”字符串的存在分为两个文件。
if $programname == 'prog1' then {
   action(type="omfile" file="/var/log/prog1.log")
   if $msg contains 'test' then
     action(type="omfile" file="/var/log/prog1test.log")
   else
     action(type="omfile" file="/var/log/prog1notest.log")
}
参考 Online Documentation 以获取更多基于表达式的过滤器的示例。RainerScript 是 rsyslog 的新配置格式的基础,参见 Using the New Configuration Format。
操作
操作指定要对已定义的选择器过滤掉的消息执行什么操作。以下是您可以在规则中定义的一些操作:
- 将 syslog 消息保存到日志文件
-
大多数操作指定将 syslog 消息保存到哪个日志文件。这是通过在已定义的选择器之后指定文件路径来完成的:
FILTER PATH
其中 FILTER 代表用户指定的选择器,PATH 是目标的路径文件。
例如,以下规则由选择所有 cron syslog 消息的选择器和将它们保存到 /var/log/cron.log 日志文件的操作组成:
cron.* /var/log/cron.log
默认情况下,每次生成 syslog 消息时都会同步日志文件。使用破折号 (-) 作为您指定省略同步的文件路径的前缀:
FILTER -PATH
请注意,如果系统在写入尝试后立即终止,可能会造成信息丢失。但是,此设置可以提高性能,尤其是在您运行产生非常冗长的日志消息的程序时。
您指定的文件路径可以是 static 或 dynamic 的。静态文件由固定文件路径表示,如上例所示。动态文件路径可以根据收到的消息而有所不同。动态文件路径由模板和问号 (?) 前缀表示:
FILTER ?DynamicFile
其中 DynamicFile 是修改输出路径的预定义模板的名称。您可以使用破折号前缀 (-) 禁用同步,也可以使用由冒号 (:) 分隔的多个模板。有关模板的详细信息,请参照 Generating Dynamic File Names。
如果您指定的文件是现有的 terminal 或 /dev/console 设备,在使用 X Window 系统时,系统日志消息将分别发送到标准输出(使用特殊的 terminal-handling)或您的控制台(使用特殊的 /dev/console-handling) 。
- 通过网络发送 syslog 消息
-
rsyslog 允许您通过网络发送和接收 syslog 消息。此功能允许您在一台机器上管理多个主机的系统日志消息。要将系统日志消息转发到远程计算机,请使用以下语法:
@(zNUMBER)HOST:PORT
其中:
-
at 符号 (
@) 表示系统日志消息使用UDP协议转发到主机。要使用TCP协议,请使用两个 at 符号,它们之间没有空格 (@@)。 -
可选的 zNUMBER 设置为 syslog 消息启用 zlib 压缩。NUMBER 属性指定压缩级别(从最低值1到最大值9)。压缩收益由
rsyslogd自动检查,仅当有任何压缩收益时才会压缩消息,并且永远不会压缩低于 60 字节的消息。 -
HOST 属性指定接收所选系统日志消息的主机。
-
PORT 属性指定主机的端口。
将“IPv6”地址指定为主机时,请将地址括在方括号中([, ])。
以下是通过网络转发 syslog 消息的一些操作示例(请注意,所有操作前面都有一个选择器,该选择器选择具有任何优先级的所有消息)。要通过 UDP 协议将消息转发到 192.168.0.1,请键入:
*.* @192.168.0.1
使用端口 18 和 TCP 协议将消息转发到“example.com”,使用:
*.* @@example.com:18
以下使用 zlib 压缩消息(9 级压缩)并使用 UDP 协议将它们转发到 2001:db8::1
*.* @(z9)[2001:db8::1]
- 输出通道
-
输出通道主要用于指定日志文件可以增长到的最大大小。这对于日志文件轮换非常有用(有关更多信息,请参阅 Log Rotation)。输出通道基本上是有关输出操作的信息的集合。输出通道由
$outchannel指令定义。要在/etc/rsyslog.conf中定义输出通道,请使用以下语法:
$outchannel NAME, FILE_NAME, MAX_SIZE, ACTION
其中:
-
NAME 属性指定输出通道的名称。
-
FILE_NAME 属性指定输出文件的名称。输出通道只能写入文件,不能写入管道、终端或其他类型的输出。
-
MAX_SIZE 属性表示指定文件(在 FILE_NAME 中)可以增长到的最大大小。该值在 bytes 中指定。
-
ACTION 属性指定在达到 MAX_SIZE 中定义的最大尺寸时采取的操作。
要将定义的输出通道用作规则内的操作,请键入:
FILTER :omfile:$NAME
以下输出显示了通过使用输出通道进行的简单日志轮换。首先,通过`$outchannel`指令定义输出通道:
$outchannel log_rotation, /var/log/test_log.log, 104857600, /home/joe/log_rotation_script
然后应用于选择任何优先级的 syslog 消息的规则,并在把获取的 syslog 消息输出到先前定义的输出通道:
*.* :omfile:$log_rotation
一旦达到限制(在示例中为 100{nbsp }MB) ,/home/joe/log_rotation_script 被执行。该脚本可以包含任何内容,包括将文件移动到不同的文件夹、编辑其中的特定内容或简单地删除它。
- 向特定用户发送 syslog 消息
-
rsyslog 可以通过指定用户名向特定用户发送 syslog 消息(如 Specifying Multiple Actions 所述)。要指定多个用户,请用逗号 (
,) 分隔每个用户名。要向当前登录的每个用户发送消息,请使用星号 (*)。 - 执行程序
-
rsyslog 允许您为选定的 syslog 消息执行程序,并使用
system()调用在 shell 中执行程序。要指定要执行的程序,请在其前面加上插入字符 (^)。随后,指定一个模板来格式化接收到的消息并将其作为单行参数传递给可执行文件(有关模板的更多信息,请参阅:Templates)。
FILTER ^EXECUTABLE; TEMPLATE
这里 FILTER 条件的输出由 EXECUTABLE 表示的程序处理。该程序可以是任何有效的可执行文件。将 TEMPLATE 替换为格式模板的名称。
在下面的例子中,任何具有任何优先级的系统日志消息都会被选中,使用 template 模板格式化并作为参数传递给 test-program 程序,然后使用提供的参数执行:
*.* ^test-program;template
|
使用 shell 执行操作时要小心
当接受来自任何主机的消息并使用 shell 执行操作时,您可能容易受到命令注入攻击。攻击者可能会尝试在您执行的程序中注入和执行命令。为避免任何可能的安全威胁,请仔细考虑此操作。 |
- 在数据库中存储 syslog 消息
-
可以使用 database writer 操作将选定的 syslog 消息直接写入数据库表中。数据库写入使用以下语法:
:PLUGIN:DB_HOST,DB_NAME,DB_USER,DB_PASSWORD;TEMPLATE
其中:
-
PLUGIN 调用指定的处理数据库写入的插件(例如,
ommysql插件)。 -
DB_HOST 属性指定数据库主机名。
-
DB_NAME 属性指定数据库的名称。
-
DB_USER 属性指定数据库用户。
-
DB_PASSWORD 属性指定用于上述数据库用户的密码。
-
TEMPLATE 可选属性指定修改系统日志消息的模板。有关模板的详细信息,请参阅:Templates。
|
使用 MySQL 和 PostgreSQL
目前,rsyslog 仅支持 $ModLoad ommysql # Output module for MySQL support $ModLoad ompgsql # Output module for PostgreSQL support 更多有关 rsyslog 模块的信息,请参阅外部参考:使用 Rsyslog 模块。 或者,您可以使用“omlibdb”模块提供的通用数据库接口(支持:Firebird/Interbase、MS SQL、Sybase、SQLLite、Ingres、Oracle、mSQL)。 |
- 丢弃系统日志消息
-
要丢弃您选择的消息,请使用波浪号 (
~)。
FILTER ~
丢弃动作主要用于在进行任何进一步处理之前过滤掉消息。如果您想省略一些会填满日志文件的重复消息,它可能会很有效。丢弃操作的结果取决于在配置文件中指定的位置,为了获得最佳结果,请将这些操作放在操作列表的顶部。请注意,一旦消息被丢弃,就无法在以后的配置文件行中检索它。
例如,以下规则丢弃任何 cron 系统日志消息:
cron.* ~
对于每个选择器,您可以指定多个操作。要为一个选择器指定多个操作,请将每个操作写在单独的行上,并在其前面加上一个 & 字符:
FILTER ACTION
& ACTION
& ACTION
多个操作提高了预期结果的整体性能,因为指定的选择器只需评估一次。
在以下示例中,所有具有关键优先级 (crit) 的内核 syslog 消息都发送给用户 user1,由模板 temp 处理并传递给 test-program 可执行文件,然后通过 UDP 协议转发到 192.168 .0.1 。
kern.=crit user1
& ^test-program;temp
& @192.168.0.1
任何操作都可以跟随一个模板来格式化消息。要指定模板,请使用分号 (;) 为操作添加后缀并指定模板的名称。有关模板的详细信息,请参阅:Templates 。
|
使用模板
模板必须在用于操作之前定义,否则将被忽略。换句话说,模板定义应该总是在 |
模板
rsyslog 生成的任何输出都可以使用 templates 根据您的需要进行修改和格式化。要创建模板,请在 /etc/rsyslog.conf 中使用以下语法:
$template TEMPLATE_NAME,"text %PROPERTY% more text", OPTION
其中:
-
$template是模板指令,指示它后面的文本定义了一个模板。 -
TEMPLATE_NAME是模板的名称。使用此名称来引用模板。 -
两个引号 (
“…”) 之间的任何内容都是实际的模板文本。在此文本中,可以使用特殊字符,例如用于换行的“\n”或用于回车的“\r”。其他字符,例如%或",如果您想按字面意思使用这些字符,则必须转义。 -
在两个百分号 (
%) 之间指定的文本指定了一个允许您访问特定内容的 property 系统日志消息。有关属性的更多信息,请参阅:Properties。 -
OPTION属性指定修改模板功能的任何选项。当前支持的模板选项是sql和stdsql,它们用于将文本格式化为 SQL 查询。
|
sql 和 stdsql 选项
请注意,数据库写入器检查是否在模板中指定了 有关详细信息,请参阅:Actions 中的 Storing syslog messages in a database 部分。 |
模板可用于生成动态文件名。通过将属性指定为文件路径的一部分,将为每个唯一属性创建一个新文件,这是对 syslog 消息进行分类的便捷方式。
例如,使用从消息中提取时间戳的 timegenerated 属性为每个 syslog 消息生成唯一的文件名:
$template DynamicFile,"/var/log/test_logs/%timegenerated%-test.log"
请记住,$template 指令仅指定模板。您必须在规则中使用它才能生效。在 /etc/rsyslog.conf 中,在操作定义中使用问号 (?) 来标记动态文件名模板:
*.* ?DynamicFile
Properties 在模板内定义的属性(在两个百分号 (%) 之间)允许通过使用 property replacer 访问系统日志消息的各种内容。要在模板内定义属性(在两个引号之间 (“…”)),请使用以下语法:
%PROPERTY_NAME:FROM_CHAR:TO_CHAR:OPTION%
其中:
-
PROPERTY_NAME 属性指定一个财产。所有可用属性的列表及其详细描述可以在
rsyslog.conf(5)手册页的 Available Properties 部分下找到。 -
FROM_CHAR_ 和 TO_CHAR 属性表示指定属性起作用的字符范围。或者,可以使用正则表达式来指定字符范围。为此,请将字母“R”设置为 FROM_CHAR 属性,并将所需的正则表达式指定为 TO_CHAR 属性。
-
OPTION 属性指定任何属性选项,例如将输入转换为小写的
lowercase选项。所有可用属性选项的列表及其详细说明可以在rsyslog.conf(5)手册页的 Property Options 部分找到。
以下是一些简单属性的示例:
-
以下属性获取系统日志消息的整个消息文本:
%msg%
-
以下属性获取系统日志消息的消息文本的前两个字符:
%msg:1:2%
-
以下属性获取系统日志消息的整个消息文本并删除其最后一个换行符:
%msg:::drop-last-lf%
-
The following property obtains the first 10 characters of the time stamp that is generated when the syslog message is received and formats it according to the RFC 3339 date standard.
%timegenerated:1:10:date-rfc3339%
本节介绍 rsyslog 模板的几个示例。
A verbose syslog message template 显示了一个格式化 syslog 消息的模板,以便输出消息的严重性、设施、收到消息时的时间戳、主机名、消息标签、消息文本,并以新行结束。
$template verbose, "%syslogseverity%, %syslogfacility%, %timegenerated%, %HOSTNAME%, %syslogtag%, %msg%\n"
A wall message template 显示了一个类似于传统墙上消息的模板(该消息发送给每个登录的用户,并且他们的 mesg(1) 权限设置为 yes)。此模板在新行上输出消息文本以及主机名、消息标记和时间戳(使用 \r 和 \n)并响铃(使用 \7)。
$template wallmsg,"\r\n\7Message from syslogd@%HOSTNAME% at %timegenerated% ...\r\n %syslogtag% %msg%\n\r"
A database formatted message template 显示了一个格式化系统日志消息的模板,以便它可以用作数据库查询。请注意模板末尾指定了 sql 选项。它告诉数据库写入器将消息格式化为 MySQL SQL 查询。
$template dbFormat,"insert into SystemEvents (Message, Facility, FromHost, Priority, DeviceReportedTime, ReceivedAt, InfoUnitID, SysLogTag) values ('%msg%', %syslogfacility%, '%HOSTNAME%', %syslogpriority%, '%timereported:::date-mysql%', '%timegenerated:::date-mysql%', %iut%, '%syslogtag%')", sql
rsyslog 还包含一组由 RSYSLOG_ 前缀标识的预定义模板。这些是为 syslog 保留的,建议不要使用此前缀创建模板以避免冲突。以下列表显示了这些预定义模板及其定义。
RSYSLOG_DebugFormat-
用于解决属性问题的特殊格式。
"Debug line with all properties:\nFROMHOST: '%FROMHOST%', fromhost-ip: '%fromhost-ip%', HOSTNAME: '%HOSTNAME%', PRI: %PRI%,\nsyslogtag '%syslogtag%', programname: '%programname%', APP-NAME: '%APP-NAME%', PROCID: '%PROCID%', MSGID: '%MSGID%',\nTIMESTAMP: '%TIMESTAMP%', STRUCTURED-DATA: '%STRUCTURED-DATA%',\nmsg: '%msg%'\nescaped msg: '%msg:::drop-cc%'\nrawmsg: '%rawmsg%'\n\n\"
RSYSLOG_SyslogProtocol23Format-
IETF 的互联网草案 ietf-syslog-protocol-23 中指定的格式,假定成为新的 syslog 标准 RFC。
"%PRI%1 %TIMESTAMP:::date-rfc3339% %HOSTNAME% %APP-NAME% %PROCID% %MSGID% %STRUCTURED-DATA% %msg%\n\"
RSYSLOG_FileFormat-
现代风格的日志文件格式,类似于传统文件格式,但具有高精度的时间戳和时区信息。
"%TIMESTAMP:::date-rfc3339% %HOSTNAME% %syslogtag%%msg:::sp-if-no-1st-sp%%msg:::drop-last-lf%\n\"
RSYSLOG_TraditionalFileFormat-
具有低精度时间戳的较旧的默认日志文件格式。
"%TIMESTAMP% %HOSTNAME% %syslogtag%%msg:::sp-if-no-1st-sp%%msg:::drop-last-lf%\n\"
RSYSLOG_ForwardFormat-
具有高精度时间戳和时区信息的转发格式。
"%PRI%%TIMESTAMP:::date-rfc3339% %HOSTNAME% %syslogtag:1:32%%msg:::sp-if-no-1st-sp%%msg%\"
RSYSLOG_TraditionalForwardFormat-
低精度时间戳的传统转发格式。
"%PRI%%TIMESTAMP% %HOSTNAME% %syslogtag:1:32%%msg:::sp-if-no-1st-sp%%msg%\"
全局指令
全局指令是适用于 rsyslogd 守护进程的配置选项。他们通常为特定的预定义变量指定一个值,该变量会影响 rsyslogd 守护进程的行为或遵循的规则。所有全局指令都必须以美元符号 ($) 开头。每行只能指定一个指令。以下是指定 syslog 消息队列最大大小的全局指令示例:
$MainMsgQueueSize 50000
该指令的默认大小为 10,000 条消息,可以通过指定不同的值来覆盖它(如上例所示)。
您可以在 /etc/rsyslog.conf 配置文件中定义多个指令。指令会影响所有配置选项的行为,直到检测到同一指令再次出现。全局指令可用于配置操作、队列和调试。可以在参考 在线文档中找到所有可用配置指令的完整列表。目前,已开发出一种新的配置格式来替代基于 $ 的语法(请参阅:Using the New Configuration Format)。但是,经典的全局指令仍然作为传统格式得到支持。
日志轮换
以下是一个示例 /etc/logrotate.conf 配置文件:
# rotate log files weekly
weekly
# keep 4 weeks worth of backlogs
rotate 4
# uncomment this if you want your log files compressed
compress
示例配置文件中的所有行都定义了适用于每个日志文件的全局选项。在我们的示例中,日志文件每周轮换一次,轮换的日志文件保存 4 周,所有轮换的日志文件都通过 gzip 压缩为 .gz 格式。任何以井号 (#) 开头的行都是注释,不会被处理。
您可以为特定日志文件定义配置选项并将其放在全局选项下。但是,建议在 /etc/logrotate.d/ 目录中为任何特定日志文件创建一个单独的配置文件,并在那里定义任何配置选项。
以下是放置在 /etc/logrotate.d/ 目录中的配置文件示例:
/var/log/messages {
    rotate 5
    weekly
    postrotate
    /usr/bin/killall -HUP syslogd
    endscript
}
此文件中的配置选项仅适用于 /var/log/messages 日志文件。此处指定的设置会尽可能覆盖全局设置。因此,轮换的“/var/log/messages”日志文件将保存五周,而不是全局选项中定义的四周。
以下是您可以在 logrotate 配置文件中指定的一些指令列表:
-
weekly— 指定按周轮换。类似的指令包括:-
daily -
monthly -
yearly
-
-
compress— 启用循环日志文件的压缩。类似的指令包括:-
nocompress -
compresscmd— 指定用于压缩的命令。 -
uncompresscmd -
compressext— 指定用于压缩的扩展名。 -
compressoptions— 指定要传递给使用的压缩程序的任何选项。 -
delaycompress— 将日志文件的压缩推迟到日志文件的下一个轮换。
-
-
rotate INTEGER- 指定日志文件在被删除或邮寄到特定地址之前所经历的轮换次数。如果指定了值 0,旧的日志文件将被删除而不是轮换。 -
mail ADDRESS- 此选项允许将已轮换多次的日志文件邮寄到指定地址。类似的指令包括:-
nomail -
mailfirst— 指定要邮寄刚刚轮换的日志文件,而不是即将过期的日志文件。 -
maillast— 指定要邮寄即将到期的日志文件,而不是刚刚轮换的日志文件。这是启用“邮件”时的默认选项。
-
For the full list of directives and various configuration options, see the logrotate(5) manual page.
使用新配置格式
在 rsyslog 版本 6 中,引入了新的配置语法。这种新的配置格式旨在更强大、更直观,并通过不允许某些无效构造来防止常见错误。语法增强由依赖 RainerScript 的新配置处理器启用。仍然完全支持旧格式,默认情况下在 /etc/rsyslog.conf 配置文件中使用它。
RainerScript 是一种脚本语言,设计用于处理网络事件和配置事件处理器,例如 rsyslog。RainerScript 最初用于定义基于表达式的过滤器,请参阅:请参阅:Expression-based Filters。rsyslog 版本 7 中的 RainerScript 版本实现了 input() 和 ruleset() 语句,允许以新语法编写 /etc/rsyslog.conf 配置文件。新语法的不同之处主要在于它更加结构化。参数作为参数传递给语句,例如输入、操作、模板和模块加载。选项的范围受块的限制。这增强了可读性并减少了由错误配置引起的错误。还显著提高了性能。
比较使用 legacy-style 参数编写的配置:
$InputFileName /tmp/inputfile
$InputFileTag tag1:
$InputFileStateFile inputfile-state
$InputRunFileMonitor
和使用新格式声明的相同配置:
input(type="imfile" file="/tmp/inputfile" tag="tag1:" statefile="inputfile-state")
这显着减少了配置中使用的参数数量,提高了可读性,还提供了更高的执行速度。有关 RainerScript 语句和参数的更多信息,请参阅: Online Documentation。
规则集
撇开特殊指令不谈,rsyslog 按照 rules 处理消息,rules 由过滤条件和条件为真时要执行的操作组成。使用传统的 /etc/rsyslog.conf 文件,所有规则都按照每个输入消息的出现顺序进行评估。此过程从第一条规则开始,一直持续到所有规则都已处理完毕或消息被其中一条规则丢弃为止。
但是,可以将规则分组为称为 rulesets 的序列。使用规则集,您可以将某些规则的影响仅限于选定的输入,或通过定义绑定到特定输入的一组不同的操作来提高 rsyslog 的性能。换句话说,对于某些类型的消息,不可避免地会被评估为假的过滤条件可以被跳过。/etc/rsyslog.conf 中的旧规则集定义如下所示:
$RuleSet rulesetname
rule
rule2
规则在定义另一个规则时结束,或者默认规则集被如下调用:
$RuleSet RSYSLOG_DefaultRuleset
在 rsyslog 7 的新配置格式中,input() 和 ruleset() 语句被保留用于此操作。/etc/rsyslog.conf 中的新格式规则集定义如下所示:
ruleset(name="rulesetname") {
      rule
      rule2
      call rulesetname2
      …
}
将 rulesetname 替换为您的规则集的标识符。规则集名称不能以 RSYSLOG_ 开头,因为此命名空间保留给 rsyslog 使用。如果消息没有分配其他规则集,则 RSYSLOG_DefaultRuleset 定义默认规则集。rule 和 rule2 定义上述过滤操作格式的规则。使用 call 参数,您可以通过从其他规则集块中调用它们来嵌套规则集。
创建规则集后,您需要指定它应用于哪些输入:
input(type="input_type" port="port_num" ruleset="rulesetname");
在这里,您可以通过 input_type(收集消息的输入模块)或 port_num ( 端口号)来识别输入消息。可以为 input() 指定其他参数,例如 file 或 tag。将 rulesetname 替换为要根据消息评估的规则集的名称。如果输入消息未明确绑定到规则集,则会触发默认规则集。
您还可以使用旧格式来定义规则集,有关详细信息,请参阅:在线文档。
以下规则集确保对来自不同端口的远程消息进行不同的处理。添加以下内容到 /etc/rsyslog.conf:
ruleset(name="remote-10514") {
    action(type="omfile" file="/var/log/remote-10514")
}

ruleset(name="remote-10515") {
    cron.* action(type="omfile" file="/var/log/remote-10515-cron")
    mail.* action(type="omfile" file="/var/log/remote-10515-mail")
}

input(type="imtcp" port="10514" ruleset="remote-10514");
input(type="imtcp" port="10515" ruleset="remote-10515");
上例中显示的规则集定义了来自两个端口的远程输入的日志目的地,如果是 10515,则根据设施对消息进行排序。然后,TCP 输入被启用并绑定到规则集。请注意,您必须加载所需的模块 (imtcp) 才能使此配置正常工作。
在 Rsyslog 中使用队列
队列用于在 rsyslog 的组件之间传递内容,主要是 syslog 消息。使用队列,rsyslog 能够同时处理多条消息,并一次将多个操作应用于单个消息。rsyslog 内部的数据流可以表示如下:
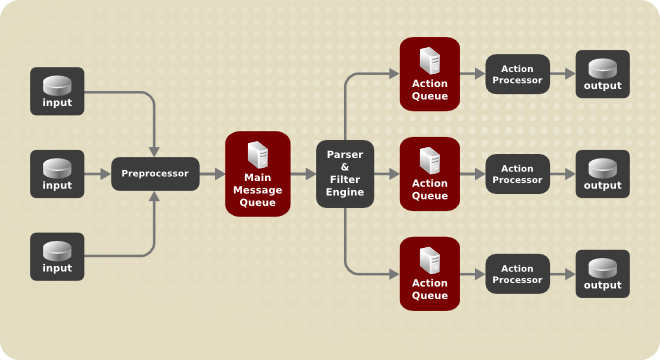
每当 rsyslog 收到消息时,它将这条消息传递给预处理器,然后将其放入主消息队列 。消息在那里等待出列并传递给规则处理器。
规则处理器 是一个解析和过滤引擎。在这里,应用了`/etc/rsyslog.conf` 中定义的规则。基于这些规则,规则处理器评估要执行哪些操作。每个动作都有自己的动作队列。消息通过此队列传递到创建最终输出的相应操作处理器。请注意,此时,可以在一条消息上同时运行多个操作。为此,一条消息被复制并传递给多个动作处理器。
每个动作只能有一个队列。根据配置,消息可以直接发送到动作处理器,而无需动作队列。这是 直接队列 的行为(见下文)。如果输出动作失败,动作处理器会通知动作队列,然后队列会取回一个未处理的元素,并在一段时间间隔后再次尝试该动作。
综上所述,队列在 rsyslog 中有两个位置:要么作为单个 主消息队列 在规则处理器之前,要么作为 action queues 在各种类型的输出操作之前。队列提供了两个主要优势,这两个优势都可以提高消息处理的性能:
-
它们充当缓冲区,在 rsyslog 的结构中 解耦 生产者和消费者
-
它们允许对消息执行的操作 并行化
除此之外,可以使用多个指令配置队列,以为您的系统提供最佳性能。以下部分介绍了这些配置选项。
|
如果输出插件无法传递消息,则将其存储在前面的消息队列中。如果队列已满,则输入会阻塞,直到不再满为止。这将防止通过阻塞队列记录新消息。在没有单独的操作队列的情况下,这可能会产生严重的后果,例如阻止“SSH”日志记录,这反过来又会阻止“SSH”访问。因此,建议对通过网络或数据库转发的输出使用专用的操作队列。 |
定义队列
根据消息的存储位置,有几种类型的队列:direct、in-memory、disk 和 disk-assisted in-memory 使用最广泛的队列。您可以为主消息队列和操作队列选择其中一种类型。将以下内容添加到`/etc/rsyslog.conf`中:
$objectQueueType queue_type
在这里,您可以把设置应用于主消息队列(将 object 替换为 MainMsg)或应用于操作队列(将 object 替换为 Action)。将 queue_type 替换为 direct、linkedlist 、fixedarray(内存队列)或 disk 之一。
主消息队列的默认设置是 FixedArray 队列,限制为 10,000 条消息。动作队列默认设置为直接队列。
对于许多简单的操作,例如将输出写入本地文件时,不需要在操作之前构建队列。为避免排队,请使用:
$objectQueueType Direct
将 object 替换为 MainMsg 或 Action 分别将此选项用于主消息队列或操作队列。使用直接队列,消息直接并立即从生产者传递到消费者。
磁盘队列将消息严格存储在硬盘驱动器上,这使得它们非常可靠,但也是所有可能的队列模式中最慢的。此模式可用于防止丢失非常重要的日志数据。但是,在大多数用例中不建议使用磁盘队列。要设置磁盘队列,请在 /etc/rsyslog.conf 中键入以下内容:
$objectQueueType Disk
将 object 替换为 MainMsg 或 Action 以分别将此选项应用于主消息队列或操作队列。磁盘队列按部分写入,默认大小为 10 Mb。可以使用以下配置指令修改此默认大小:
$objectQueueMaxFileSize size
其中 size 表示磁盘队列部分的大小。定义的大小限制不是限制性的,rsyslog 总是写入一个完整的队列条目,即使它违反了大小限制。磁盘队列的每个部分都与单个文件匹配。这些文件的命名指令如下所示:
$objectQueueFilename name
这设置了一个 name 文件前缀后跟一个 7 位数字,从 1 开始,每个文件递增。
使用内存队列,排队的消息被保存在内存中,这使得进程非常快。如果计算机重启或关闭,排队的数据会丢失。但是,您可以使用 $ActionQueueSaveOnShutdown 设置在关机前保存数据。内存中的队列有两种类型:
-
FixedArray 队列 — 主消息队列的默认模式,限制为 10,000 个元素。这种类型的队列使用一个固定的、预先分配的数组来保存指向队列元素的指针。由于这些指针,即使队列为空,也会消耗一定量的内存。但是,FixedArray 提供了最佳的运行时性能,并且当您期望相对较少的排队消息和高性能时,它是最佳选择。
-
LinkedList 队列 — 在这里,所有结构都在链表中动态分配,因此仅在需要时分配内存。LinkedList 队列可以很好地处理偶尔的突发消息。
一般来说,如有疑问,请使用 LinkedList 队列。与 FixedArray 相比,它消耗更少的内存并降低了处理开销。
使用以下语法配置内存队列:
$objectQueueType LinkedList
$objectQueueType FixedArray
将 object 替换为 MainMsg 或 Action 以分别将此选项用于主消息队列或操作队列。
磁盘和内存队列各有它们的优势,rsyslog 让您可以将它们组合成 磁盘辅助的内存队列。为此,请配置一个普通的内存队列,然后添加 $objectQueueFileName 指令来定义磁盘辅助的文件名。然后,此队列变为 磁盘辅助,这意味着它将内存队列与磁盘队列耦合以协同工作。
如果内存队列已满或需要在关机后保留,则磁盘队列被激活。使用磁盘辅助队列,您可以设置特定于磁盘的配置参数和特定于内存的配置参数。这种类型的队列可能是最常用的,它对于可能长时间运行且不可靠的操作特别有用。
要指定磁盘辅助内存队列的功能,请使用所谓的 watermarks:
$objectQueueHighWatermark number
$objectQueueLowWatermark number
将 object 替换为 MainMsg 或 Action 以分别将此选项用于主消息队列或操作队列。将 number 替换为排队的消息。当内存中的队列达到高水位线定义的数量时,它开始将消息写入磁盘并继续,直到内存中的队列大小下降到低水位线定义的数量。正确设置水位线可以最大程度地减少不必要的磁盘写入,也会为消息突发留出内存空间,因为写入磁盘文件的时间相当长。因此,高水位线必须低于使用 $objectQueueSize 设置的整个队列容量。高水位线和总队列大小之间的差异是为消息突发保留的备用内存缓冲区。另一方面,高水位线设置得太低会不必要地经常打开磁盘辅助。
Rsyslog 通常用于维护集中式日志系统,其中日志消息通过网络转发到服务器。为避免服务器不可用时消息丢失,建议为转发操作配置一个操作队列。这样,发送失败的消息将被存储在本地,直到再次可以访问服务器。请注意,此类队列不可配置为使用“UDP”协议的连接。要建立完全可靠的连接,例如当您的日志服务器位于您的专用网络之外时,请考虑使用:使用 RELP 中描述的 RELP 协议。
假设任务是将日志消息从系统转发到主机名为 example.com 的服务器,并配置一个操作队列以在服务器中断时缓冲消息。为此,请执行以下步骤:
-
创建一个工作目录来存储队列文件。例如:
~]# mkdir /rsyslog/work/
-
在
/etc/rsyslog.conf中如下配置或在/etc/rsyslog.d/目录中创建具有以下内容的文件:
$WorkDirectory /rsyslog/work

$ActionQueueType LinkedList
$ActionQueueFileName example_fwd
$ActionResumeRetryCount -1
$ActionQueueSaveOnShutdown on
*.*       @@example.com:18
其中:
-
上一步创建的`/rsyslog/work/`目录被标记为工作目录,
-
$ActionQueueType启用内存中的 LinkedList 队列, -
$ActionFileName定义磁盘存储,在这种情况下,备份文件在/rsyslog/work/目录中创建,带有 example_fwd 前缀, -
$ActionResumeRetryCount -1设置防止 rsyslog 表单在服务器未响应并重试连接时丢弃消息, -
启用
$ActionQueueSaveOnShutdown则当 rsyslog 关闭时保存内存中的数据, -
最后一行将所有收到的消息转发到日志服务器,端口是可选的。
通过上述配置,如果远程服务器无法访问,rsyslog 会将消息保存在内存中。只有当 rsyslog 用完配置的内存队列空间或需要关闭时,才会在磁盘上创建文件,这有利于系统性能。
将日志消息转发到多个服务器的过程与前面的过程类似:
-
为 rsyslog 创建一个工作目录来存储队列文件。例如:
~]# mkdir /rsyslog/work/
-
每个目标服务器都需要单独的转发规则、操作队列规范和磁盘上的备份文件。例如,在`/etc/rsyslog.conf`中使用如下配置或者在`/etc/rsyslog.d/`目录下创建一个内容如下的文件:
$WorkDirectory /rsyslog/work

$ActionQueueType LinkedList
$ActionQueueFileName example_fwd1
$ActionResumeRetryCount -1
$ActionQueueSaveOnShutdown on
*.*       @@example1.com

$ActionQueueType LinkedList
$ActionQueueFileName example_fwd2
$ActionResumeRetryCount -1
$ActionQueueSaveOnShutdown on
*.*       @@example2.com
管理队列
所有类型的队列都可以进一步配置以满足您的要求。您可以使用多个指令来修改操作队列和主消息队列。目前,有 20 多个队列参数可用,请参阅:在线文档。其中一些设置是常用的,其他设置(例如工作线程管理)提供对队列行为的更密切控制,并为高级用户保留。通过高级设置,您可以优化 rsyslog 的性能、调度队列或修改系统关闭时队列的行为。
您可以使用以下设置限制队列可以包含的消息数量:
$objectQueueHighWatermark number
将 object 替换为 MainMsg 或 Action 以使用此选项分别用于主消息队列或动作队列。将 number 替换为排队的消息。您只能将队列大小设置为消息数,而不是它们的实际内存大小。主消息队列和规则集队列的默认队列大小为 10,000 条消息,操作队列为 1000 条。
磁盘辅助队列默认是无限的,不能用这个指令限制,但是你可以通过以下设置为它们保留物理磁盘空间:
$objectQueueMaxDiscSpace number
将 object 替换为 MainMsg 或 Action。当达到 number 指定的大小限制时,消息将被丢弃,直到出队的消息释放出足够的空间。
当队列达到一定数量的消息时,您可以丢弃不太重要的消息,以便为更高优先级的条目节省队列空间。启动丢弃过程的阈值可以用所谓的 丢弃标记 设置:
$objectQueueDiscardMark number
将 object 替换为 MainMsg 或 Action 以分别将此选项用于主消息队列或操作队列。在这里,number 代表消息队列中的消息达到此数量才开始丢弃。要定义要丢弃的消息,请使用:
$objectQueueDiscardSeverity priority
将 priority 替换为以下关键字之一(或数字):debug (7)、info (6)、notice (5)、warning (4)、err (3)、crit (2)、alert (1) 和 emerg (0)。使用此设置,在达到丢弃标记后,将立即从队列中删除具有低于定义优先级的新传入和已排队消息。
您可以配置 rsyslog 以在特定时间段内处理队列。例如,使用此选项,您可以将一些处理转移到非高峰时间。要定义时间范围,请使用以下语法:
$objectQueueDequeueTimeBegin hour
$objectQueueDequeueTimeEnd hour
使用 hour 您可以指定限制时间的小时数框架。使用没有分钟的 24 小时格式。
一个 worker thread 对排队的消息执行指定的操作。例如,在主消息队列中,一个工作任务是将过滤逻辑应用于每个传入的消息,并将它们排入相关的操作队列。当消息到达时,会自动启动一个工作线程。当消息数量达到一定数量时,会开启另一个工作线程。要指定此数字,请使用:
$objectQueueWorkerThreadMinimumMessages number
将 number 替换为将触发补充工作线程的消息数。例如,将 number 设置为 100,当超过 100 条消息到达时启动一个新的工作线程。当超过 200 条消息到达时,第三个工作线程启动,依此类推。但是,并行运行的工作线程过多会变得低效,因此您可以使用以下方法限制它们的最大数量:
$objectQueueWorkerThreads number
其中 number 代表可以并行运行的最大工作线程数。对于主消息队列,默认限制为 1 个线程。一旦启动了工作线程,它就会一直运行,直到出现不活动超时。要设置超时长度,请键入:
$objectQueueWorkerTimeoutThreadShutdown time
将 time 替换为以毫秒为单位的持续时间。如果没有此设置,则会应用零超时,并且工作线程在消息用完时会立即终止。如果您将 time 指定为 -1,则不会关闭任何线程。
为了提高性能,您可以配置 rsyslog 以一次将多条消息出列。要设置此类出队的上限,请使用:
$objectQueueDequeueBatchSize number
将 number 替换为一次可以出队的最大消息数。请注意,更高的设置与更多的允许工作线程相结合会导致更大的内存消耗。
当终止仍然包含消息的队列时,可以尝试通过指定工作线程完成队列处理的时间间隔来尽量减少数据丢失:
$objectQueueTimeoutShutdown time
以毫秒为单位指定 time。如果在那段时间之后仍有一些排队的消息,工作线程完成当前数据元素然后终止。因此,未处理的消息会丢失。可以为工作线程设置另一个时间间隔来完成最后一个元素:
$objectQueueTimeoutActionCompletion time
如果此超时到期,任何剩余的工作线程都将关闭。要在关机时保存数据,请使用:
$objectQueueTimeoutSaveOnShutdown time
如果设置,所有队列元素都会在 rsyslog 终止之前保存到磁盘。
在日志服务器上配置 rsyslog
rsyslog 服务为运行日志服务器,配置单个系统以将其日志文件发送到日志服务器提供了便利。有关客户端 rsyslog 配置的信息,请参阅:可靠地将日志消息转发到服务器。
rsyslog 服务必须安装在您打算用作日志服务器的系统上,以及所有将配置为向其发送日志的系统上。Rsyslog 默认安装在 Fedora 26 中。如果需要,请以 root 执行以下命令确保安装:
~]# dnf install rsyslog
必须在您打算用作日志服务器的系统上执行此过程中的步骤。此过程中的所有步骤都必须以“root”用户身份进行:
-
配置防火墙以允许
rsyslogTCP流量。-
rsyslogTCP流量的默认端口是514。要允许此端口上的TCP流量,请输入如下命令:
-
~]# firewall-cmd --zone=zone --add-port=514/tcp
success
其中 zone 是要使用的接口的区域。
-
在文本编辑器中打开
/etc/rsyslog.conf文件并执行以下操作:-
在 modules 部分下方,
Provides UDP syslog reception部分上方添加这些行:
-
# 在使用它们的规则之前定义模板

### Per-Host Templates for Remote Systems ###
$template TmplAuthpriv, "/var/log/remote/auth/%HOSTNAME%/%PROGRAMNAME:::secpath-replace%.log"
$template TmplMsg, "/var/log/remote/msg/%HOSTNAME%/%PROGRAMNAME:::secpath-replace%.log"
-
将默认的
Provides TCP syslog reception部分替换为以下内容:
# Provides TCP syslog reception
$ModLoad imtcp
# Adding this ruleset to process remote messages
$RuleSet remote1
authpriv.*   ?TmplAuthpriv
*.info;mail.none;authpriv.none;cron.none   ?TmplMsg
$RuleSet RSYSLOG_DefaultRuleset   #End the rule set by switching back to the default rule set
$InputTCPServerBindRuleset remote1  #Define a new input and bind it to the "remote1" rule set
$InputTCPServerRun 514
将更改保存到 /etc/ rsyslog.conf 文件。
-
rsyslog` 服务必须在日志服务器和试图登录它的系统上运行。
-
使用 systemctl 命令启动
rsyslog服务。
-
~]# systemctl start rsyslog
-
为确保
rsyslog服务以后自动启动,请以 root 身份执行命令:
~]# systemctl enable rsyslog
您的日志服务器现在已配置为接收和存储来自您环境中其他系统的日志文件。
在日志服务器上使用新模板语法
Rsyslog 7 有许多不同的模板样式。字符串模板最接近旧格式。使用字符串格式从上面的示例中复制模板如下所示:
template(name="TmplAuthpriv" type="string"
         string="/var/log/remote/auth/%HOSTNAME%/%PROGRAMNAME:::secpath-replace%.log"
        )

template(name="TmplMsg" type="string"
         string="/var/log/remote/msg/%HOSTNAME%/%PROGRAMNAME:::secpath-replace%.log"
        )
这些模板也可以写成列表格式如下:
template(name="TmplAuthpriv" type="list") {
    constant(value="/var/log/remote/auth/")
    property(name="hostname")
    constant(value="/")
    property(name="programname" SecurePath="replace")
    constant(value=".log")
    }
template(name="TmplMsg" type="list") {
    constant(value="/var/log/remote/msg/")
    property(name="hostname")
    constant(value="/")
    property(name="programname" SecurePath="replace")
    constant(value=".log")
    }
这种模板文本格式对于那些刚接触 rsyslog 的人来说可能更容易阅读,因此更容易适应需求改变。
完成对新语法的更改,我们需要重现模块加载命令,添加规则集,然后将规则集绑定到协议、端口和规则集:
module(load="imtcp")

ruleset(name="remote1"){
     authpriv.*   action(type="omfile" DynaFile="TmplAuthpriv")
      *.info;mail.none;authpriv.none;cron.none action(type="omfile" DynaFile="TmplMsg")
}

input(type="imtcp" port="514" ruleset="remote1")
Using Rsyslog Modules
Due to its modular design, rsyslog offers a variety of modules which provide additional functionality. Note that modules can be written by third parties. Most modules provide additional inputs (see Input Modules below) or outputs (see Output Modules below). Other modules provide special functionality specific to each module. The modules may provide additional configuration directives that become available after a module is loaded. To load a module, use the following syntax:
$ModLoad MODULE
where $ModLoad is the global directive that loads the specified module and MODULE represents your desired module. For example, if you want to load the Text File Input Module (imfile) that enables rsyslog to convert any standard text files into syslog messages, specify the following line in the /etc/rsyslog.conf configuration file:
$ModLoad imfile
rsyslog offers a number of modules which are split into the following main categories:
-
Input Modules — Input modules gather messages from various sources. The name of an input module always starts with the
imprefix, such as imfile and imjournal. -
Output Modules — Output modules provide a facility to issue message to various targets such as sending across a network, storing in a database, or encrypting. The name of an output module always starts with the
omprefix, such as omsnmp, omrelp, and so on. -
Parser Modules — These modules are useful in creating custom parsing rules or to parse malformed messages. With moderate knowledge of the C programming language, you can create your own message parser. The name of a parser module always starts with the
pmprefix, such as pmrfc5424, pmrfc3164, and so on. -
Message Modification Modules — Message modification modules change content of syslog messages. Names of these modules start with the
mmprefix. Message Modification Modules such as mmanon, mmnormalize, or mmjsonparse are used for anonymization or normalization of messages. -
String Generator Modules — String generator modules generate strings based on the message content and strongly cooperate with the template feature provided by rsyslog. For more information on templates, see Templates. The name of a string generator module always starts with the
smprefix, such as smfile or smtradfile. -
Library Modules — Library modules provide functionality for other loadable modules. These modules are loaded automatically by rsyslog when needed and cannot be configured by the user.
A comprehensive list of all available modules and their detailed description can be found at http://www.rsyslog.com/doc/rsyslog_conf_modules.html.
|
Note that when rsyslog loads any modules, it provides them with access to some of its functions and data. This poses a possible security threat. To minimize security risks, use trustworthy modules only. |
Importing Text Files
The Text File Input Module, abbreviated as imfile, enables rsyslog to convert any text file into a stream of syslog messages. You can use imfile to import log messages from applications that create their own text file logs. To load imfile, add the following into /etc/rsyslog.conf:
$ModLoad imfile
$InputFilePollInterval int
It is sufficient to load imfile once, even when importing multiple files. The $InputFilePollInterval global directive specifies how often rsyslog checks for changes in connected text files. The default interval is 10 seconds, to change it, replace int with a time interval specified in seconds.
To identify the text files to import, use the following syntax in /etc/rsyslog.conf:
# File 1
$InputFileName path_to_file
$InputFileTag tag:
$InputFileStateFile state_file_name
$InputFileSeverity severity
$InputFileFacility facility
$InputRunFileMonitor

# File 2
$InputFileName path_to_file2
...
Four settings are required to specify an input text file:
-
replace path_to_file with a path to the text file.
-
replace tag: with a tag name for this message.
-
replace state_file_name with a unique name for the state file. State files, which are stored in the rsyslog working directory, keep cursors for the monitored files, marking what partition has already been processed. If you delete them, whole files will be read in again. Make sure that you specify a name that does not already exist.
-
add the $InputRunFileMonitor directive that enables the file monitoring. Without this setting, the text file will be ignored.
Apart from the required directives, there are several other settings that can be applied on the text input. Set the severity of imported messages by replacing severity with an appropriate keyword. Replace facility with a keyword to define the subsystem that produced the message. The keywords for severity and facility are the same as those used in facility/priority-based filters, see Filters.
The Apache HTTP server creates log files in text format. To apply the processing capabilities of rsyslog to apache error messages, first use the imfile module to import the messages. Add the following into /etc/rsyslog.conf:
$ModLoad imfile

$InputFileName /var/log/httpd/error_log
$InputFileTag apache-error:
$InputFileStateFile state-apache-error
$InputRunFileMonitor
Exporting Messages to a Database
Processing of log data can be faster and more convenient when performed in a database rather than with text files. Based on the type of DBMS used, choose from various output modules such as ommysql, ompgsql, omoracle, or ommongodb. As an alternative, use the generic omlibdbi output module that relies on the libdbi library. The omlibdbi module supports database systems Firebird/Interbase, MS SQL, Sybase, SQLite, Ingres, Oracle, mSQL, MySQL, and PostgreSQL.
To store the rsyslog messages in a MySQL database, add the following into /etc/rsyslog.conf:
$ModLoad ommysql

$ActionOmmysqlServerPort 1234
*.* :ommysql:database-server,database-name,database-userid,database-password
First, the output module is loaded, then the communication port is specified. Additional information, such as name of the server and the database, and authentication data, is specified on the last line of the above example.
Enabling Encrypted Transport
Confidentiality and integrity in network transmissions can be provided by either the TLS or GSSAPI encryption protocol.
Transport Layer Security (TLS) is a cryptographic protocol designed to provide communication security over the network. When using TLS, rsyslog messages are encrypted before sending, and mutual authentication exists between the sender and receiver.
Generic Security Service API (GSSAPI) is an application programming interface for programs to access security services. To use it in connection with rsyslog you must have a functioning Kerberos environment.
Interaction of Rsyslog and Journal
As mentioned above, Rsyslog and Journal, the two logging applications present on your system, have several distinctive features that make them suitable for specific use cases. In many situations it is useful to combine their capabilities, for example to create structured messages and store them in a file database (see Structured Logging with Rsyslog). A communication interface needed for this cooperation is provided by input and output modules on the side of Rsyslog and by the Journal's communication socket.
By default, rsyslogd uses the imjournal module as a default input mode for journal files. With this module, you import not only the messages but also the structured data provided by journald. Also, older data can be imported from journald (unless forbidden with the $ImjournalIgnorePreviousMessages directive). See Importing Data from Journal for basic configuration of imjournal.
As an alternative, configure rsyslogd to read from the socket provided by journal as an output for syslog-based applications. The path to the socket is /run/systemd/journal/syslog. Use this option when you want to maintain plain rsyslog messages. Compared to imjournal the socket input currently offers more features, such as ruleset binding or filtering. To import Journal data trough the socket, use the following configuration in /etc/rsyslog.conf:
$ModLoad imuxsock
$OmitLocalLogging off
The above syntax loads the imuxsock module and turns off the $OmitLocalLogging directive, which enables the import trough the system socket. The path to this socket is specified separately in /etc/rsyslog.d/listen.conf as follows:
$SystemLogSocketName /run/systemd/journal/syslog
You can also output messages from Rsyslog to Journal with the omjournal module. Configure the output in /etc/rsyslog.conf as follows:
$ModLoad omjournal

*.* :omjournal:
For instance, the following configuration forwards all received messages on tcp port 10514 to the Journal:
$ModLoad imtcp
$ModLoad omjournal

$RuleSet remote
*.* :omjournal:

$InputTCPServerBindRuleset remote
$InputTCPServerRun 10514
Structured Logging with Rsyslog
On systems that produce large amounts of log data, it can be convenient to maintain log messages in a structured format. With structured messages, it is easier to search for particular information, to produce statistics and to cope with changes and inconsistencies in message structure. Rsyslog uses the JSON (JavaScript Object Notation) format to provide structure for log messages.
Compare the following unstructured log message:
Oct 25 10:20:37 localhost anacron[1395]: Jobs will be executed sequentially
with a structured one:
{"timestamp":"2013-10-25T10:20:37", "host":"localhost", "program":"anacron", "pid":"1395", "msg":"Jobs will be executed sequentially"}
Searching structured data with use of key-value pairs is faster and more precise than searching text files with regular expressions. The structure also lets you to search for the same entry in messages produced by various applications. Also, JSON files can be stored in a document database such as MongoDB, which provides additional performance and analysis capabilities. On the other hand, a structured message requires more disk space than the unstructured one.
In rsyslog, log messages with meta data are pulled from Journal with use of the imjournal module. With the mmjsonparse module, you can parse data imported from Journal and from other sources and process them further, for example as a database output. For parsing to be successful, mmjsonparse requires input messages to be structured in a way that is defined by the Lumberjack project.
The Lumberjack project aims to add structured logging to rsyslog in a backward-compatible way. To identify a structured message, Lumberjack specifies the @cee: string that prepends the actual JSON structure. Also, Lumberjack defines the list of standard field names that should be used for entities in the JSON string. For more information on Lumberjack, see Online Documentation.
The following is an example of a lumberjack-formatted message:
@cee: {"pid":17055, "uid":1000, "gid":1000, "appname":"logger", "msg":"Message text."}
To build this structure inside Rsyslog, a template is used, see Filtering Structured Messages. Applications and servers can employ the libumberlog library to generate messages in the lumberjack-compliant form. For more information on libumberlog, see Online Documentation.
Importing Data from Journal
The imjournal module is Rsyslog's input module to natively read the journal files (see Interaction of Rsyslog and Journal). Journal messages are then logged in text format as other rsyslog messages. However, with further processing, it is possible to translate meta data provided by Journal into a structured message.
To import data from Journal to Rsyslog, use the following configuration in /etc/rsyslog.conf:
$ModLoad imjournal

$imjournalPersistStateInterval number_of_messages
$imjournalStateFile path
$imjournalRatelimitInterval seconds
$imjournalRatelimitBurst burst_number
$ImjournalIgnorePreviousMessages off/on
-
With number_of_messages, you can specify how often the journal data must be saved. This will happen each time the specified number of messages is reached.
-
Replace path with a path to the state file. This file tracks the journal entry that was the last one processed.
-
With seconds, you set the length of the rate limit interval. The number of messages processed during this interval can not exceed the value specified in burst_number. The default setting is 20,000 messages per 600 seconds. Rsyslog discards messages that come after the maximum burst within the time frame specified.
-
With
$ImjournalIgnorePreviousMessagesyou can ignore messages that are currently in Journal and import only new messages, which is used when there is no state file specified. The default setting isoff. Please note that if this setting is off and there is no state file, all messages in the Journal are processed, even if they were already processed in a previous rsyslog session.
|
You can use $ModLoad imuxsock $ModLoad imjournal $OmitLocalLogging on $AddUnixListenSocket /run/systemd/journal/syslog |
You can translate all data and meta data stored by Journal into structured messages. Some of these meta data entries are listed in Verbose journalctl Output, for a complete list of journal fields see the systemd.journal-fields(7) manual page. For example, it is possible to focus on kernel journal fields, that are used by messages originating in the kernel.
Filtering Structured Messages
To create a lumberjack-formatted message that is required by rsyslog's parsing module, use the following template:
template(name="CEETemplate" type="string" string="%TIMESTAMP% %HOSTNAME% %syslogtag% @cee: %$!all-json%\n")
This template prepends the @cee: string to the JSON string and can be applied, for example, when creating an output file with omfile module. To access JSON field names, use the $! prefix. For example, the following filter condition searches for messages with specific hostname and UID:
($!hostname == "hostname" && $!UID== "UID")
Parsing JSON
The mmjsonparse module is used for parsing structured messages.
These messages can come from Journal or from other input sources, and must be formatted in a way defined by the Lumberjack project. These messages are identified by the presence of the @cee: string. Then, mmjsonparse checks if the JSON structure is valid and then the message is parsed.
To parse lumberjack-formatted JSON messages with mmjsonparse, use the following configuration in the /etc/rsyslog.conf:
$ModLoad mmjsonparse

*.* :mmjsonparse:
In this example, the mmjsonparse module is loaded on the first line, then all messages are forwarded to it. Currently, there are no configuration parameters available for mmjsonparse.
Storing Messages in the MongoDB
Rsyslog supports storing JSON logs in the MongoDB document database through the ommongodb output module.
To forward log messages into MongoDB, use the following syntax in the /etc/rsyslog.conf (configuration parameters for ommongodb are available only in the new configuration format; see Using the New Configuration Format):
$ModLoad ommongodb

*.* action(type="ommongodb" server="DB_server" serverport="port" db="DB_name" collection="collection_name" uid="UID" pwd="password")
-
Replace DB_server with the name or address of the MongoDB server. Specify port to select a non-standard port from the MongoDB server. The default port value is
0and usually there is no need to change this parameter. -
With DB_name, you identify to which database on the MongoDB server you want to direct the output. Replace collection_name with the name of a collection in this database. In MongoDB, collection is a group of documents, the equivalent of an RDBMS table.
-
You can set your login details by replacing UID and password.
You can shape the form of the final database output with use of templates. By default, rsyslog uses a template based on standard lumberjack field names.
Debugging Rsyslog
To run rsyslogd in debugging mode, use the following command:
rsyslogd-dn
With this command, rsyslogd produces debugging information and prints it to the standard output. The -n stands for "no fork". You can modify debugging with environmental variables, for example, you can store the debug output in a log file. Before starting rsyslogd, type the following on the command line:
export RSYSLOG_DEBUGLOG="path"
export RSYSLOG_DEBUG="Debug"
Replace path with a desired location for the file where the debugging information will be logged. For a complete list of options available for the RSYSLOG_DEBUG variable, see the related section in the rsyslogd(8) manual page.
To check if syntax used in the /etc/rsyslog.conf file is valid use:
rsyslogd-N1
Where 1 represents level of verbosity of the output message. This is a forward compatibility option because currently, only one level is provided. However, you must add this argument to run the validation.
Troubleshooting Logging to a Server
-
Ensure the time is correctly set on the systems generating the log messages as well as on any logging servers. See Configuring the Date and Time for information on checking and setting the time. See Configuring NTP Using ntpd and Configuring NTP Using the chrony Suite for information on using
NTPto keep the system clock accurately set. -
On a logging server, check that the firewall has the appropriate ports open to allow ingress of either
UDPorTCP, depending on what traffic and port the sending systems are configured to use. For example:
~]# firewall-cmd --zone=public --list-ports
For more information on opening and closing ports in firewalld, see the Red Hat Enterprise Linux 7 Security Guide. Review the configuration of the logging server to ensure it is listening on the same port the sending systems are configured to send on, and all are set to use the same protocol.
-
Use the logger command to generate test log messages. For example:
~]$ logger -p authpriv.info "Test Secret"
~]$ logger -p auth.info "Test Info"
See the logger(1) manual page for more information on the logger command.
Using the Journal
The Journal is a component of systemd that is responsible for viewing and management of log files. It can be used in parallel, or in place of a traditional syslog daemon, such as rsyslogd. The Journal was developed to address problems connected with traditional logging. It is closely integrated with the rest of the system, supports various logging technologies and access management for the log files.
Logging data is collected, stored, and processed by the Journal’s journald service. It creates and maintains binary files called journals based on logging information that is received from the kernel, from user processes, from standard output, and standard error output of system services or via its native API. These journals are structured and indexed, which provides relatively fast seek times. Journal entries can carry a unique identifier. The journald service collects numerous meta data fields for each log message. The actual journal files are secured, and therefore cannot be manually edited.
Viewing Log Files
To access the journal logs, use the journalctl tool. For a basic view of the logs type as root:
journalctl
An output of this command is a list of all log files generated on the system including messages generated by system components and by users. The structure of this output is similar to one used in /var/log/messages/ but with certain improvements:
-
the priority of entries is marked visually. Lines of error priority and higher are highlighted with red color and a bold font is used for lines with notice and warning priority
-
the time stamps are converted for the local time zone of your system
-
all logged data is shown, including rotated logs
-
the beginning of a boot is tagged with a special line
The following is an example output provided by the journalctl tool. When called without parameters, the listed entries begin with a time stamp, then the host name and application that performed the operation is mentioned followed by the actual message. This example shows the first three entries in the journal log:
# journalctl
-- Logs begin at Thu 2013-08-01 15:42:12 CEST, end at Thu 2013-08-01 15:48:48 CEST. --
Aug 01 15:42:12 localhost systemd-journal[54]: Allowing runtime journal files to grow to 49.7M.
Aug 01 15:42:12 localhost kernel: Initializing cgroup subsys cpuset
Aug 01 15:42:12 localhost kernel: Initializing cgroup subsys cpu

[...]
In many cases, only the latest entries in the journal log are relevant. The simplest way to reduce journalctl output is to use the -n option that lists only the specified number of most recent log entries:
journalctl -n Number
Replace Number with the number of lines to be shown. When no number is specified, journalctl displays the ten most recent entries.
The journalctl command allows controlling the form of the output with the following syntax:
journalctl -o form
Replace form with a keyword specifying a desired form of output. There are several options, such as verbose, which returns full-structured entry items with all fields, export, which creates a binary stream suitable for backups and network transfer, and json, which formats entries as JSON data structures. For the full list of keywords, see the journalctl(1) manual page.
To view full meta data about all entries, type:
# journalctl -o verbose
[...]

Fri 2013-08-02 14:41:22 CEST [s=e1021ca1b81e4fc688fad6a3ea21d35b;i=55c;b=78c81449c920439da57da7bd5c56a770;m=27cc
        _BOOT_ID=78c81449c920439da57da7bd5c56a770
        PRIORITY=5
        SYSLOG_FACILITY=3
        _TRANSPORT=syslog
        _MACHINE_ID=69d27b356a94476da859461d3a3bc6fd
        _HOSTNAME=localhost.localdomain
        _PID=562
        _COMM=dbus-daemon
        _EXE=/usr/bin/dbus-daemon
        _CMDLINE=/bin/dbus-daemon --system --address=systemd: --nofork --nopidfile --systemd-activation
        _SYSTEMD_CGROUP=/system/dbus.service
        _SYSTEMD_UNIT=dbus.service
        SYSLOG_IDENTIFIER=dbus
        SYSLOG_PID=562
        _UID=81
        _GID=81
        _SELINUX_CONTEXT=system_u:system_r:system_dbusd_t:s0-s0:c0.c1023
        MESSAGE=[system] Successfully activated service 'net.reactivated.Fprint'
        _SOURCE_REALTIME_TIMESTAMP=1375447282839181

[...]
This example lists fields that identify a single log entry. These meta data can be used for message filtering as shown in Advanced Filtering. For a complete description of all possible fields see the systemd.journal-fields(7) manual page.
Access Control
By default, Journal users without root privileges can only see log files generated by them. The system administrator can add selected users to the adm group, which grants them access to complete log files. To do so, type as root:
usermod-a-Gadm username
Here, replace username with a name of the user to be added to the adm group. This user then receives the same output of the journalctl command as the root user. Note that access control only works when persistent storage is enabled for Journal.
Using The Live View
When called without parameters, journalctl shows the full list of entries, starting with the oldest entry collected. With the live view, you can supervise the log messages in real time as new entries are continuously printed as they appear. To start journalctl in live view mode, type:
journalctl -f
This command returns a list of the ten most current log lines. The journalctl utility then stays running and waits for new changes to show them immediately.
Filtering Messages
The output of the journalctl command executed without parameters is often extensive, therefore you can use various filtering methods to extract information to meet your needs.
Log messages are often used to track erroneous behavior on the system. To view only entries with a selected or higher priority, use the following syntax:
journalctl -p priority
Here, replace priority with one of the following keywords (or with a number): debug (7), info (6), notice (5), warning (4), err (3), crit (2), alert (1), and emerg (0).
To view only entries with error or higher priority, use:
journalctl -p err
To view log entries only from the current boot, type:
journalctl -b
If you reboot your system just occasionally, the -b will not significantly reduce the output of journalctl. In such cases, time-based filtering is more helpful:
journalctl--since=value--until=value
With --since and --until, you can view only log messages created within a specified time range. You can pass values to these options in form of date or time or both as shown in the following example.
Filtering options can be combined to reduce the set of results according to specific requests. For example, to view the warning or higher priority messages from a certain point in time, type:
journalctl-p warning--since="2013-3-16 23:59:59"
Verbose journalctl Output lists a set of fields that specify a log entry and can all be used for filtering. For a complete description of meta data that systemd can store, see the systemd.journal-fields(7) manual page. This meta data is collected for each log message, without user intervention. Values are usually text-based, but can take binary and large values; fields can have multiple values assigned though it is not very common.
To view a list of unique values that occur in a specified field, use the following syntax:
journalctl -F fieldname
Replace fieldname with a name of a field you are interested in.
To show only log entries that fit a specific condition, use the following syntax:
journalctl fieldname=value
Replace fieldname with a name of a field and value with a specific value contained in that field. As a result, only lines that match this condition are returned.
|
Tab Completion on Field Names
As the number of meta data fields stored by journalctl
and press the Tab key two times. This shows a list of available field names. Tab completion based on context works on field names, so you can type a distinctive set of letters from a field name and then press Tab to complete the name automatically. Similarly, you can list unique values from a field. Type: journalctl fieldname=
and press Tab two times. This serves as an alternative to journalctl |
You can specify multiple values for one field:
journalctl fieldname=value1 fieldname=value2 ...
Specifying two matches for the same field results in a logical OR combination of the matches. Entries matching value1 or value2 are displayed.
Also, you can specify multiple field-value pairs to further reduce the output set:
journalctl fieldname1=value fieldname2=value ...
If two matches for different field names are specified, they will be combined with a logical AND. Entries have to match both conditions to be shown.
With use of the + symbol, you can set a logical OR combination of matches for multiple fields:
journalctl fieldname1=value + fieldname2=value ...
This command returns entries that match at least one of the conditions, not only those that match both of them.
To display entries created by avahi-daemon.service or crond.service under user with UID 70, use the following command:
journalctl_UID=70_SYSTEMD_UNIT=avahi-daemon.service_SYSTEMD_UNIT=crond.service
Since there are two values set for the _SYSTEMD_UNIT field, both results will be displayed, but only when matching the _UID=70 condition. This can be expressed simply as: (UID=70 and (avahi or cron)).
You can apply the aforementioned filtering also in the live-view mode to keep track of the latest changes in the selected group of log entries:
journalctl -f fieldname=value ...
Enabling Persistent Storage
By default, Journal stores log files only in memory or a small ring-buffer in the /run/log/journal/ directory. This is sufficient to show recent log history with journalctl. This directory is volatile, log data is not saved permanently. With the default configuration, syslog reads the journal logs and stores them in the /var/log/ directory. With persistent logging enabled, journal files are stored in /var/log/journal which means they persist after reboot. Journal can then replace rsyslog for some users (but see the chapter introduction).
Enabled persistent storage has the following advantages
-
Richer data is recorded for troubleshooting in a longer period of time
-
For immediate troubleshooting, richer data is available after a reboot
-
Server console currently reads data from journal, not log files
Persistent storage has also certain disadvantages:
-
Even with persistent storage the amount of data stored depends on free memory, there is no guarantee to cover a specific time span
-
More disk space is needed for logs
To enable persistent storage for Journal, create the journal directory manually as shown in the following example. As root type:
mkdir-p/var/log/journal
Then, restart journald to apply the change:
systemctlrestartsystemd-journald
Managing Log Files in a Graphical Environment
As an alternative to the aforementioned command-line utilities, Red Hat Enterprise Linux 7 provides an accessible GUI for managing log messages.
Viewing Log Files
Most log files are stored in plain text format. You can view them with any text editor such as Vi or Emacs. Some log files are readable by all users on the system; however, root privileges are required to read most log files. To view system log files in an interactive, real-time application, use the System Log.
|
Installing the gnome-system-log package
In order to use the System Log, first ensure the gnome-system-log package is installed on your system by running, as ~]# dnf install gnome-system-log For more information on installing packages with DNF, see Installing Packages. |
After you have installed the gnome-system-log package, open the System Log by clicking , or type the following command at a shell prompt:
~]$ gnome-system-log
The application only displays log files that exist; thus, the list might differ from the one shown in System Log.
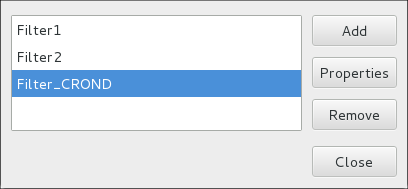
The System Log application lets you filter any existing log file. Click on the button marked with the gear symbol to view the menu, select menu:[Filters > > Manage Filters] to define or edit the desired filter.
Adding or editing a filter lets you define its parameters as is shown in System Log - defining a filter.
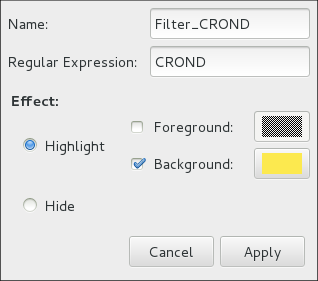
When defining a filter, the following parameters can be edited:
-
Name— Specifies the name of the filter. -
Regular Expression— Specifies the regular expression that will be applied to the log file and will attempt to match any possible strings of text in it. -
Effect-
Highlight— If checked, the found results will be highlighted with the selected color. You may select whether to highlight the background or the foreground of the text. -
Hide— If checked, the found results will be hidden from the log file you are viewing.
-
When you have at least one filter defined, it can be selected from the Filters menu and it will automatically search for the strings you have defined in the filter and highlight or hide every successful match in the log file you are currently viewing.
When you select the Show matches only option, only the matched strings will be shown in the log file you are currently viewing.
Adding a Log File
To add a log file you want to view in the list, select . This will display the Open Log window where you can select the directory and file name of the log file you want to view. System Log - adding a log file illustrates the Open Log window.
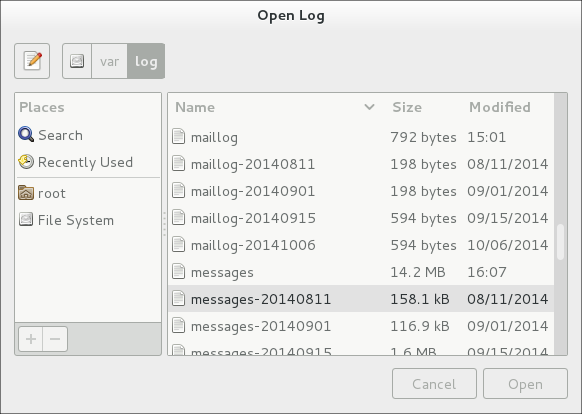
Click on the Open button to open the file. The file is immediately added to the viewing list where you can select it and view its contents.
|
Reading zipped log files
The System Log also allows you to open log files zipped in the |
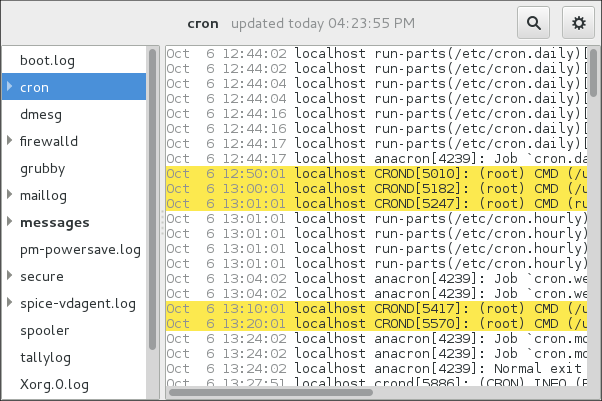
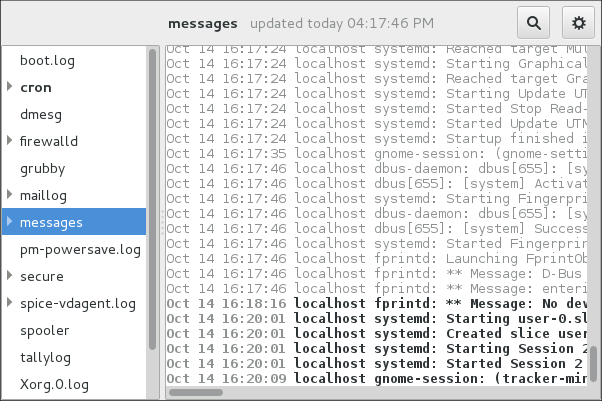
Monitoring Log Files
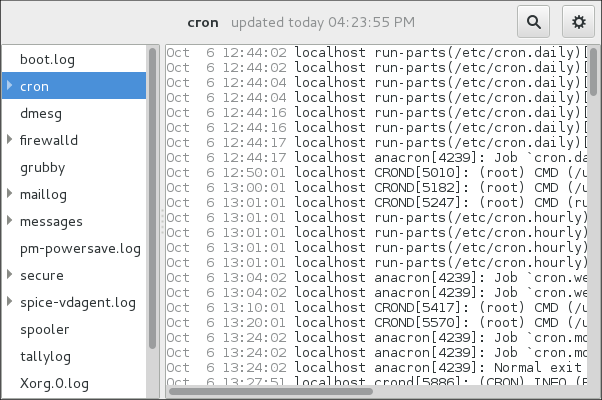
System Log monitors all opened logs by default. If a new line is added to a monitored log file, the log name appears in bold in the log list. If the log file is selected or displayed, the new lines appear in bold at the bottom of the log file. System Log - new log alert illustrates a new alert in the cron log file and in the messages log file. Clicking on the messages log file displays the logs in the file with the new lines in bold.
其他资源
For more information on how to configure the rsyslog daemon and how to locate, view, and monitor log files, see the resources listed below.
-
rsyslogd(8) — The manual page for thersyslogddaemon documents its usage. -
rsyslog.conf(5) — The manual page namedrsyslog.confdocuments available configuration options. -
logrotate(8) — The manual page for the logrotate utility explains in greater detail how to configure and use it. -
journalctl(1) — The manual page for the journalctl daemon documents its usage. -
journald.conf(5) — This manual page documents available configuration options. -
systemd.journal-fields(7) — This manual page lists special Journal fields.
-
rsyslog Home Page — The rsyslog home page offers a thorough technical breakdown of its features, documentation, configuration examples, and video tutorials.
-
RainerScript documentation on the rsyslog Home Page — Commented summary of data types, expressions, and functions available in RainerScript.
-
Description of queues on the rsyslog Home Page — General information on various types of message queues and their usage.
-
rsyslog Wiki — The rsyslog Wiki contains useful configuration examples.
Want to help? Learn how to contribute to Fedora Docs ›