Preparing for Installation
This chapter describes the steps you need take before you begin the installation. Not every step must be strictly followed - for example, if you plan to use the default installation settings, you do not need to gather system information such as disk device labels/UUIDs or network information such as the system’s IP address. However, you should still go through this chapter, as it also describes the available types of installation media and how to prepare boot media and installation sources.
Upgrade or Install?
If you already have Fedora installed and want to upgrade your installation to the current version, there are two basic ways to do so:
- Automatic upgrade using dnf system upgrade
-
The preferred way to upgrade your system is an automatic upgrade using the dnf system upgrade utility. For information on performing an automatic upgrade, see Fedora Wiki dnf system upgrade.
- Manual Reinstallation
-
You can upgrade to the latest version of Fedora manually instead of relying on dnf system upgrade. This involves booting the installer as if you were performing a clean installation, letting it detect your existing Fedora system, and overwriting the root partition while preserving data on other partitions and volumes. The same process can also be used to reinstall the system, if you need to. For detailed information, see Manual System Upgrade or Reinstallation.
|
Always back up your data before performing an upgrade or reinstalling your system, no matter which method you choose. |
Downloading Boot and Installation Images
The Fedora Project offers different Editions tailored for some specific use cases. Choose the Fedora Edition best for you, or you can build your own by customizing after the installation, or by using a kickstart file as described in Creating a Kickstart File. Kickstart installation requires the netinstall media type, or a direct installation booting method such as PXE; kickstarts are not supported with live images.
Read more about Fedora Workstation, Fedora Cloud, Fedora Server and the available media types in Downloading Fedora.
You can also choose a Fedora Spin featuring favorite alternative desktops or tools for specialized tasks at http://spins.fedoraproject.org.
Verifying the Downloaded Image
Because transmission errors or other problems may corrupt the Fedora image you have downloaded, it is important to verify the file’s integrity. After the images are created, an operation is performed on the file that produces a value called a checksum using a complex mathematical algorithm. The operation is sufficiently complex that any change to the original file will produce a different checksum.
By calculating the image’s checksum on your own computer and comparing it to the original checksum, you can verify the image has not been tampered with or corrupted. The original checksum values are provided at https://fedoraproject.org/verify, and are gpg signed to demonstrate their integrity.
Verifying checksums on Windows systems
-
Download the Fedora image of your choice from https://fedoraproject.org/get-fedora and the corresponding checksum file from https://fedoraproject.org/verify
-
Open a powershell session.
-
Change to the directory containing the downloaded files.
> cd $HOME\Downloads\
> ls

Directory: C:\Users\Pete\Downloads

Mode                LastWriteTime         Length  Name
----                -------------         ------  ----
-a---        11/25/2014  12:39 PM            272  Fedora-Server-21-x86_64-CHECKSUM
-a---        11/25/2014  12:39 PM     2047868928  Fedora-Server-DVD-x86_64-21.iso
-
Load the resources required to calculate the checksum.
> $image = "Fedora-Server-DVD-x86_64-21.iso"
> $checksum_file = "Fedora-Server-21-x86_64-CHECKSUM"
> $sha256 = New-Object -TypeName System.Security.Cryptography.sha256CryptoServiceProvider
> $expected_checksum = ((Get-Content $checksum_file | Select-String -Pattern $image) -split " ")[0].ToLower()
-
Calculate the downloaded image’s checksum. This will take a while!
> $download_checksum = [System.BitConverter]::ToString($sha256.ComputeHash([System.IO.File]::ReadAllBytes("$PWD\$image"))).ToLower() -replace '-', '' -
Compare the calculated checksum to the expected checksum.
> echo "Download Checksum: $download_checksum"
> echo "Expected Checksum: $expected_checksum"
> if ( $download_checksum -eq "$expected_checksum" ) {
echo "Checksum test passed!"
} else {
echo "Checksum test failed."
}
Verifying checksums on Linux and OSX systems
-
Download the Fedora image of your choice from https://fedoraproject.org/get-fedora and the corresponding checksum file from https://fedoraproject.org/verify
-
Open a terminal window, and navigate to the directory with the downloaded files.
$ cd ~/Downloads -
Use the appropriate utility to verify the image checksum.
-
For Linux:
$ sha256sum -c *CHECKSUM
-
For OSX:
$ shasum -a 256 -c *CHECKSUM
-
Preparing Boot Media
Fedora images are Hybrid ISOs and can be used to create installation media with both optical and USB disks, for booting on both BIOS and UEFI systems.
|
Fedora Media Writer and Universal USB Creators
Fedora Media Writer has been improved and is now the default way to make bootable media. Fedora Media Writer supports Linux, Mac, and Windows. It is an easy way to make bootable USB media to install Fedora (or other operating systems). While use of Fedora Media Writer is strongly encouraged, other USB media creation software can work as well. Some of the new additions to Fedora Media Writer are that Fedora Workstation and Server are the first choices on the main screen. However more choices are available if you select the button below "Custom OS". Options like Fedora Spins will appear. Fedora Spins such as XFCE and Mate will be selectable. Universal USB creation tools such as Unetbootin are a historically popular way to create USB installers from ISOs intended for optical media. They typically function by creating a filesystem on the USB drive, extracting files from the image, and writing syslinux bootloader to the device. These methods circumvent the boot-loader configuration built into Fedora images, which are pre-partitioned and designed to boot on UEFI systems with SecureBoot enabled as well as BIOS systems. They do not produce a consistent result with Fedora’s images, especially for use with UEFI systems. Utilities that use a direct write method, and do not modify the Fedora image, will produce the most consistently successful results. |
Be sure you choose the right device!
Most media creation methods in this section are destructive. Ensure you do not need any data on the USB stick, and double check you have chosen the correct device before continuing.
-
Download the latest Windows Installer file from Marin Briza’s github page: https://github.com/MartinBriza/MediaWriter/releases.
-
Run the installation by double clicking it, and then clicking next through the set-up wizard. The Wizard gives you the options to customize the software’s installation if you choose to.
-
In Windows 8 and 10, the application will be under "all apps" under F for Fedora Media Writer. Or in Windows 10, you can just type Fedora Media Writer in the search box on the task bar.
-
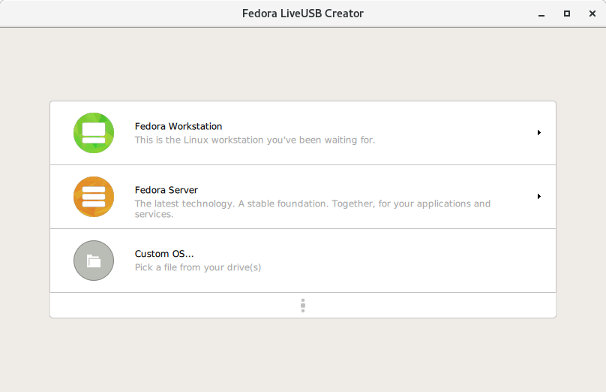
Select the Fedora Edition you wish to make a bootable USB drive for.
 Figure 1. Fedora Media Writer Main Screen: Choose your Edition of Fedora
 -
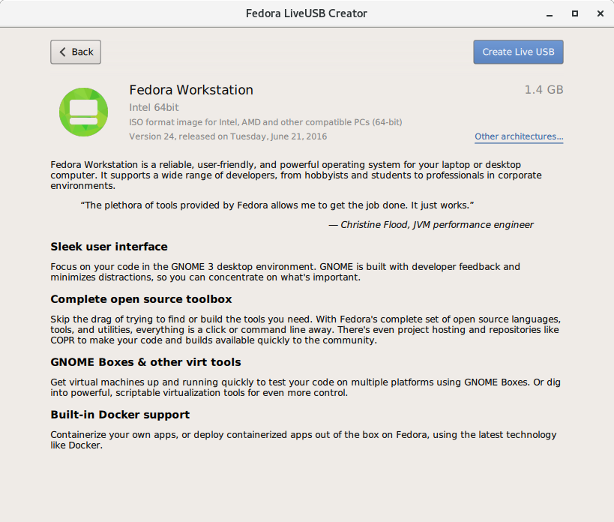
If you choose one of the beginning default Fedora editions, such as Fedora workstation or server. Fedora Media Writer will give you information and details about it before you proceed with the download and USB creation. For Fedora Workstation, you can choose a different architecture, such as 32bit if you select "other architectures". Otherwise select "Create Live USB" to proceed.
 Figure 2. Fedora Media Writer Distro Information
 -
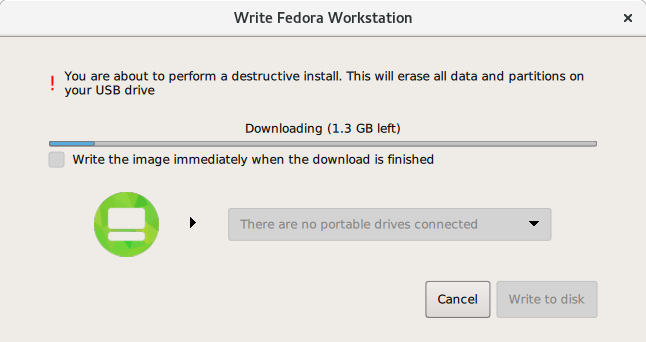
Fedora Media Writer will automatically download the ISO for you, but if you all-ready have it in your Downloads directory it will be immediately available to use.
 Figure 3. Fedora Media Writer Automatic Download
 -
After the download completes, or when Fedora Media Writer is ready. Plug in a USB drive you wish to use as a bootable media.
-
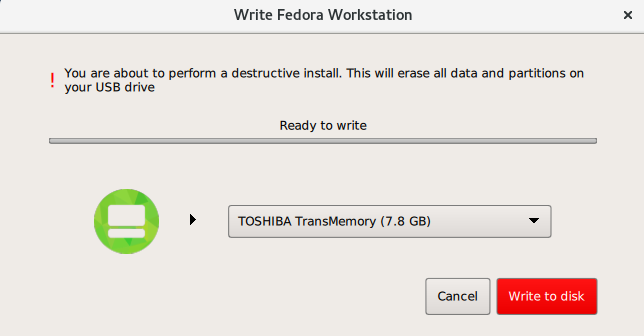
Click the red "Write to disk" button.
 Figure 4. Fedora Media Writer Write to USB Device
-
On Fedora 25 or later, you can download Fedora Media Writer with the command:
$ sudo dnf install mediawriter -
You can call Fedora Media Writer by issuing the command:
$ sudo mediawriteror in Gnome 3 by selecting Activities, then selecting Utilities, and then selecting Fedora Media Writer.
-
Select the Fedora Edition you wish to make a bootable USB drive for.
 Figure 5. Fedora Media Writer Main Screen: Choose your Edition of Fedora
 -
If you choose one of the beginning default Fedora editions, such as Fedora workstation or server. Fedora Media Writer will give you information and details about it before you proceed with the download and USB creation. For Fedora Workstation, you can choose a different architecture, such as 32bit if you select "other architectures". Otherwise select "Create Live USB" to proceed.
 Figure 6. Fedora Media Writer Distro Information
 -
Fedora Media Writer will automatically download the ISO for you, but if you all-ready have it in your Downloads directory it will be immediately available to use.
 Figure 7. Fedora Media Writer Automatic Download
 -
After the download completes, or when Fedora Media Writer is ready. Plug in a USB drive you wish to use as a bootable media.
-
Click the red "Write to disk" button.
 Figure 8. Fedora Media Writer Write to USB Device
-
Download the latest Macintosh Disk Image (the package will have a .dmg extension) from Marin Briza’s github page: https://github.com/MartinBriza/MediaWriter/releases.
-
Open the .dmg file and copy the mediawriter file into your applications folder.
-
Navigate to your applications directory, and then launch the mediawriter app.
-
Mac OS will then ask if you are sure you want to open the file (it is from the internet after all), select "Open" to run the program.
-
Select the Fedora Edition you wish to make a bootable USB drive for.
 Figure 9. Fedora Media Writer Main Screen: Choose your Edition of Fedora
 -
If you choose one of the beginning default Fedora editions, such as Fedora workstation or server. Fedora Media Writer will give you information and details about it before you proceed with the download and USB creation. For Fedora Workstation, you can choose a different architecture, such as 32bit if you select "other architectures". Otherwise select "Create Live USB" to proceed.
 Figure 10. Fedora Media Writer Distro Information
 -
Fedora Media Writer will automatically download the ISO for you, but if you all-ready have it in your Downloads directory it will be immediately available to use.
 Figure 11. Fedora Media Writer Automatic Download
 -
After the download completes, or when Fedora Media Writer is ready. Plug in a USB drive you wish to use as a bootable media.
-
Click the red "Write to disk" button.
 Figure 12. Fedora Media Writer Write to USB Device
-
On a system with GNOME, or with the gnome-disk-utility package installed, open
Disksusing the system menu. -
Click your USB device in the left column.
-
Click the menu icon in the upper right corner of the window, and choose the
Restore Disk Imageoption. -
Navigate to your image file and click
Start Restoring. After a few minutes, it will report the process is complete and your installation media will be ready to use.
-
Open a terminal window and insert the usb drive.
-
Find the
device nodeassigned to the drive. In the example below, the drive is givensdd.$ dmesg|tail [288954.686557] usb 2-1.8: New USB device strings: Mfr=0, Product=1, SerialNumber=2 [288954.686559] usb 2-1.8: Product: USB Storage [288954.686562] usb 2-1.8: SerialNumber: 000000009225 [288954.712590] usb-storage 2-1.8:1.0: USB Mass Storage device detected [288954.712687] scsi host6: usb-storage 2-1.8:1.0 [288954.712809] usbcore: registered new interface driver usb-storage [288954.716682] usbcore: registered new interface driver uas [288955.717140] scsi 6:0:0:0: Direct-Access Generic STORAGE DEVICE 9228 PQ: 0 ANSI: 0 [288955.717745] sd 6:0:0:0: Attached scsi generic sg4 type 0 [288961.876382] sd 6:0:0:0: sdd Attached SCSI removable disk -
Use the dd utility to write the image. Make sure you have the right drive!
# dd if=/path/to/Fedora-Live-Security-x86_64-21.iso of=/dev/sdd
In addition to creating a bootable USB flash drive, you can also use the provided ISO images to create bootable optical media (a CD or DVD). This approach may be necessary when installing Fedora on an older system which can not boot from USB.
|
The exact steps you need to take to burn a bootable CD or DVD from an ISO image will vary depending on what disc burning software you use. This procedure only offers a general overview. |
-
Insert a blank CD or DVD into your system’s CD or DVD burner.
-
Open your system’s burning software - for example, Brasero on Fedora systems with GNOME desktop environment, or Nero on Windows systems. In the software’s main menu, find an option which lets you burn an ISO image to a disc. For example, in Brasero, this option is
Burn imagein the main menu on the left side of the window. -
When prompted, select the ISO image of Fedora to be burned, and the CD or DVD burner with a blank disc inside (if you have more than one drive).
-
Confirm your selection, and wait for the disc to be burned.
Want to help? Learn how to contribute to Fedora Docs ›