Installing the Fedora Server Edition as a virtual machine using Cockpit
The objective here is to install a Fedora Server in a virtual machine using the deployed generic installation media. An underlying assumption is that the processor architecture is the same as that of the host. The other case is also possible, but requires additional configuration.
The descriptions can also be used as a blueprint for installing other distributions with the respective distribution’s own installation media.
Why Cockpit
Fedora Server is designed as a "headless" system, i.e. it comes without an elaborate graphical user interface and corresponding hardware. Only a simple text console is available. A system administrator has to perform all work on the machine using the command line.
Cockpit offers an alternative "remote" graphical interface. It operates in the web browser of the system administrator’s desktop and executes the required commands on the server on behalf of them.
First hand, Cockpit saves the memorization of the complex parameter zoo of virt-install, the CLI installation tool. It saves long typing on the keyboard including the correction of accidental typos. But even those who 'speak virt-install' fluently, can benefit from Cockpit. It automatically provides a lot of status information about configuration and resource usage, which you would otherwise have to collect manually. And this information is always present, no need to keep this information in mind.
Therefore, Cockpit is useful for a beginner in server administration, for the part-time administrator as well as for experienced administrators. Particularly impressive is, that Cockpit does not require its own specific configuration organization, but strictly uses the standard configuration methods. So you can mix and match Cockpit based and CLI based administration work. This makes it pleasantly different from the popular NAS devices or even professional interfaces such as the old Sun Cobalt appliances or ISP Config.
Preparations
We assume a complete installation of virtualization support according to the Adding Virtualization Support guide.
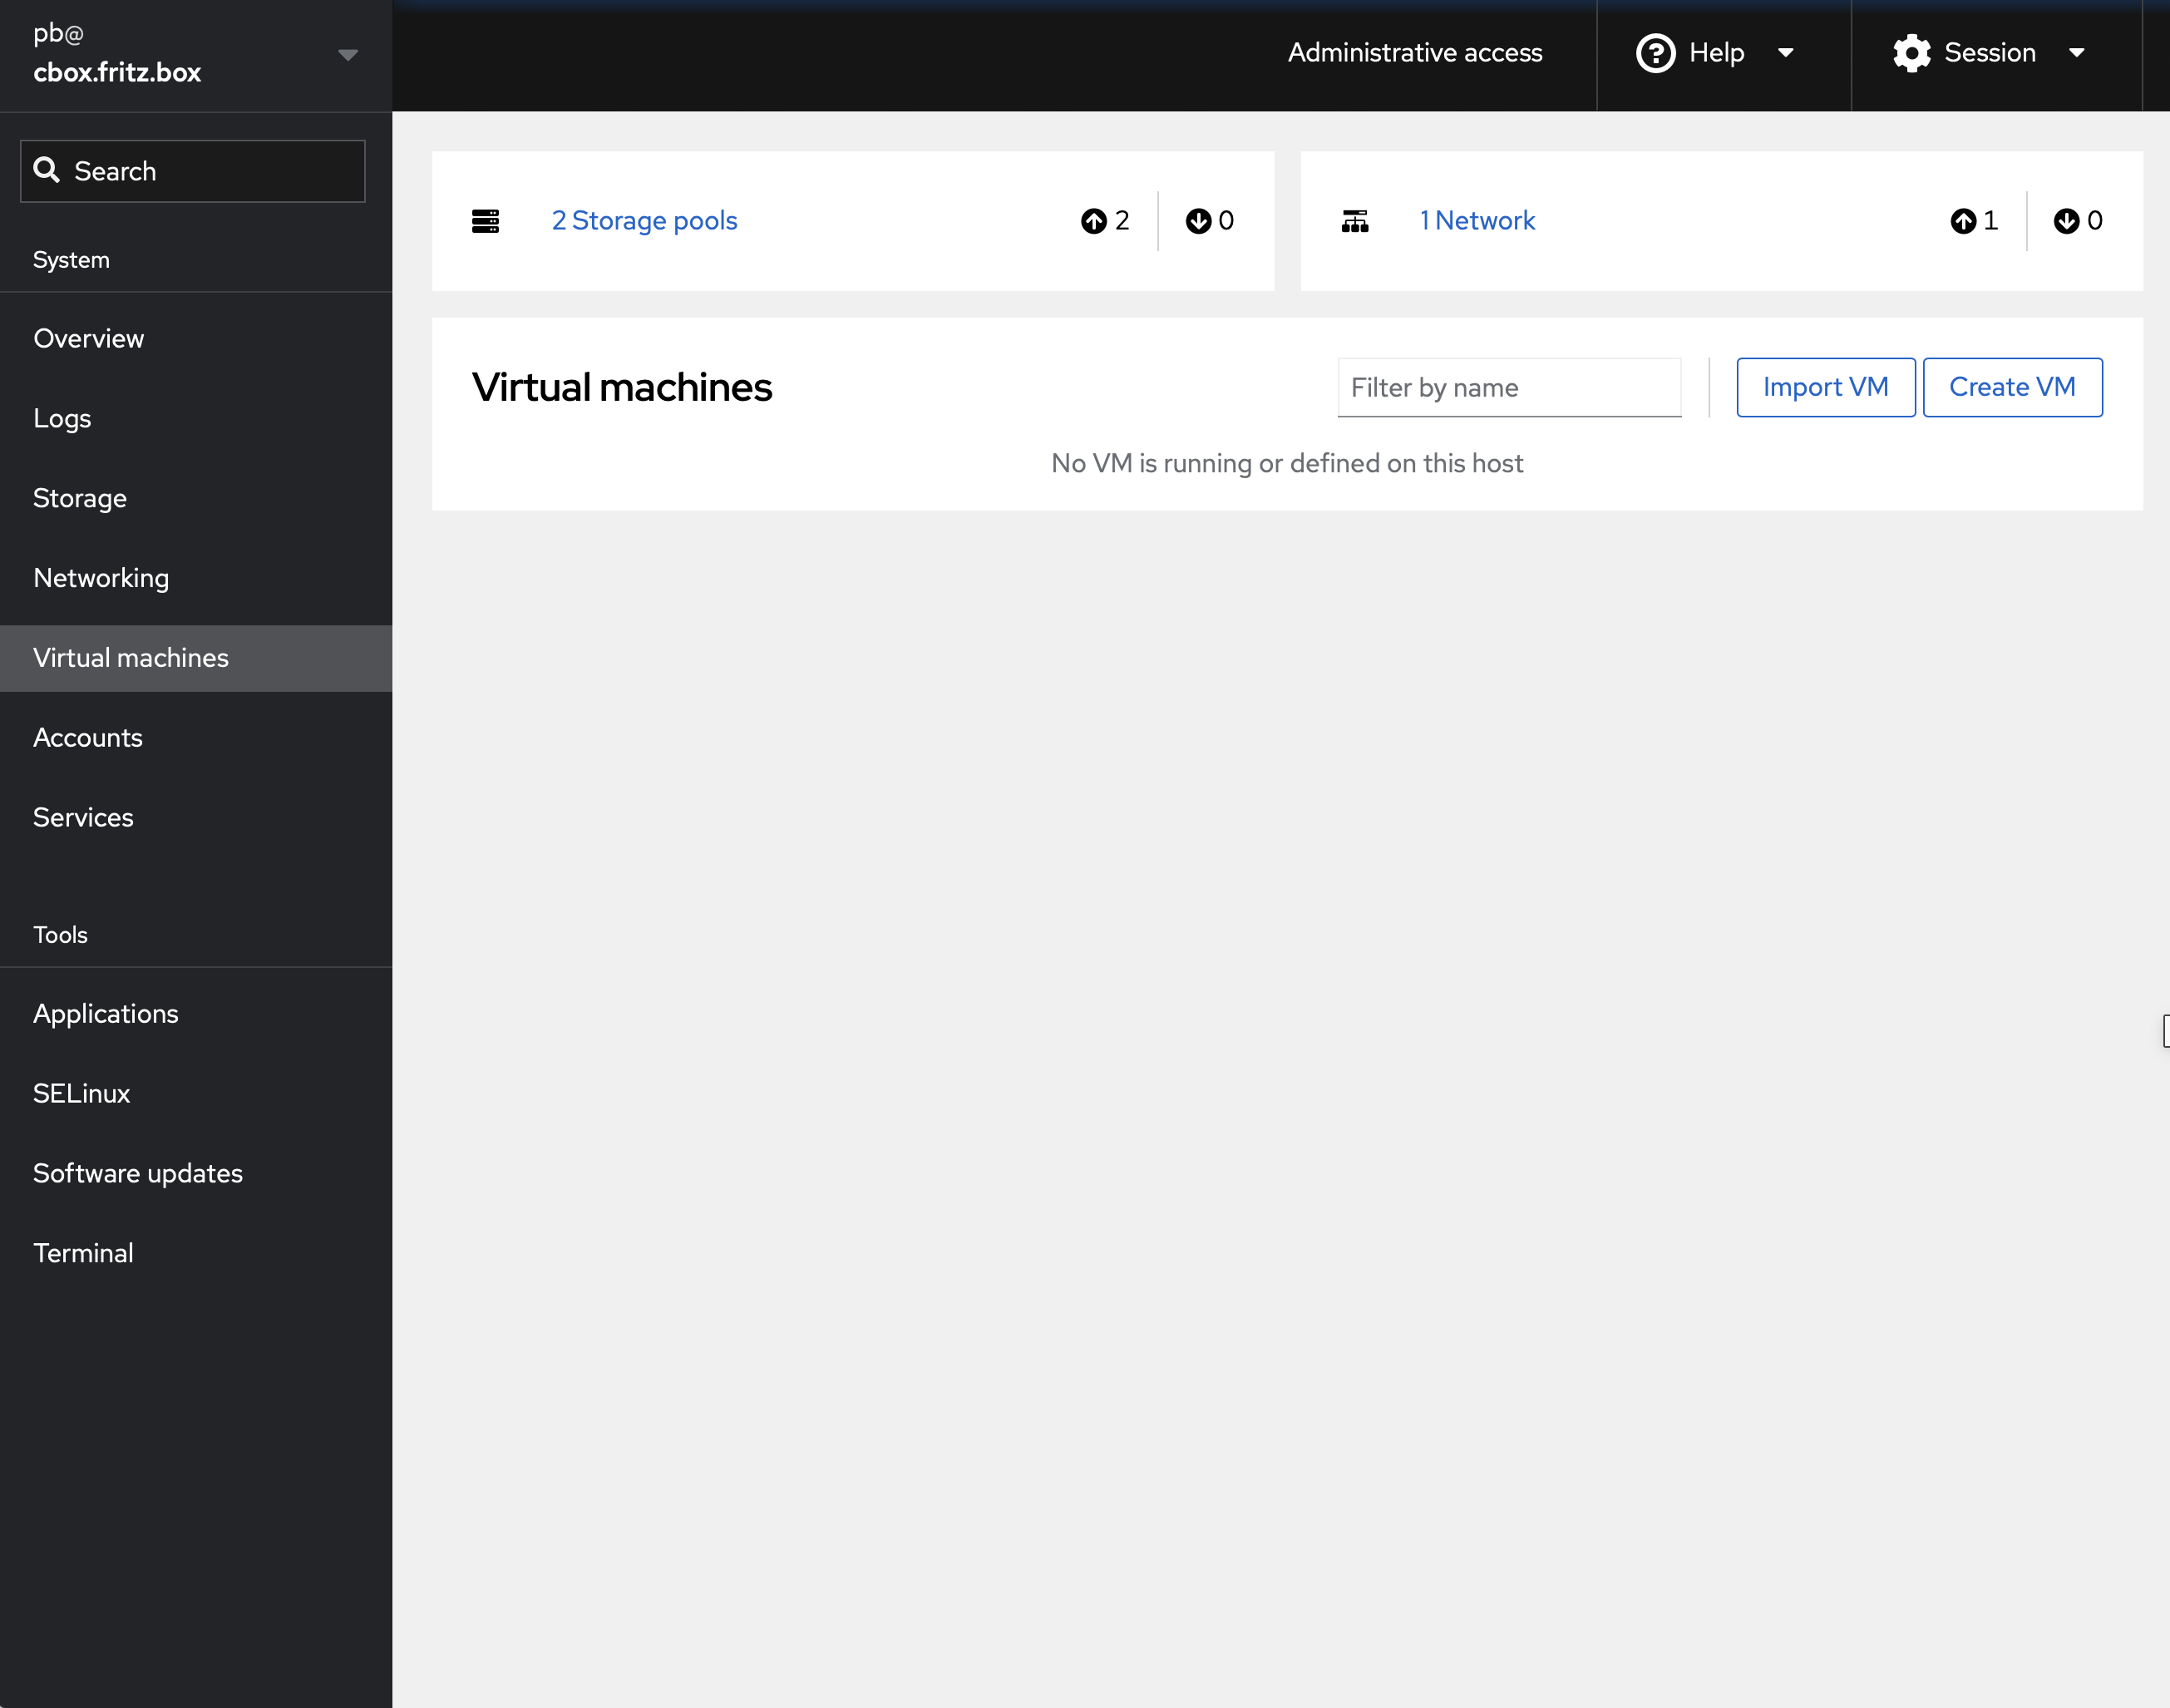
Open your browser and connect to the Cockpit instance of your host server. Consult the post-installation guide to find out the possible connection paths. Log in as root or with your administrative account. In the overview (start) page select Virtual Machines in the left navigation column.
If there is no entry Virtual Machines follow the before mentioned guide for completion.
Provisioning installation media
Cockpit offers the option to load an installation medium not only locally, but also from a remote location. Especially if several virtual machines are to be installed, it is more efficient to keep the installation medium locally.
Select Terminal in the left navigation bar and issue the commands line by line:
[…]# sudo wget -P /var/lib/libvirt/boot/  https://download.fedoraproject.org/pub/fedora/linux/releases/41/Server/x86_64/iso/Fedora-Server-dvd-x86_64-41-1.4.iso
[…]# sudo wget -P /var/lib/libvirt/boot/ https://download.fedoraproject.org/pub/fedora/linux/releases/41/Server/x86_64/iso/Fedora-Server-41-1.4-x86_64-CHECKSUM
[…]# sudo curl -O https://fedoraproject.org/fedora.gpg | gpg --import
[…]# sudo gpgv --keyring ./fedora.gpg  /var/lib/libvirt/boot/*-CHECKSUM
[…]# sudo sh -c ' cd /var/lib/libvirt/boot/  &&  sha256sum --ignore-missing -c *-CHECKSUM '
You can safely ignore the warning of the last command about not correctly formated lines.
You can provide additional installation media in an analog way. With everything necessary in place, we can start installing a virtual machine.
Basic configuration of the virtual machine to get installed
|
This guide uses Cockpit, version 326, and Cockpit machines, version 321. On updated systems, you may have an updated version and see slightly different screens. |
To start a VM installation, connect your desktop browser to the Cockpit instance of your host server. Consult the post-installation guide to find out the possible connection paths. Log in as root or with your administrative account. In the overview (start) page select Virtual Machines in the left navigation column and then Create VM (the button Import VM next to it refers to the other alternative, using disk images) and fill in the form that opens..
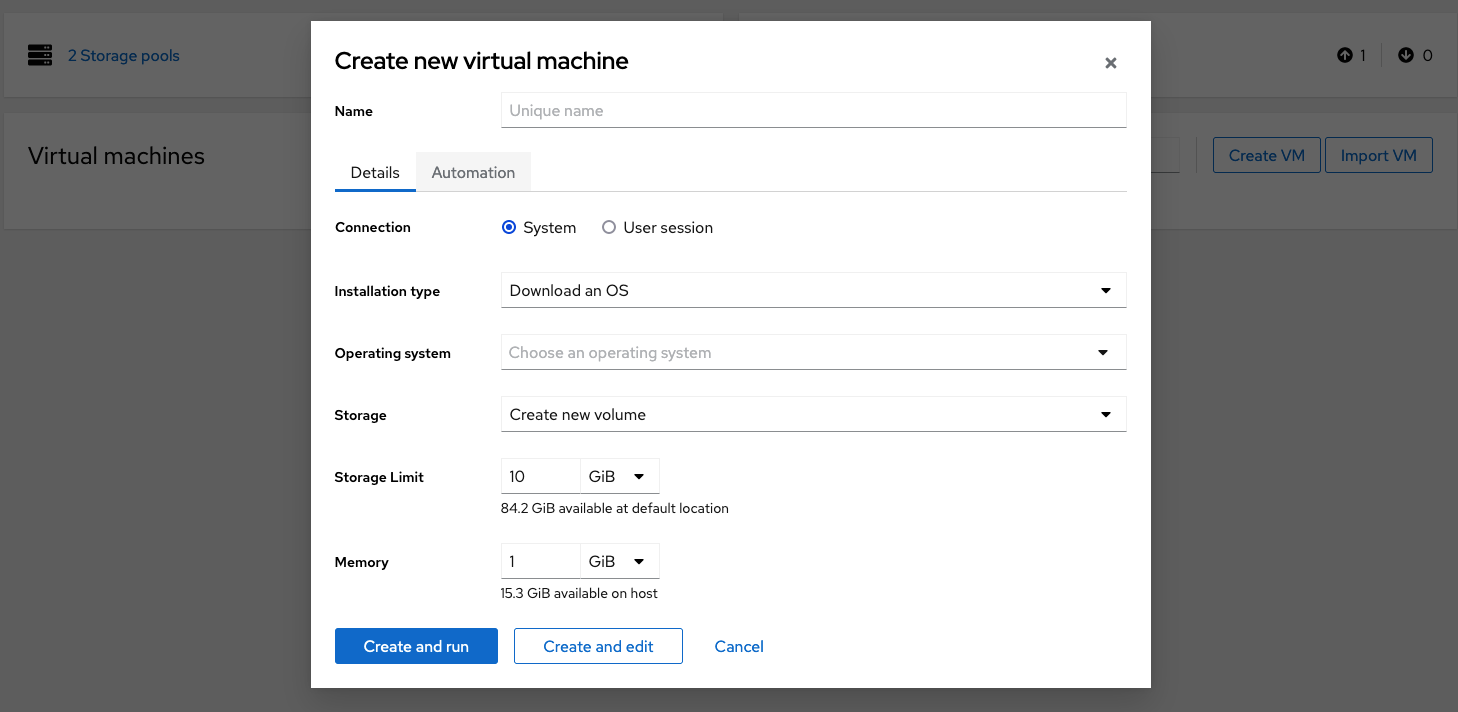
First, specify a name for the virtual machine to be created. It must be unique in the host server’s name space. Select an connection type, usually system. See explanation in the Adding Virtualization Support guide.
Then select the installation type to be used. The drop down menu offers several alternatives:
- Download an OS
-
Download from a remote location. You have to choose the Distribution from a drop down menu in the next field. It includes various distributions and version. But you can’t select the Fedora edition. Not an recommendable option.
- Cloud base image
-
That refers to the special case of cloud disk images. That is not covered here.
- Local install media
-
Use a ISO image or a distro install tree stored on the local disk. This is the option we want to use here. Select this option and specify in the next field the fully qulified path and filename.
- URL (ISO image or distro install tree)
-
The same as 'Download an OS', but you can freely specify the exact distribution by download URL in the next field and do not depend on a preset list
- Network boot (PXE)
-
That’s another special case we don’t cover here. You need to set up a special install server beforehand.
As mentioned above choose Local install media and select in the drop down menu of the following row the fully qualified file name. In our example of Fedora Server 41 it is /var/lib/libvirt/boot/Fedora-Server-dvd-x86_64-41-1.3.iso. The drop down menu works a bit unfamiliar. You have to select the target file step by step from subdirectory to subdirectory up to the file name.
In the next line, "Operating system", Cockpit should display the correct OS "Fedora" and release, in this example "41". Otherwise use the drop down menu to select the correct operating system. Use (unkown) or Fedora (unkown) as fallback, if the exact version and edition is not included in the selection list.
In the next fields, leave Storage at the default value Create new volume, and select an appropriate size of virtual hard disk and memory.
Finally, check all entries again and then select Create and edit option. This allows us to perform further configurations, especially the network connections. This saves additional administration work later on.
It takes a short time and then the virtual machine’s details page is displayed.
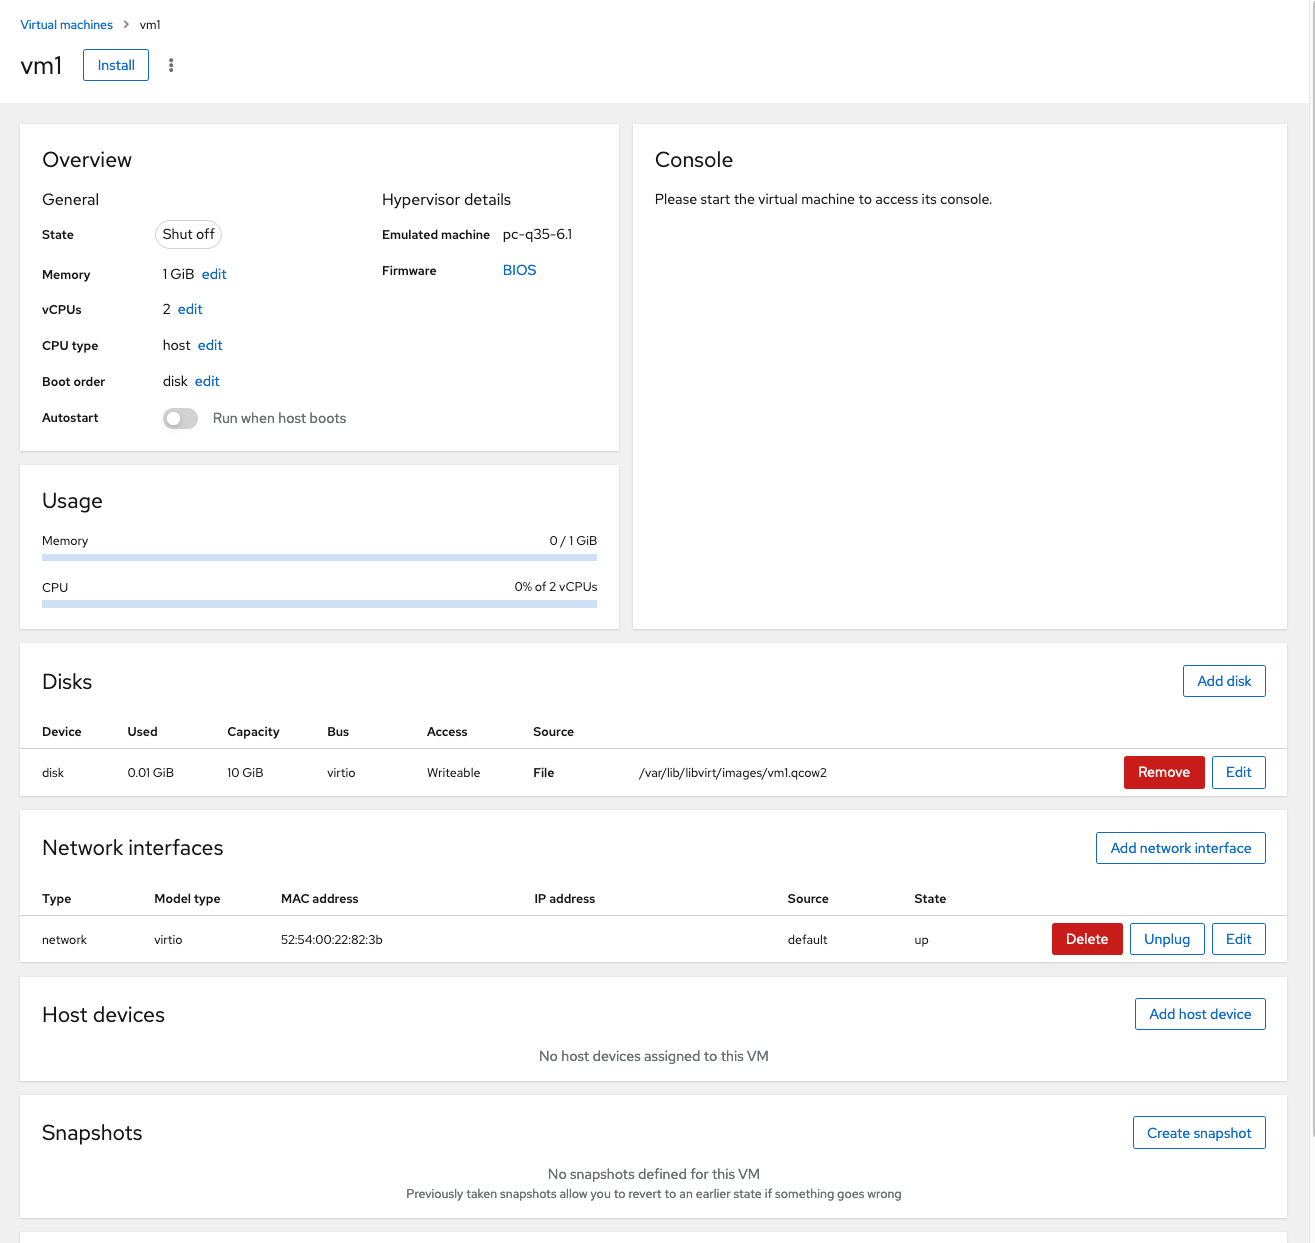
The upper part offers the opportunity to configure a number of general properties of the virtual hardware, including the size of the memory and the number of CPUs. The Autostart option defines whether the server should start the virtual machine automatically at system startup - important for reliable everyday operation.
Adjust the options according to your need.
Disks
The disk list shows that Cockpit has created a virtual disk in the pool Disk images, which resides in the ~/libvirt/images directory. The virtual machine name is used as the name of the disk image file. The file extension qcow2 indicates a dynamic image format that occupies only as much space as the available data require and grows as needed to the maximum set size. This can be seen clearly in the Used and Capacity columns.
The administrator does not need to worry about all these details. A clear benefit of Cockpit.
Network connections
The list of network interfaces shows only one interface, the internal network managed by libvirt. However, virtual machines are mostly used for tasks that require access to the public network and also require reachability from the public network. Examples are web and mail servers or other custom services. The key part is to isolate these accesses from the host server for security reasons.
So, the virtual machine must access the public interface of the host. To do this, you can either bind a virtual bridge to the interface or use Mac-vlan. The latter adds virtual interfaces to the physical interface, each with its own Mac address and its own IP (and alias IPs if needed). The libvirt toolkit refers to this as direct attachment. It is now the recommended approach. It acts similar to a bridge, but with less system load. The disadvantage is that direct communication between the host and the VMS is not possible, but between the VMs it is. Hosts and VMs can only communicate via the internal, protected network. For administrators of remote, not directly accessible servers, the additional big advantage is that after the initial configuration, there is no need to touch the precious network connection again.
An administrator who sticks to the habit that the first network adapter in the device list establishes the external connection will now edit and rearrange the existing network configuration. Select Edit to access the Configuration form.
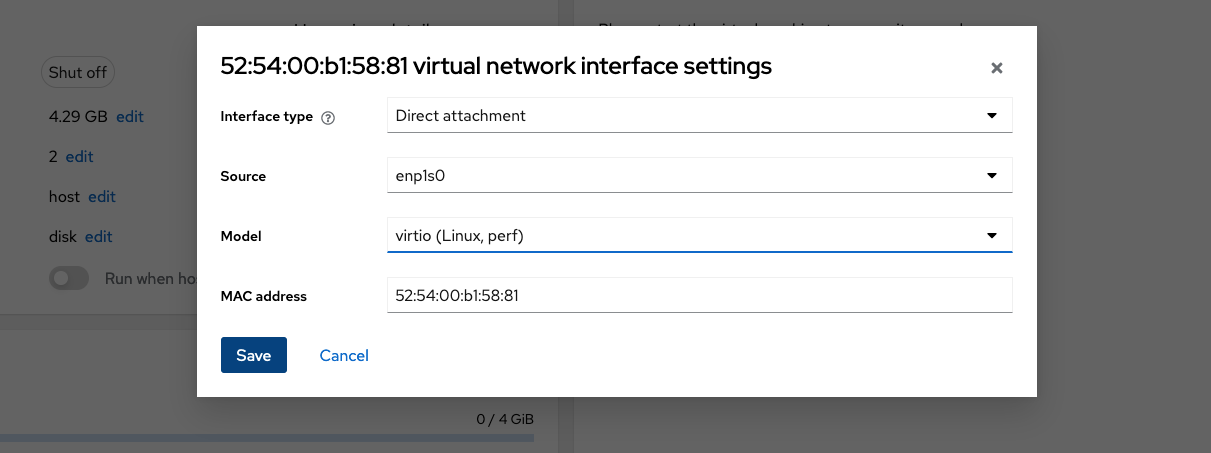
Replace the interface type by Direct attachment and select the external physical interface of the host in the Source field. Leave model and MAC address unchanged.
Next, if you also want an internal network, select Add network interface. A nearly identical form pops up. Select Interface tpye as Virtual network if it is not already preselected and default as Source. Again, leave model virtio (Linux, perf) and MAC address Generate automatically unchanged.
Now everything is ready and the installation can begin.
Interactive installation
Select Install at the top of the form. After a short time you see the well known initial screen of the install procedure.
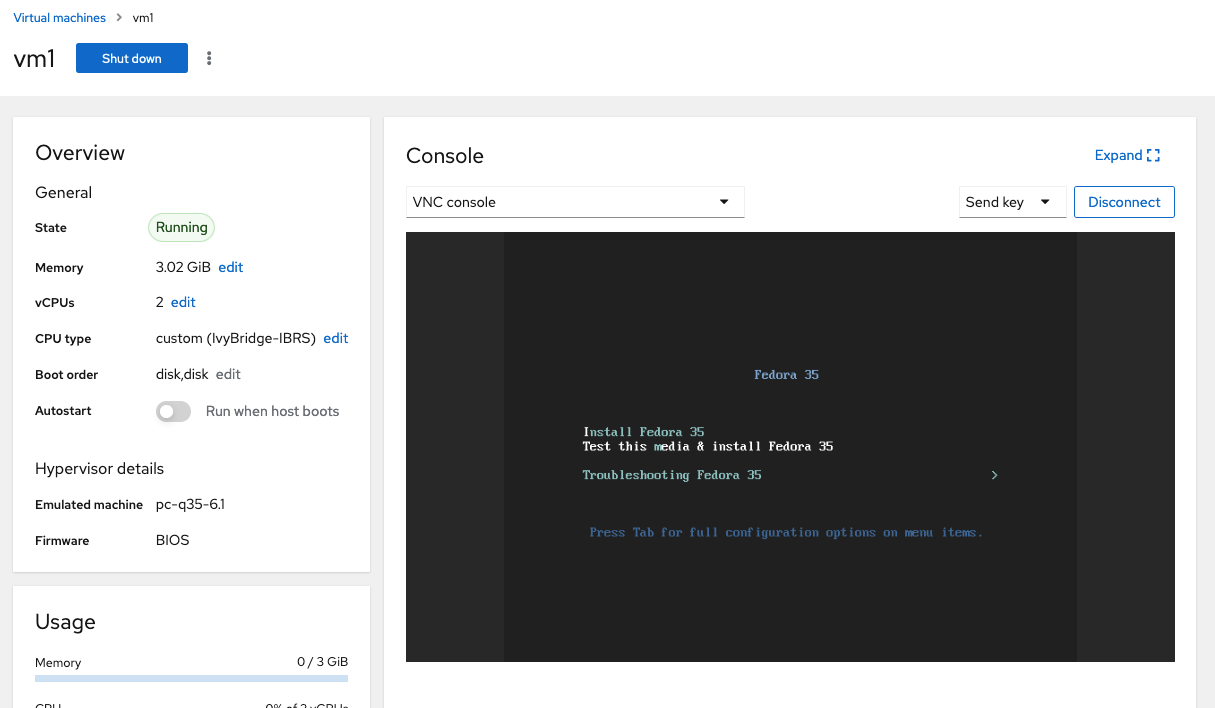
After a test of the installation media the installation program, Anaconda, shows up and displays the familiar overview screen. You may select Expand at the right top to increase readability. There is no collapse button, you have to click on the VM name in the breadcrumb displayed at the top.
Start with installation as usual. You may basically follow the Server installation guide.
The installation process will take some time.
If you want to save the disk image for future VM creation, select shutdown, copy the image to ~/libvirt/boot/, and then start the VM anew for post-installation steps. Otherwise restart according the installation program’s advise and procede with post-install.
Excursus: Save generated virual machine for later reuse
Sometimes, after selecting Shutdown the machine automatically start again. Login with your administrativ account and perform a shutdown:
sudo shutdown -h now. Then switch to a host’s terminal window and execute:[…]# qemu-img convert -O qcow2 /var/lib/libvirt/images/{VM_NAME}.qcow2 /var/lib/libvirt/boot/fedora-servervm-img.qcow2A comparison of the two image files reveals that the originally created image is about 20 GiB in size, as specified while creating the virtual machine. Thus the dynamic capabilities of the qcow2 format are not used during the installation process. The copied image is only a fraction of that. The conversion process automatically re-uses the dynamic capability and creates a sparse image by masking out unused parts (thin provisioning). The copy could be made even smaller by using the -c parameter and additionally compressing the copied image. However, this may reduce the performance somewhat. In any way, the image will grow during later reuse in the course of operation depending on actual needs.
Follow the accompanying tutorial to prepare the copied image for reuse.
Virtual machines post installation tasks
There are some post-install task that are specific for a virtual machine. Otherwise, it is the same tasks that are performed after a bare-metal installation.
Before you start the post installation tasks you may consider to 'sparsify' the image, i.d. to mask out currently unused space and convert the image to thin provisioning (and so using the dynamic capabilities of the qcow2 image format). You must use a host terminal window. Cockpit doesn’t currently support such an operation.
[…]# qemu-img convert -O qcow2 /var/lib/libvirt/images/{VM_NAME}.qcow2 /var/lib/libvirt/images/{VM_NAME}-sparse.qcow2
[…]# mv  /var/lib/libvirt/images/{VM_NAME}-sparse.qcow2  /var/lib/libvirt/images/{VM_NAME}.qcow2
If you have not already done so, start the virtual machine and log in with the administrator account. You can select expand at a top of the terminal window to increase readability. Selecting "Serial console" on the left above the terminal window instead of "VNC console" further improves readability in some cases. However, on some devices this does not work at all.
All subsequent tasks must be executed with ROOT privileges. If the root account is locked, ROOT privileges should generally be acquired for the sake of simplicity.
[…]# sudo -i
[sudo] password for <user>:
Mandatory post-installation tasks
-
Check hostname and time synchronisation
A correct hostname is specifically important for DHCP of the internal network to work properly. A correct time is important vor various tasks, sopecifically syncronization.
-
Check hostname. You need a correct static hostname.
[…]# hostnamectl-
Set hostname if required:
[…]# hostnamectl set-hostname <YourFQDN>
-
-
Check time zone, time synchronisation, time
[…]# timedatectl-
Correct time zone if necessary:
[…]# timedatectl set-timezone <ZONE> -
If necessary, activate time synchronisation:
[…]# timedatectl set-ntp true -
Correct time if necessary:
[…]# timedatectl set-time <TIME>
-
-
-
Consolidate internal network configuration
The internal network must use DHCP. Don’t change that unless you are sure, what you are doing.
Usually, it is useful to resolve a single member name to the internal network, in the example here vm1 to vm1.example.lan instead of vm1.example.com. For this purpose it is necessary to explicitly set the DNS search path of the internal interface.
-
List the interfaces and determine the name of the internal interface
[…]# nmcli con NAME UUID TYPE DEVICE enp1 47df4730-171e-3bfe-b5d9-4238137e0f70 ethernet enp1 enp2 7627fc10-f1bf-3220-99e2-3bd369837439 ethernet enp2 -
Set the DNS serach path for the internal interface
If enp2 it the internal interface, set dns search and deactivate IPv6 that is not used internally
[…]# nmcli con mod enp2  ipv4.dns-search example.lan   ipv6.method disabled
[…]# nmcli con up enp2
[…]# systemctl  restart  NetworkManager
-
-
Check name resolution
Check /etc/resolv.conf
[…]# ls -al /etc/resolv.confIf it is a file instead of a link, you have to fix it.
[…]# rm -f /etc/resolv.conf
[…]# ln -s  /run/systemd/resolve/stub-resolv.conf   /etc/resolv.conf
[…]# ls -l /etc/resolv.conf
[…]# systemctl  restart  NetworkManager
[…]# systemctl  restart  systemd-resolved
Check whether the name resolution works as desired.
[…]# host vm1.example.com […]# host vm1.example.lan […]# host vm1 -
Adjust firewall setting of the internal interface
The installer assigns all interfaces to the FedoraServer zone, which limits access to ssh (and Cockpit). For the internal, protected network a broader accessibility may be appropriate, depending on the use case. If appropriate, modify the configuration (check alternative zone and select a suitable one).
[…]# firewall-cmd --get-active-zones […]# firewall-cmd --permanent --zone=trusted --change-interface=<internalIF> […]# firewall-cmd --reload […]# firewall-cmd --get-active-zones -
Increase security of Cockpit access
Refer to the corresponding section in the post-installation guide to find options to enhance security of Cockpit access.
Optional post-installation tasks
-
Making vim the default editor
If you are a somewhat experienced administrator, you are probably annoyed that Namo, default editor since Fedora 34, always pops up when you want to edit crontab or similar. It is therefore worth reconfiguring right from the start.
[…]# dnf install --allowerasing vim-default-editor -
Reconfiguring the external interface as static
Many administrators prefer to configure the external interface statically to ensure connectivity even if the DHCP server fails or is corrupted. Adjust the following example as needed.
[…]# nmcli con mod <IF_NAME> ipv4.method static \clear
     ipv4.address "xxx.xxx.xxx.xxx/yy" \
     ipv4.gateway "xxx.xxx.xxx.zzz" \
     ipv4.dns "xxx.xxx.xxx.vvv" \
     ipv6.method manual \
     ipv6.addresses xxxx:xxxx:xxxx:xxxx::yyyy/64 \
     ipv6.gateway xxxx:xxxx:xxxx:xxxx::zz \
     ipv6.dns "xxxx.xxxx.xxxx.xxxx::vvv"  \
     connection.zone "FedoraServer"
Ensure, parameter search-domain is empty!
-
Remove unnecessary hardware packages
[…]# dnf remove iwl* linux-firmware* zd1211-firmware* ipw* atmel* alsa-sof-firmware*
It is also advisable to review all the tasks in the general post-installation guide for virtual machines as well.
Want to help? Learn how to contribute to Fedora Docs ›