Instalasi Menggunakan Anaconda
Bab ini memberikan petunjuk langkah demi langkah untuk menginstal Fedora menggunakan penginstal Anaconda. Sebagian besar bab ini menjelaskan instalasi menggunakan antarmuka pengguna grafis. Mode teks juga tersedia untuk sistem tanpa tampilan grafis, tetapi mode ini terbatas pada aspek tertentu (misalnya, partisi kustom tidak mungkin dalam mode teks).
Jika sistem Anda tidak memiliki kemampuan untuk menggunakan mode grafis, Anda dapat:
-
Menggunakan Kickstart untuk mengotomatisasi instalasi seperti yang dijelaskan dalam Mengotomatisasi Instalasi dengan Kickstart
-
Melakukan instalasi grafis dari jarak jauh dengan menghubungkan ke sistem instalasi dari komputer lain dengan tampilan grafis menggunakan protokol VNC (Virtual Network Computing) - Lihat Instalasi Menggunakan VNC
Pengantar Anaconda
Installer Fedora, Anaconda, berbeda dari kebanyakan program instalasi sistem operasi lain karena sifatnya yang paralel. Kebanyakan installer mengikuti jalur tetap: Anda harus memilih bahasa Anda terlebih dahulu, kemudian Anda mengkonfigurasi jaringan, kemudian jenis instalasi, kemudian partisi, dll. Biasanya hanya ada satu cara untuk melanjutkan pada waktu tertentu.
Dalam Anaconda Anda pertama hanya diminta untuk memilih bahasa dan lokal, dan kemudian Anda disajikan dengan layar utama, di mana Anda dapat mengkonfigurasi sebagian besar aspek instalasi dalam urutan apapun yang Anda suka. Hal ini tidak berlaku untuk semua bagian dari proses instalasi, namun - misalnya, ketika menginstal dari lokasi jaringan, Anda harus mengkonfigurasi jaringan sebelum Anda dapat memilih paket untuk menginstal.
Some screens will be automatically configured depending on your hardware and the type of media you used to start the installation. You can still change the detected settings in any screen. Screens which have not been automatically configured, and therefore require your attention before you begin the installation, are marked by an exclamation mark. You can not start the actual installation process before you finish configuring these settings.
Perbedaan tambahan muncul di layar tertentu; terutama proses partisi kustom sangat berbeda dari distribusi Linux lainnya. Perbedaan ini dijelaskan dalam sub bagian layar.
Konsol dan Pencatatan Log selama Instalasi
Bagian berikut ini menjelaskan cara mengakses log dan shell interaktif selama instalasi. Hal ini berguna ketika memecahkan masalah, tetapi seharusnya tidak diperlukan dalam banyak kasus.
Mengakses Konsol
Installer Fedora menggunakan multiplekser terminal tmux untuk menampilkan dan mengontrol beberapa jendela yang dapat Anda gunakan selain antarmuka utama. Setiap jendela ini melayani tujuan yang berbeda - mereka menampilkan beberapa log yang berbeda, yang dapat digunakan untuk memecahkan masalah apapun selama instalasi, dan salah satu jendela menyediakan prompt shell interaktif dengan hak root, kecuali prompt ini secara khusus dinonaktifkan dengan menggunakan suatu opsi boot atau suatu perintah Kickstart.
|
Secara umum, tidak ada alasan untuk meninggalkan lingkungan instalasi grafis default kecuali jika Anda perlu untuk mendiagnosa masalah instalasi. |
Multiplekser terminal berjalan di konsol virtual 1. Untuk beralih dari lingkungan instalasi aktual ke tmux, tekan Ctrl+Alt+F1. Untuk kembali ke antarmuka instalasi utama yang berjalan di konsol virtual 6, tekan Ctrl+Alt+F6.
|
Jika Anda memilih instalasi mode teks, Anda akan mulai di konsol virtual 1 (tmux), dan beralih ke konsol 6 akan membuka prompt shell bukan antarmuka grafis. |
Konsol yang menjalankan tmux memiliki 5 jendela yang tersedia; isinya dijelaskan dalam tabel di bawah ini, bersama dengan pintasan papan tik yang digunakan untuk mengaksesnya. Perhatikan bahwa pintasan papan tik punya dua bagian: pertama tekan Ctrl+b, kemudian lepaskan kedua tombol, dan tekan tombol angka untuk jendela yang ingin Anda gunakan.
Anda juga dapat menggunakan Ctrl+b n dan Ctrl+b p untuk beralih ke jendela tmux berikutnya atau sebelumnya.
| Pintasan | Isi |
|---|---|
Ctrl+b 1 |
Jendela program instalasi utama. Berisi prompt berbasis teks (selama instalasi mode teks atau jika Anda menggunakan mode langsung VNC), dan juga beberapa informasi debug. |
Ctrl+b 2 |
Prompt shell interaktif dengan hak |
Ctrl+b 3 |
Log instalasi; menampilkan pesan yang disimpan di |
Ctrl+b 4 |
Log penyimpanan; menampilkan pesan yang terkait perangkat penyimpanan dari kernel dan layanan sistem, disimpan dalam |
Ctrl+b 5 |
Log program; menampilkan pesan dari utilitas sistem lain, disimpan dalam |
Selain menampilkan informasi diagnostik dalam jendela tmux, Anaconda juga menghasilkan beberapa berkas log, yang dapat ditransfer dari sistem instalasi. Berkas log ini dijelaskan dalam Berkas Log yang Dihasilkan Selama Instalasi, dan arahan untuk mentransfer mereka dari sistem instalasi tersedia di Mentransfer Berkas Log dari Sistem Instalasi.
Menyimpan Tangkapan Layar
Anda dapat menekan Shift+Print Screen setiap saat selama instalasi grafis untuk menangkap layar saat ini. Tangkapan layar ini disimpan ke /tmp/anaconda-screenshots.
Selain itu, Anda dapat menggunakan perintah autostep --autoscreenshot di berkas Kickstart untuk menangkap dan menyimpan setiap langkah instalasi secara otomatis. Lihat autostep (opsional) - Pergi Melalui Setiap Layar untuk rincian.
Instalasi dalam Mode Teks
Instalasi mode teks menawarkan antarmuka interaktif dan non-grafis untuk memasang Fedora. Ini mungkin berguna pada sistem tanpa kemampuan grafis; namun Anda harus selalu mempertimbangkan alternatif yang tersedia sebelum memulai instalasi berbasis teks. Mode teks terbatas dalam banyaknya pilihan yang dapat Anda buat selama instalasi.
There are two alternatives to text mode which can both be used even if the installation system does not have a graphical display. You can either connect to the installation system using VNC and perform an interactive graphical installation remotely (see Installing Using VNC), or you can create a Kickstart file to perform the installation automatically (see Automating the Installation with Kickstart).
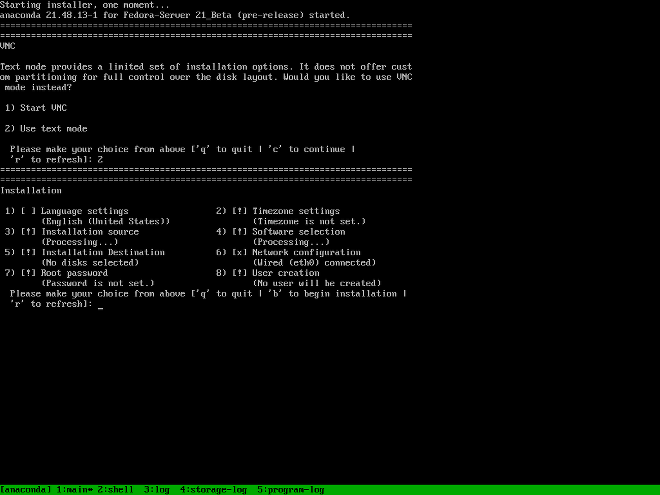
Installation in text mode follows a pattern similar to the graphical installation: There is no single fixed progression; you can configure many settings in any order you want using the main status screen. Screens which have already been configured, either automatically or by you, are marked as [x], and screens which require your attention before the installation can begin are marked with [!]. Available commands are displayed below the list of available options.
Limits of interactive text mode installation include:
-
The installer will always use the English language and the US English keyboard layout. You can configure your language and keyboard settings, but these settings will only apply to the installed system, not to the installation.
-
You can not configure any advanced storage methods (LVM, software RAID, FCoE, zFCP and iSCSI).
-
It is not possible to configure custom partitioning; you must use one of the automatic partitioning settings. You also cannot configure where the boot loader will be installed.
Untuk memulai instalasi mode teks, boot instalasi dengan opsi boot inst.text yang digunakan baik pada baris perintah boot di menu boot, atau dalam konfigurasi server PXE Anda. Lihat Mem-boot Instalasi untuk informasi tentang booting dan menggunakan opsi boot.
Installing in the Graphical User Interface
The graphical installation interface is the preferred method of manually installing Fedora. It allows you full control over all available settings, including custom partitioning and advanced storage configuration, and it is also localized to many languages other than English, allowing you to perform the entire installation in a different language. The graphical mode is used by default when you boot the system from local media (a CD, DVD or a USB flash drive).
The sections below discuss each screen available in the installation process. Note that due to the installer’s parallel nature, most of the screens do not have to be completed in the order in which they are described here.
Each screen in the graphical interface contains a Help button. This button opens the Yelp help browser displaying the section of the Fedora Installation Guide relevant to the current screen.
You can also control the graphical installer with your keyboard. Use Tab and Shift+Tab to cycle through active control elements (buttons, check boxes, etc.) on the current screen, Up and Down arrow keys to scroll through lists, and Left and Right to scroll through horizontal toolbars or table entries. Space or Enter can be used to select or remove a highlighted item from selection and to expand and collapse drop-down menus.
Additionally, elements in each screen can be toggled using their respective shortcuts. These shortcuts are highlighted (underlined) when you hold down the Alt key; to toggle that element, press Alt+X, where X is the highlighted letter.
Your current keyboard layout is displayed in the top right hand corner. Only one layout is configured by default; if you configure more than layout in the Keyboard Layout screen (Keyboard Layout), you can switch between them by clicking the layout indicator.
Layar Selamat Datang dan Pemilihan Bahasa
Layar pertama yang ditampilkan seketika setelah installer grafis dimulai adalah layar Selamat Datang.
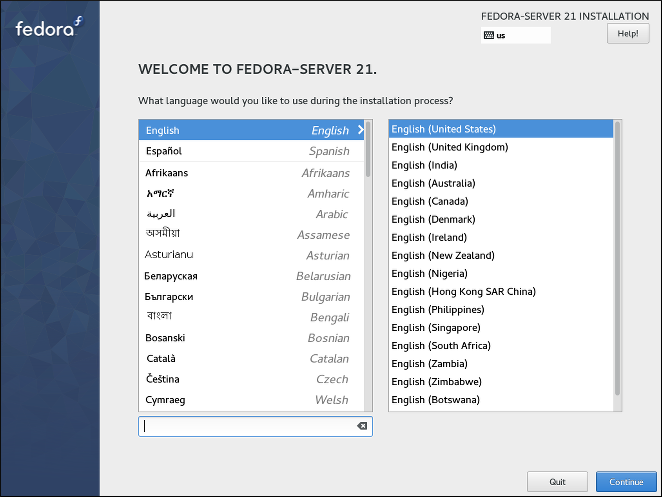
Pertama, pilih bahasa yang Anda sukai di kolom sisi kiri, lalu pilih lokal dari kolom sebelah kanan. Anda dapat memakai ruas masukan teks di pojok kiri bawah untuk mencari bahasa Anda daripada memeriksa daftar lengkap yang berisi lebih dari 70 bahasa.
Bahasa yang Anda pilih pada layar ini akan dipakai selama instalasi, and itu juga akan dipakai pada sistem terpasang secara baku. Anda dapat mengubah bahasa untuk sistem yang dipasang nanti, tapi sekali Anda mengklik Lanjutkan pada layar ini, Anda tidak akan bisa kembali dan mengubah bahasa yang dipakai dalam installer itu sendiri.
Satu bahasa diprapilih secara baku pada puncak daftar. Bila akses jaringan dikonfigurasi pada titik ini (sebagai contoh, Anda mem-boot dari suatu server jaringan bukan dari media lokal), bahasa yang diprapilih akan ditentukan berbasis pada deteksi lokasi otomatis memakai modul GeoIP. Sebagai alternatif, bila Anda memakai opsi inst.lang= pada baris perintah boot atau dalam konfigurasi server PXE Anda, bahasa ini akan dipilih secara baku, tapi Anda masih dapat mengubahnya.
After you select your language and locale, click Continue to confirm your selection and proceed to Installation Summary.
|
Bila Anda memasang suatu versi prarilis Fedora, sebuah pesan akan ditampilkan setelah Anda mengklik |
Installation Summary
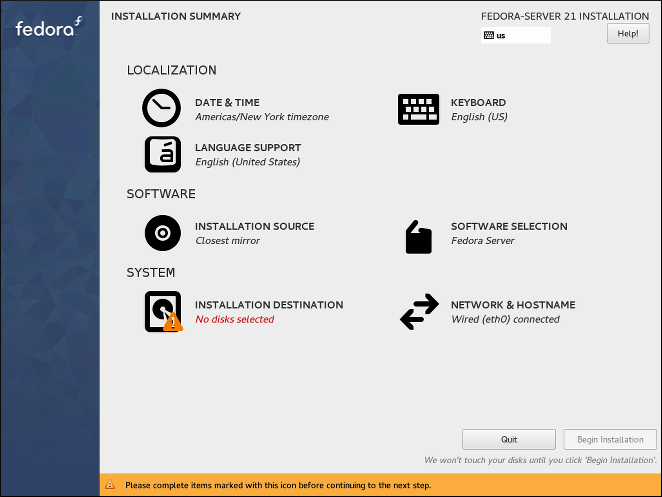
The Installation Summary screen is the central location for setting up an installation. Most of the options which can be configured during the installation can be accessed from here.
|
If you used a Kickstart option or a boot option to specify an installation repository on a network, but no network is available at the start of the installation, the installer will display the |
The summary screen consists of several links to other screens, separated into categories. These links can be in several different states, which are graphically indicated:
-
A warning symbol (yellow triangle with an exclamation mark) next to an icon means that a screen requires your attention before you start the installation. This typically happens with the
Installation Destinationscreen, because even though there is a default automatic partitioning variant, you always have to at least confirm this selection, even if you do not want to make any changes. -
If a link is greyed out, it means that the installer is currently configuring this section, and you must wait for the configuration to finish before accessing that screen. This typically happens when you change the installation source in the
Installation Sourcescreen and the installer is probing the new source location and gathering a list of available packages. -
Screens with black text and no warning symbol mean that this screen does not require your attention. You can still change your settings in these screens, but it is not necessary to do so to complete the installation. This typically happens with localization settings, as these are either detected automatically, or set up on the previous screen where you select your language and locale.
A warning message is displayed at the bottom of the summary screen, and the Begin Installation button is greyed out, as long as at least one item has not been configured yet.

Each screen also has an explanatory text below its title, showing settings currently configured in that screen. This text may be concatenated; in that case, move your mouse cursor over it and wait until a tooltip with the full text appears.

Once you configure everything required for the installation, you can press the Begin Installation button to start installing Fedora. This will take you to Configuration and Installation Progress. Note that as the text below this button says, nothing will be written to your hard drive before you press this button. You can press Quit at any point; this will discard all changes you made in the installer so far and reboot the system.
Tanggal & Waktu
The Date & Time screen allows you to configure time and date-related settings for your system. This screen is automatically configured based on the settings you selected in Welcome Screen and Language Selection, but you can change your date, time and location settings before you begin the installation.
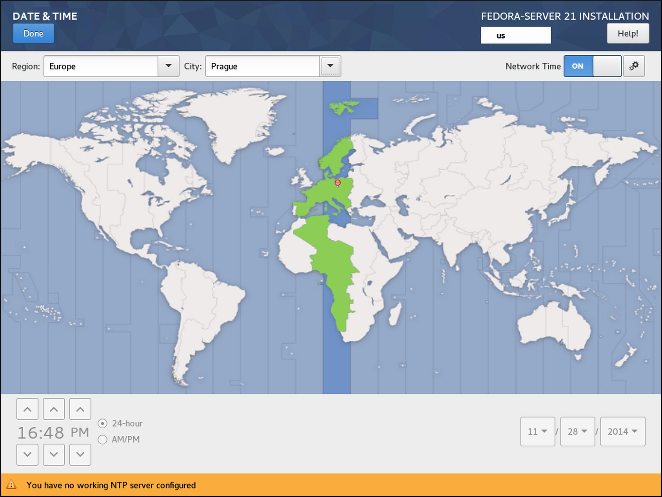
Pertama, pilih Wilayah Anda memakai menu drop down di pojok kiri atas layar. Kemudian, pilih Kota Anda, atau kota terdekat ke lokasi Anda di zona waktu yang sama. Memilih suatu lokasi spesifik membantu {PRODUCTS} memastikan bahwa waktu Anda selalu ditata dengan benar termasuk perubahan waktu otomatis untuk daylight savings time bila berlaku.
Anda juga dapat memilih suatu zona waktu relatif to Greenwich Mean Time (GMT) tanpa menata lokasi Anda ke suatu wilayah spesifik. Untuk melakukan itu, pilih Etc sebagai wilayah Anda.
|
The list of cities and regions comes from the Time Zone Database (tzdata) public domain, which is maintained by the Internet Assigned Numbers Authority (IANA). The Fedora Project can not add cities or regions into this database. You can find more information at the IANA official website. |
Saklar berlabel Waktu Jaringan di pojok kanan atas layar dapat dipakai untuk memfungsikan atau menonaktifkan sinkronisasi waktu memakai Network Time Protocol (NTP). Memfungsikan opsi ini akan menjaga waktu sistem Anda benar selama sistem dapat mengakses internet. Secara baku, empat pool NTP dikonfigurasi; Anda dapat menambahkan yang lain dan menonaktifkan atau menghapus yang baku dengan mengklik tombol roda gerigi di sebelah saklar.
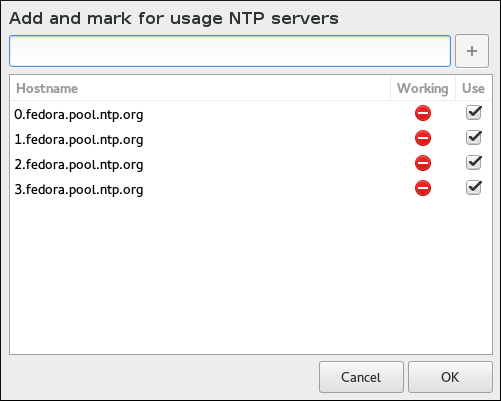
Bila Anda menonaktifkan sinkronisasi waktu jaringan, kendali di dasar layar akan menjadi aktif, dan Anda akan dapat menata waktu dan tanggal saat ini secara manual.
After configuring your time and date settings, press the Done button in the top left corner to return to Installation Summary.
Keyboard Layout
The Keyboard Layout screen allows you to set up one or more keyboard layouts for your system and a way to switch between them. One keyboard layout is configured automatically based on your selection in Welcome Screen and Language Selection, but you can change this layout and add additional ones before you begin the installation.
Keyboard layouts are a separate setting from system languages, and these two settings can be mixed as you see fit.
|
All settings configured in this screen will be available on the installed system, and they will also become immediately available inside the installer. You can use the keyboard icon in the top right corner of any screen, or the keyboard switch you configured in this screen, to cycle between your configured layouts. |
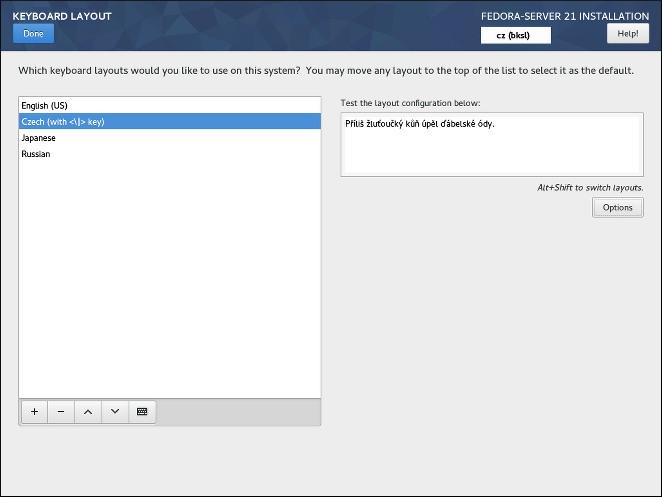
The left half of the screen contains a window listing all currently configured layouts. The order in which the layouts are displayed is important - the same order will be used when switching between layouts, and the first listed layout will be the default on your system.
The text field on the right side of the screen can be used to test the currently selected layout.
You can click a layout in the list to highlight it. At the bottom of the list, there is a set of buttons:
-
The
+button adds a new layout. When you press this button, a new window opens with a list of all available layouts, grouped by language. You can find a layout by browsing the list, or you can use the search bar at the bottom of this window. When you find the layout you want to add, highlight it and pressAdd. -
The
-button removes the currently highlighted layout. -
The up and down buttons can be used to move the highlighted layout up or down in the list.
-
The keyboard button opens a new window which offers a visual representation of the highlighted layout.
|
If you use a layout that cannot accept Latin characters, such as |
You can also optionally configure a keyboard switch which can be used to cycle between available layouts. To do so, click the Options button on the right side of the screen. The Layout Switching Options dialog will open, allowing you to configure one or more keys or key combinations for switching. Select one or more key combinations using the check boxes next to them, and click OK to confirm your selection.
After you finish configuring keyboard layouts and switches, click Done in the top left corner to return to Installation Summary.
Language Support
The Language Support screen allows you to configure language settings for your system. The default language is determined by your selection in Welcome Screen and Language Selection and support for this language can not be removed. You can only add additional languages, which will be available on the installed system - not during the installation.
If you want to change the default language, or the language used during the installation, you must reboot your system, start the installer again, and select a different language in Welcome Screen and Language Selection.
|
Adding support for another language does not automatically configure the corresponding keyboard layout. Layouts are a separate setting configured in Keyboard Layout. |
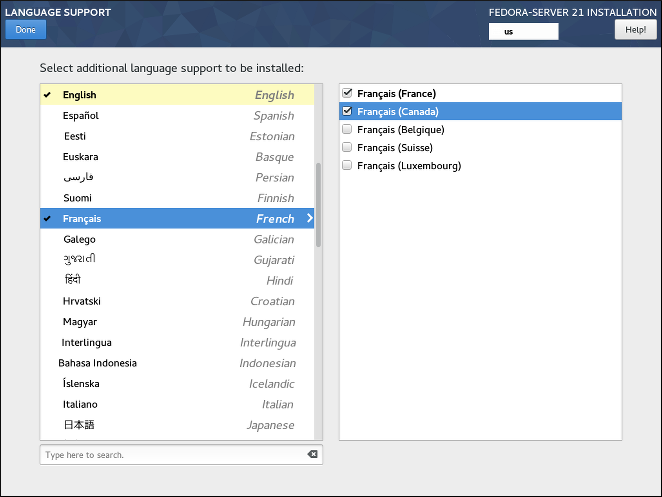
The left panel contains a list of available language groups such as English or Bulgarian. If at least one language from a group is selected, a check mark will be displayed next to the group, and the list entry will be highlighted. This allows you to easily see which languages you have configured support for.
To add support for one or more additional languages, click a group in the left panel, and then select one or more regional variations in the right panel using check boxes next to list entries. Repeat this process for all languages you want to install support for.
|
Enabling support for some languages (typically languages which use non-Latin script) will install additional packages - for example, enabling support for one or more languages from the |
Once you have made your selections, click Done in the top left corner to return to Installation Summary.
Installation Source
The Installation Source screen allows you to specify a location (local or on the network) from which packages will be downloaded and installed on your system. This screen will be configured automatically in most cases, but you can change your settings or add additional sources.
|
Normally, when you first enter the |
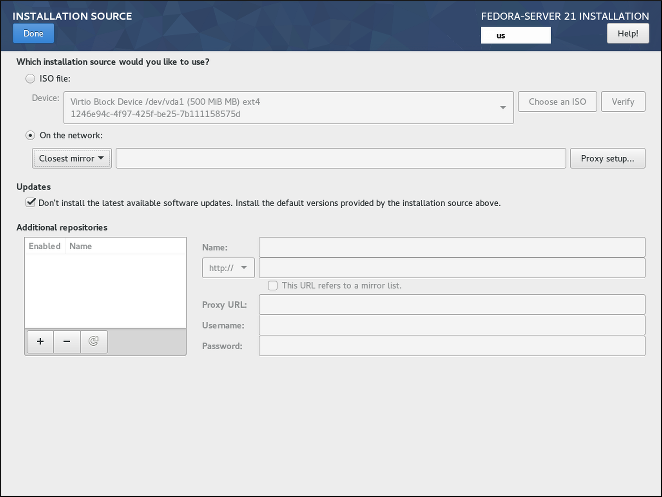
The following options are available. Note that not all of them may be displayed.
- Auto-detected installation media
-
This is the option selected by default if you started the installer from media containing an installation source, such as a live DVD. No additional configuration is necessary. You can click the
Verifybutton check the media integrity. - ISO file
-
This option will appear if the installation program detected a partitioned hard drive with mountable file systems during boot. Select this option, click the Choose an ISO button, and browse to the installation ISO file’s location on your system. You can click the
Verifybutton to check the file’s integrity. - On the network
-
Use this option to download packages to be installed from a network location instead of local media. This is the default selection on network installation media.
In most cases, the
Closest mirroroption available from the protocol selection drop-down menu is preferable. If this option is selected, packages for your system will be downloaded from the most suitable location (mirror).To manually configure a network-based installation source, use the drop-down menu to specify the protocol to be used when downloading packages. This setting depends on the server you want to use. Then, type the server address (without the protocol) into the address field. If you choose NFS, a second input field will appear where you can specify custom
NFS mount options.When selecting an NFS installation source, you must specify the address with a colon (
:) character separating the host name from the path. For example:server.example.com:/path/to/directoryTo configure a proxy for an HTTP or HTTPS source, click the Proxy setup button. Check
Enable HTTP proxyand type the URL into theProxy URLbox. If the proxy server requires authentication, checkUse Authenticationand enter your user name and password. Click OK to finish the configuration.If your HTTP or HTTPS URL refers to a repository mirror list, mark the check box under the address field.
You can also specify additional repositories in the Additional repositories section to gain access to more installation environments and software add-ons. All environments and add-ons will be available for selection in Software Selection once you finish configuring the sources.
To add a repository, click the + button. To delete a repository, select one in the list and click the - button. Click the arrow icon to revert to the previous list of repositories, i.e. to replace current entries with those that were present at the time you entered the Installation Source screen. To activate or deactivate a repository, click the check box in the Enabled column at each entry in the list.
You can name your additional repository and configure it the same way as the primary repository on the network using the input fields on the right side of the section.
Once you have selected your installation source, click Done in the top left corner to return to Installation Summary.
Software Selection
The Software Selection screen allows you to choose a Base Environment and Add-ons. These options control which software packages will be installed on your system during the installation process.
This screen is only available if Installation Source is properly configured and only after the installer has downloaded package metadata from the source.
|
It is not possible to select specific packages during a manual installation. You can only select pre-defined environments and add-ons. If you need to control exactly which packages are installed, you must use a Kickstart file and define the packages in the %packages section. See Automating the Installation with Kickstart for information about Kickstart installations. |
The availability of environments and add-ons depends on your installation source. By default, the selection depends on the installation media you used to start the installation; Fedora Server installation image will have different environments and add-ons available for selection than, for example, the Fedora Cloud image. You can change this by configuring a different installation source containing different environments.
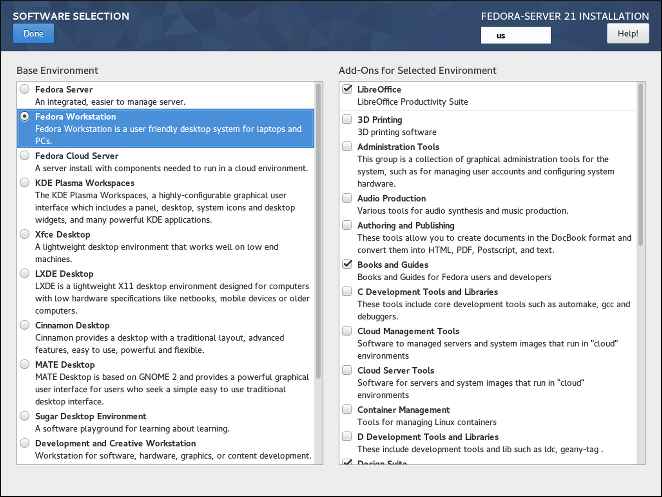
To configure your software selection, first choose an environment on the left side of the screen. Only one environment can be chosen, even if more are available. Then, on the right side of the screen, select one or more add-ons which you want to install by marking the check boxes next to each add-on.
The list of add-ons is divided into two parts by a horizontal line. Add-ons above this line are defined as part of your chosen environment; if you select a different environment, the add-ons available here will change. The add-ons displayed below the separator are not specific to your chosen environment.
Environments and add-ons are defined using a comps.xml file in your installation source (for example, in the repodata/ directory on the full Fedora Server installation DVD). Review this file to see exactly which packages will be installed as part of a certain environment or add-on. For more information about the comps.xml file, see %packages (required) - Package Selection.
After you finish configuring your software selection, click Done in the top left corner to return to Installation Summary.
Installation Destination
The Installation Destination screen allows you to configure storage options - namely, which disks will be used as the installation target for your Fedora installation. At least one disk must always be selected for the installation to proceed.
For information about the theory and concepts behind disk partitioning in Linux, see Recommended Partitioning Scheme.
|
If you plan to use a disk which already contains some data - for example, if you want to shrink an existing Microsoft Windows partition and install Fedora as a second system or if you are upgrading a previous release of Fedora, make sure to back up any important data first. Manipulating partitions always carries a risk - if the process is interrupted or fails for any reason (installer error, hardware failure, power outage, etc.), any data already on the disk may become impossible to recover. |
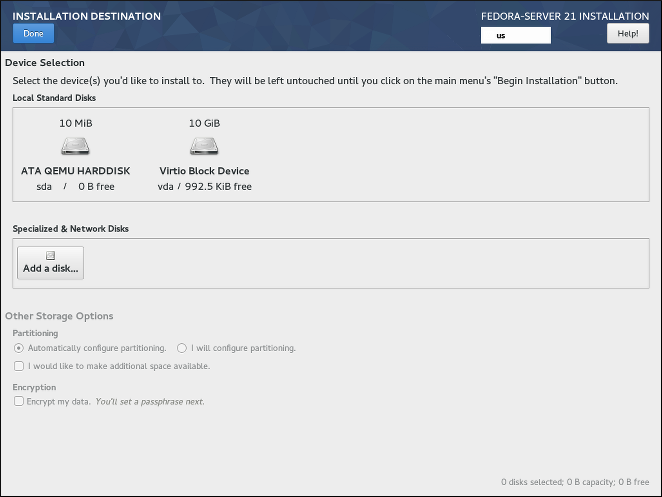
In the top part of the screen, all locally available storage devices (SATA, IDE and SCSI hard drives, USB flash drives, etc.) are displayed in the Local Standard Disks section. Local disks are detected when the installer starts - any storage devices connected after the installation has started will not be shown.
If you need to configure additional local storage devices, select I will configure partitioning and press Done to move to Manual Partitioning. Then, connect any new hard drives you want to make available during the installation, and press the button marked by a circular arrow in the set of controls below the list of mount points on the left side of the screen. In the dialog window that opens, press Rescan Disks and wait until the scanning process completes. Then, press OK to return to Installation Destination; all detected disks including any new ones will be displayed in the Local Standard Disks section.
The Specialized & Network Disks section below shows advanced network storage (such as iSCSI and FCoE disks) currently configured. When you first open this screen, no such devices will be displayed because they can not be automatically detected; to search for network storage devices, press Add a disk button and proceed with Installation Destination - Specialized & Network Disks. Any network storage you configure will then show up in the Specialized & Network Disks the same way local disks are shown above.
All storage devices which will be used to install Fedora have a black circle icon with a white check mark on them. Disks not marked by this icon will not be used during the installation - they will be ignored if you choose automatic partitioning, and they will not be available in manual partitioning.
|
USB storage devices such as flash drives and external disks will be shown in the |

After you select all disks you want to install Fedora, select one of the two options in the Other Storage Options section:
-
Automatically configure partitioning- If this option is selected, then after you pressDonein the top left corner of the screen, the installer will determine the total amount of space on all selected disks, and it will create a Logical Volume Management (LVM) layout suitable for your system. The specifics of this layout depend on whether your system uses BIOS or UEFI firmware, the total amount of free space on your disks, and the amount of RAM on your system (which determines the size of your swap space).With automatic partitioning, you can also select the
I would like to make additional space availableoption below. Use this option if you want to reclaim space from an existing partitioning layout - for example, if a disk you want to use already contains a different operating system, and you want to make this system’s partitions smaller to allow more room for Fedora. TheReclaim spacedialog which opens if this option is selected is described later in this section. -
I will configure partitioning- Select this option and pressDonein the top left corner of the screen to configure your system’s partitioning layout manually. This requires some knowledge of the theory behind disk partitions and related concepts, but gives you full control over the way the system will be installed. For instructions for manual partitioning, see Manual Partitioning.
Additionally, you can select Encrypt my data; this will encrypt all partitions except the ones needed to boot the system (such as /boot) using Linux Unified Key Setup (LUKS). Encrypting your hard drive is recommended. For detailed information about LUKS encryption, see the Fedora Security Guide, available at https://docs.fedoraproject.org/.
|
If you lose the LUKS passphrase, any encrypted partitions and the data on them will become completely inaccessible. There is no way to recover a lost passphrase. However, if you perform a Kickstart installation, you can save encryption passphrases and create backup encryption passphrases during the installation. See Automating the Installation with Kickstart for information about Kickstart installations. |
To control which one of your selected storage devices will contain the boot loader, click the Full disk summary and bootloader link in the bottom left corner of the screen, and follow the instructions in Boot Loader Installation. Note that while in most cases it is sufficient to leave the boot loader in the default location, some configurations (for example, systems which require chain loading from another boot loader) will require the boot drive to be specified manually.
After you select storage devices, choose between automatic and manual partitioning, configure encryption and boot loader location, press Done in the top left corner of the screen. Then, depending on your settings, the following will happen:
-
If you chose to encrypt your hard drive, the
Disk Encryption Passphrasedialog will appear. Enter your chosen passphrase into thePassphraseandConfirmfields. When you do so, the passphrase will be automatically evaluated and its strength will be displayed, along with suggestions on how to make it stronger if the installer has determined it to be weak. For information about creating strong passwords, see Fedora Security Guide. -
If you selected automatic partitioning and the
I would like to make additional space available, or if there is not enough free space on your selected hard drives to install Fedora, theReclaim Spacedialog will appear. This dialog lists all disk devices you have configured and all partitions on those devices. The bottom right corner of the dialog displays information about how much space the system needs for at least a minimal installation and how much space you have reclaimed.If you use the
Reclaim Spacedialog to delete a partition, all data on that partition will be lost. If you want to preserve your data, use theShrinkoption, not theDeleteoption.First, review the displayed list of available storage devices. The
Reclaimable Spacecolumn shows how much space can be reclaimed from each entry. To reclaim space, select a disk or partition, and press either theDeletebutton to delete that partition (or all partitions on a selected disk), orShrinkto use free space on a partition while preserving existing data. Alternatively, you can pressDelete allin the bottom right corner; this will delete all existing partitions on all disks and make this space available to Fedora, but all existing data on all disks will be lost.After you free enough space for your Fedora installation, press
Reclaim spaceto finish.No changes to any disks will be made until you press
Begin Installationin Installation Summary. TheReclaim Spacedialog only marks partitions for resizing or deletion, but no such action is performed immediately. -
If you selected the
I will configure partitioningoption, pressingDonewill open theManual Partitioningscreen. See Manual Partitioning for further instructions.
Boot Loader Installation
Fedora uses GRUB2 (GRand Unified Bootloader version 2) as its boot loader. The boot loader is the first program that runs when the computer starts and is responsible for loading and transferring control to an operating system. GRUB2 can boot any compatible operating system (including Microsoft Windows) and can also use chain loading to transfer control to other boot loaders for unsupported operating systems.
|
Installing GRUB2 may overwrite your existing boot loader. |
If you have other operating systems already installed, the Fedora installer will attempt to automatically detect and configure the boot loader to start them. You can manually configure any additional operating systems after you finish the installation, if they are not detected properly. For instructions on editing GRUB2 configuration, see the Fedora System Administrator’s Guide, available at https://docs.fedoraproject.org/
If you are installing Fedora system with more than one disk, you may want to manually specify where the bootloader should be installed. Click the Full disk summary and bootloader link at the bottom of the Installation Destination screen. The Selected Disks dialog will appear. The bootloader will be installed on the device of your choice, or on a UEFI system, the EFI system partition will be created on that device during guided partitioning.
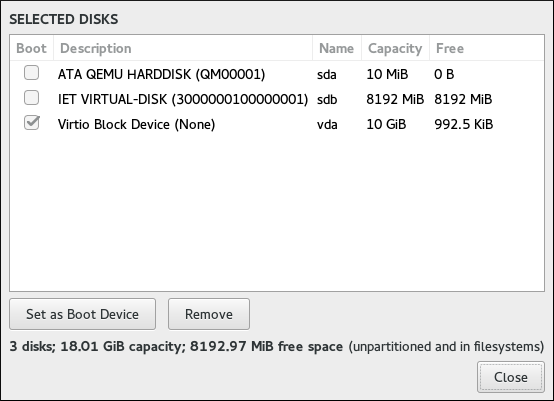
In the Boot column, a "tick" icon marks one of the devices as the intended boot device. To change the boot device, select a device from the list and click the Set as Boot Device button to install the boot loader there instead. Only one device can be set as the boot device.
To decline installation of a new boot loader, select the device currently marked for boot and click the Do not install bootloader button. This will remove the tick and ensure GRUB2 is not installed on any device.
|
If you choose not to install a boot loader for any reason, you will not be able to boot the system directly, and you must use another boot method, such as a stand-alone commercial boot loader application. Use this option only if you are sure you have another way to boot your system. |
The boot loader may also require a special partition to be created, depending on whether your system uses BIOS or UEFI firmware and also depending on whether the boot drive has a GUID Partition Table (GPT) or a Master Boot Record (MBR, also known as msdos) label. If you use automatic partitioning, the installer will create this partition if needed. For details, see Recommended Partitioning Scheme.
Installation Destination - Specialized & Network Disks
This part of the Installation Destination screen allows you to configure non-local storage devices, namely iSCSI and FCoE storage. This section will mostly be useful to advanced users who have a need for networked disks. For instructions on setting up local hard drives, see Installation Destination.
|
This section only explains how to make existing network disks available inside the installer. It does not explain how to set up your network or a storage server, only how to connect to them. |
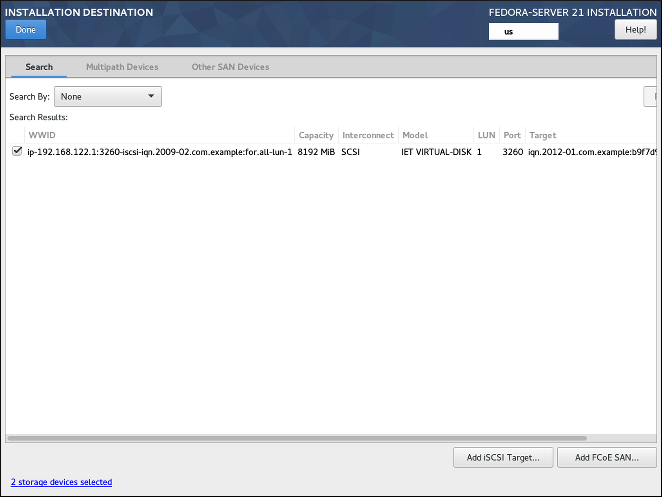
The screen contains a list of all currently available (discovered) network storage devices. When the screen is opened for the first time, the list will be empty in most cases because no network storage has been discovered - the installer makes no attempt at discovering this unless you configure network disks using a Kickstart file.
To add one or more storage devices to the screen so you can search them and use them in the installation, click Add iSCSI Target or Add FCoE SAN in the bottom right corner of the screen, and follow the instructions in Add iSCSI Target or Add FCoE SAN, depending on which type of network storage you want to add.
Network storage devices successfully discovered and configured by the installer will then be displayed in the main list, along with identifying information such as Name, WWID, Model and Target. To sort the list by a specific column (for example WWID), click the column’s heading.
|
On lower display resolutions, the list may be too wide to fit on the screen, and some of the columns or buttons may be hidden initially. Use the horizontal scroll bar at the bottom of the list to move your view and see all available table columns and controls. |
There are three tabs on the top of the list, which display different information:
- Search
-
Displays all available devices, regardless of their type, and allows you to filter them either by their World Wide Identifier (WWID) or by the port, target, or logical unit number (LUN) at which they are accessed.
- Multipath Devices
-
Storage devices accessible through more than one path, such as through multiple SCSI controllers or Fiber Channel ports on the same system.
The installation program only detects multipath storage devices with serial numbers that are 16 or 32 characters long.
- Other SAN Devices
-
Devices available on a Storage Area Network (SAN).
Depending on the tab you are currently in, you can filter the discovered devices by using the Filter By field. Some of the filtering options are automatically populated based on discovered devices (for example, if you select Filter By: Vendor, another drop-down menu will appear showing all vendors of all discovered devices). Other filters require your input (for example when filtering by WWID), and present you with a text input field instead of a drop-down menu.
In the list (regardless of how it is filtered), each device is presented on a separate row, with a check box to its left. Mark the check box to make the device available during the installation process; this will cause this device (node) to be shown in the Specialized & Network Disks section in Installation Destination. There, you can select the disk as an installation target and proceed with either manual or automatic partitioning.
|
Devices that you select here are not automatically wiped by the installation process. Selecting a device on this screen does not, in itself, place data stored on the device at risk. Also note that any devices that you do not select here to form part of the installed system can be added to the system after installation by modifying the |
When you have selected the storage devices to make available during installation, click Done to return to Installation Destination.
Add iSCSI Target
To use iSCSI storage devices, the installer must be able to discover them as iSCSI targets and be able to create an iSCSI session to access them. Both of these steps may require a user name and password for Challenge Handshake Authentication Protocol (CHAP) authentication.
You can also configure an iSCSI target to authenticate the iSCSI initiator on the system to which the target is attached (reverse CHAP), both for discovery and for the session. Used together, CHAP and reverse CHAP are called mutual CHAP or two-way CHAP. Mutual CHAP provides the greatest level of security for iSCSI connections, particularly if the user name and password are different for CHAP authentication and reverse CHAP authentication.
Follow the procedure below to add an iSCSI storage target to your system.
-
Click the
Add iSCSI Targetbutton in the bottom right corner of the Installation Destination - Specialized & Network Disks screen. A new dialog window titledAdd iSCSI Storage Targetwill open. -
Enter the IP address of the iSCSI target in the
Target IP Addressfield. -
Provide a name in the
iSCSI Initiator Namefield for the iSCSI initiator in iSCSI Qualified Name (IQN) format. A valid IQN entry contains:-
The string
iqn.(including the period). -
A date code specifying the year and month in which your organization’s Internet domain or subdomain name was registered, represented as four digits for the year, a dash, and two digits for the month, followed by a period. For example, represent September 2010 as
2010-09. -
Your organization’s Internet domain or subdomain name, presented in reverse order (with the top-level domain first). For example, represent the subdomain storage.example.com as
com.example.storage. -
A colon (
:) followed by a string which uniquely identifies this particular iSCSI initiator within your domain or subdomain. For example,:diskarrays-sn-a8675309A complete IQN will therefore look as follows:
iqn.2010-09.com.example.storage:diskarrays-sn-a8675309An example using the correct format is also displayed below the input field for reference.
For more information about IQNs, see 3.2.6. iSCSI Names in RFC 3720 - Internet Small Computer Systems Interface (iSCSI), available from https://tools.ietf.org/html/rfc3720#section-3.2.6 and 1. iSCSI Names and Addresses in RFC 3721 - Internet Small Computer Systems Interface (iSCSI) Naming and Discovery, available from https://tools.ietf.org/html/rfc3721#section-1.
-
-
Specify the type of authentication to use for iSCSI discovery using the
Discovery Authentication Typedrop-down menu. Depending on which type of authentication you selected, additional input fields (such asCHAP UsernameandCHAP Passwordmay then become visible. Fill in your authentication credentials; these should be provided by your organization. -
Click the
Start Discoverybutton. The installer will now attempt to discover an iSCSI target based on the information you provided, and if the target requires CHAP or reverse CHAP authentication, it will attempt to use the credentials you provided. This process may take some time (generally less than 30 seconds), depending on your network.If the discovery was not successful, an error message will be displayed in the dialog window. This message will vary based on which part of the discovery failed. If the installer did not find the target you specified at all, you should check the IP address; if the problem is an authentication error, make sure you entered all CHAP and reverse CHAP credentials correctly and that you have access to the iSCSI target.
The
No nodes discoverederror message may also mean that all nodes on the address you specified are already configured. During discovery, Anaconda ignores nodes which have already been added.If the discovery was successful, you will see a list of all discovered nodes.
-
Select one or more nodes you want to log in to by marking or unmarking the check box next to each node discovered on the target. Below the list, select again the type of authentication you want to use; you can also select the
Use the credentials from discoveryoption if the CHAP/reverse CHAP user name and password you used to discover the target are also valid for logging in to it.After selecting all nodes you want to use, click
Log Into initiate an iSCSI session. Anaconda will attempt to log in to all selected nodes. If the login process is succesful, theAdd iSCSI Storage Targetdialog will close, and all nodes you have configured will now be shown in the list of network disks in Installation Destination - Specialized & Network Disks.
You can repeat this procedure to discover additional iSCSI targets, or to add more nodes from a previously configured target. However, note that once you click the Start Discovery button for the first time, you will not be able to change the iSCSI Initiator Name. If you made an error when configuring the initiator name, you must restart the installation.
Add FCoE SAN
The following procedure explains how to add Fibre Channel over Ethernet (FCoE) storage devices and make them available during the installation:
-
Click the
Add FCoE SANbutton in the bottom right corner of Installation Destination - Specialized & Network Disks. A new dialog window will open. -
Select the network interface (
NIC) which is connected to your FCoE switch from the drop-down menu. Note that this network interface must be configured and connected - see Network & Hostname. -
Below the
NICdrop-down menu are two choices:Use DCB-
Data Center Bridging (DCB) is a set of enhancements to the Ethernet protocols designed to increase the efficiency of Ethernet connections in storage networks and clusters. This option should only be enabled for network interfaces that require a host-based DCBX client. Configurations on interfaces that implement a hardware DCBX client should leave this check box empty.
Use auto vlan-
This option indicates whether VLAN discovery should be performed. If this box is checked, then the FCoE Initiation Protocol (FIP) VLAN discovery protocol will run on the Ethernet interface once the link configuration has been validated. If they are not already configured, network interfaces for any discovered FCoE VLANs will be automatically created and FCoE instances will be created on the VLAN interfaces. This option is enabled by default.
-
After you select which interface and options to use, click
Add FCoE Disk(s). Discovered FCoE storage devices will be displayed under theOther SAN Devicestab in Installation Destination - Specialized & Network Disks.
Pemartisian Manual
Layar Pemartisian Manual memungkinkan Anda membuat konfigurasi penyimpanan untuk sistem Fedora secara manual, memberi Anda kontrol lebih besar atas penyimpanan sistem Anda.
In most other installers for both Linux and other operating systems, disk partitioning usually takes a "bottom-up" approach. In these installers, you first create underlying devices such as LVM physical volumes, then you create a layout such as LVM on top of them, then you create file systems on top of logical volumes, and the last step is usually assigning a mount point to each volume as needed.
Anaconda menggunakan pendekatan yang berlawanan. Pertama, Anda membuat semua titik kait terpisah yang Anda butuhkan, dan semua yang diperlukan untuk membuatnya (membuat grup volume, volume logis di dalamnya, dan volume fisik di mana grup volume akan berada) dilakukan secara otomatis. Anda kemudian dapat menyesuaikan pengaturan otomatis yang Anda butuhkan.
|
No permanent changes will be made to your disks during the actual partitioning process. The configuration you have selected will only be written to your system after you press the |
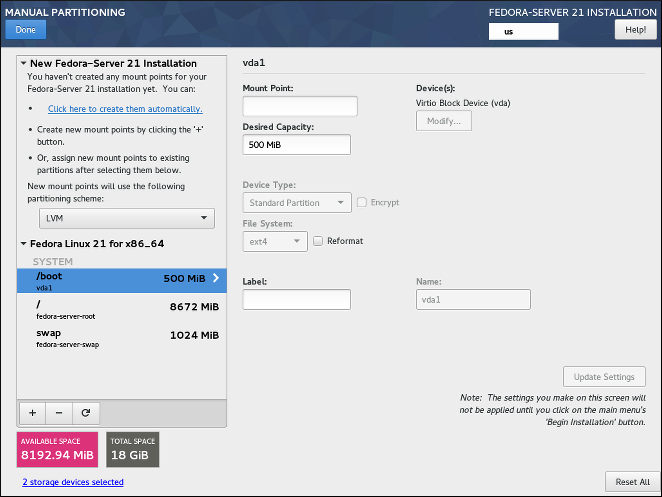
When you first open the Manual Partitioning screen, the column on the left side will display all previously existing partitions on all drives which you selected as installation targers in Installation Destination. If none of the selected drives contain any existing partitions, then a message informing you that no mount points currently exist will appear.
Here, you can choose a partitioning scheme such as LVM or BTRFS and click the Click here to create them automatically to prompt the installer to create a basic partitioning layout; this layout follows the guidelines described in Recommended Partitioning Scheme. The created layout is a basic layout where partition/volume sizes are determined automatically based on the total amount of available space.
Klik tombol + untuk menambahkan titik kait. Pada jendela dialog yang terbuka, pilih titik kait seperti / atau /home, dan kapasitas yang diinginkan untuk titik kait (seperti 10GB atau 500MB). Perhatikan bahwa menentukan titik kait wajib, tetapi Anda tidak perlu menentukan kapasitas pada titik ini; hal ini berguna saat menambahkan titik kait yang ingin Anda buat lebih besar dari izin ruang yang tersedia saat ini. Kemudian, klik Tambahkan titik kait untuk menambahkannya ke daftar menggunakan pengaturan default, yang berarti akan dibuat sebagai volume logis, dan grup volume baru akan dibuat untuk itu kecuali bila sudah ada.
Kemudian, pilih titik kait yang baru dibuat dalam daftar di sebelah kiri. Satu set kontrol akan ditampilkan di sisi kanan layar, memungkinkan Anda untuk mengubah titik kait, perangkat yang secara fisik akan ditempati, kapasitas, sistem berkas, dll. Ketika Anda mengubah pengaturan, tekan Perbarui Pengaturan di kanan bawah. Ini akan menyimpan konfigurasi yang disesuaikan; Anda sekarang dapat membuat titik kait lain, atau memilih yang ada yang berbeda dan menyesuaikan pengaturannya juga.
|
For a description of available device and file system types, see Device, File System and RAID Types. |
Untuk menghapus titik kait, pilih dalam daftar dan tekan tombol - di bawah.
The exact steps for configuring your storage depend on your specific needs and your system configuration. Procedures for creating specific layouts are described further in this chapter. Before you start, you should also review Recommended Partitioning Scheme and Advice on Partitions for a list of requirements and tips for partitioning your disks for Fedora.
Di bawah daftar titik kait yang ada adalah dua ruas, menunjukkan berapa banyak ruang kosong yang tersisa di perangkat penyimpanan Anda dan berapa banyak ruang total yang mereka miliki.
Klik XX perangkat penyimpanan yang dipilih untuk melihat ringkasan perangkat penyimpanan yang saat ini dipilih; ini dapat membantu Anda dengan orientasi dalam skema penyimpanan yang lebih rumit. Perangkat yang ditampilkan di sini adalah orang yang telah Anda pilih di Tujuan Instalasi. Jika Anda ingin menambahkan atau menghapus perangkat penyimpanan dari konfigurasi, kembali ke layar tersebut dan ubah pilihan Anda.
Anda dapat menekan tombol Reset Semua di sudut kanan bawah setiap saat untuk me-reset konfigurasi penyimpanan ke keadaan ketika Anda terakhir membuka layar Pemartisian Manual. Ini berarti bahwa jika Anda memodifikasi konfigurasi penyimpanan, meninggalkan layar, dan kemudian kembali, tombol reset akan me-reset konfigurasi kembali ke keadaan yang sudah dimodifikasi, membuang hanya perubahan yang telah Anda buat baru-baru ini, bukan semua perubahan konfigurasi penyimpanan sejak Anda mem-boot installer.
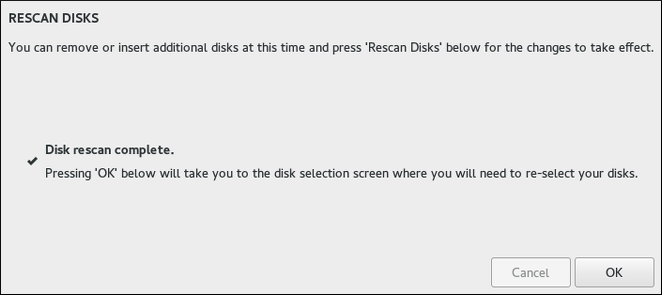
Untuk membuang semua perubahan, dan juga mendeteksi setiap drive baru yang belum terdeteksi ketika installer mulai (biasanya ketika Anda melampirkan drive baru setelah Anda mulai), tekan tombol ditandai dengan panah melingkar di set kontrol di bawah daftar titik pasang di sisi kiri layar. Pada jendela dialog yang terbuka, tekan Pindai Ulang Disk dan tunggu sampai proses pemindaian selesai. Kemudian, tekan OK untuk kembali ke Tujuan Instalasi; Semua disk yang terdeteksi termasuk yang baru akan ditampilkan di bagian Disk Standar Lokal.
Setelah Anda selesai mengonfigurasi penyimpanan sistem Anda, tekan Selesai di pojok kiri atas untuk menyimpan konfigurasi dan kembali ke layar Ringkasan Instalasi. Pada titik ini, penginstal akan memeriksa apakah konfigurasi penyimpanan Anda valid. Jika kesalahan terdeteksi, pesan akan ditampilkan di bagian bawah layar. Klik pesan untuk membuka jendela dialog yang menjelaskan apa jenis kesalahan telah terdeteksi (misalnya, Anda menempatkan /boot pada subvolume Btrfs, atau Anda tidak membuat partisi boot BIOS ketika sistem Anda membutuhkannya).
Jika pesan tersebut ditampilkan, kembali dan perbaiki masalah yang ditemukan oleh penginstal; jika tidak, Anda tidak akan dapat melanjutkan dengan instalasi. Anda juga dapat menekan Selesai lagi untuk kembali ke Ringkasan Instalasi pula, tetapi kesalahan konfigurasi penyimpanan akan mencegah Anda dari memulai proses instalasi yang sebenarnya.
If no error message is displayed and if you made any changes since the last time you have visited this screen, a summary dialog will appear, displaying a detailed list of the changes you made. Review the list and click Accept Changes to proceed with Installation Summary, or click Cancel & Return to Custom Partitioning if you want to make any more changes.
Membuat Partisi Standar
Standard partitions are the most common type of partition, with the widest support across operating systems. For example, Microsoft Windows uses exclusively physical partitions and can not natively work with LVM or Btrfs. Most Fedora partitioning setups will also require at least one standard partition for the /boot directory, and possibly also another standard partition with the BIOS Boot or EFI System file system to store the boot loader.
Lihat Pengenalan ke Partisi Disk untuk informasi tambahan tentang konsep di balik partisi fisik.
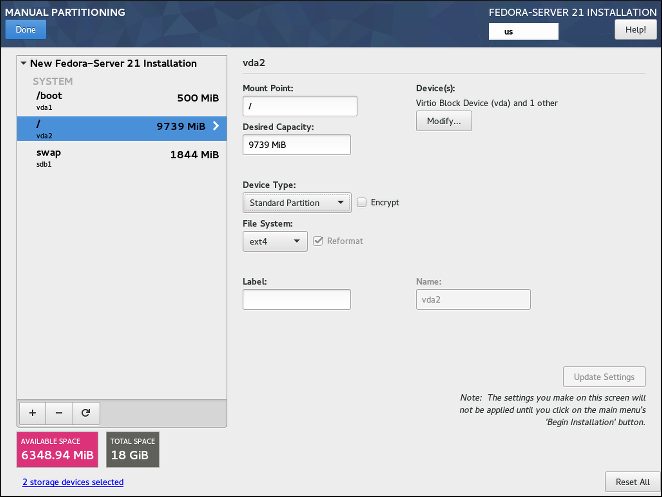
Ikuti prosedur di bawah ini untuk membuat titik kait pada partisi fisik standar:
-
Klik tombol
+di bagian bawah daftar yang menunjukkan titik kait yang ada. Jendela dialog baru akan terbuka. -
Di jendela dialog baru, tentukan titik kait yang ingin Anda buat titik kait terpisah - misalnya,
/. Opsional, tentukan ukuran partisi menggunakan unit standar seperti MB atau GB (misalnya,50GB). Kemudian, klikTambahkan titik kaituntuk menambahkan titik kait dan kembali ke layar partisi utama.Saat membuat partisi swap, tentukan titik kait sebagai
swap. Untuk partisi Boot BIOS, gunakanbiosboot. Untuk Partisi Sistem EFI, gunakan/boot/efi.Untuk informasi tentang tipe-tipe partisi ini, lihat Skema Pemartisian yang Direkomendasikan.
-
Titik kait sekarang telah dibuat dengan menggunakan pengaturan default, yang berarti telah dibuat sebagai volume logis LVM. Pilih titik kait yang baru dibuat di panel kiri untuk mengonfigurasinya lebih jauh, dan mengubahnya menjadi partisi fisik dengan mengubah pilihan
Tipe PerantimenjadiPartisi Standar. Kemudian, klikPerbarui Pengaturandi sudut kanan bawah layar. -
Di bagian
Perantidi sisi kanan layar, Anda dapat melihat bahwa partisi telah ditetapkan ke satu atau beberapa hard drive. Klik tombolUbahuntuk mengonfigurasi pada drive mana partisi ini akan dibuat. -
Dalam dialog
Konfigurasi Titik Kait, Anda dapat menentukan volume ini boleh berada di perangkat fisik mana (disk). Anda dapat memilih satu atau lebih disk yang akan digunakan untuk meyimpan volume ini dengan menekan Ctrl dan mengklik setiap disk dalam daftar. Jika Anda memilih beberapa disk di sini, Anaconda akan menentukan di mana tepatnya partisi harus dibuat berdasarkan bagaimana Anda mengkonfigurasi sisa instalasi. Jika Anda ingin memastikan bahwa partisi ini ditempatkan pada hard drive tertentu, pilih hanya drive itu dan jangan pilih semua yang lain.Setelah Anda selesai mengkonfigurasi lokasi partisi, klik
Simpanuntuk kembali ke layar utamaPemartisian Manual. -
Konfigurasikan pengaturan lain khusus untuk partisi -
Titik Kait,Kapasitas yang Diinginkan, danSistem Berkas. TekanPerbarui Pengaturanuntuk menerapkan perubahan konfigurasi.
Ulangi prosedur ini untuk setiap partisi standar tambahan yang ingin Anda buat.
Creating Software RAID
Redundant arrays of independent disks (RAIDs) are constructed from multiple storage devices that are arranged to provide increased performance and, in some configurations, greater fault tolerance. See Device, File System and RAID Types a description of different kinds of RAIDs.
A RAID device is created in one step, and disks are added or removed as necessary. One RAID partition per physical disk is allowed for each device, so the number of disks available to the installation program determines which levels of RAID device are available to you. For example, if your system has two hard drives, the installation program will not allow you to create a RAID10 device, which requires 4 separate partitions.
|
This section only explains how to create software RAID with standard (physical) partitions. However, you can also configure LVM volume groups and Btrfs volumes to use RAID and place their logical volumes or Btrfs subvolumes on top of this RAID array. See Creating a Logical Volume Managament (LVM) Layout and Creating a Btrfs Layout for instructions on creating RAID in LVM and Btrfs. |
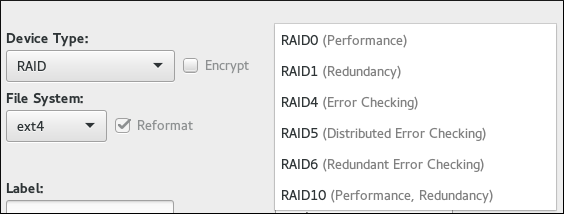
|
RAID configuration options are only visible if you have selected two or more disks for installation. At least two disks are required to create a RAID device, and some RAID layouts will require more. Requirements for different types of RAID are described in Device, File System and RAID Types. |
Follow the procedure below to create software RAID:
-
Klik tombol
+di bagian bawah daftar yang menunjukkan titik kait yang ada. Jendela dialog baru akan terbuka. -
In the new dialog window, specify a mount point for which you want to create a separate software RAID partition - for example,
/. Optionally, specify a size for the new partition using standard units such as MB or GB (for example,50GB). Then, clickAdd mount pointto add the mount point and return to the main partitioning screen.When creating a mount point for swap on software RAID, specify the mount point as
swap. -
The mount point has now been created using the default settings, which means it has been created as an LVM logical volume. Select the newly created mount point in the left pane to configure it further, and convert it to a software RAID partition by changing the
Device Typeoption toRAID. -
Choose a RAID type from the
RAID Leveldrop-down menu. Available RAID types and their requirements are described in Device, File System and RAID Types. -
In the
Device(s)section on the right side of the screen, you can see that the partition has been assigned to several physical disks. Click theModifybutton to configure on which drives this partition will be created. -
In the
Configure Mount Pointdialog, you can specify which physical devices (disks) this partition may reside on. You can select one or more disks which will be used to hold this partition by holding down Ctrl and clicking each disk in the list. If you want to make sure that this partition is placed on a specific set of hard drives, select only those drives and unselect all others.Setelah Anda selesai mengkonfigurasi lokasi partisi, klik
Simpanuntuk kembali ke layar utamaPemartisian Manual. -
Konfigurasikan pengaturan lain khusus untuk partisi -
Titik Kait,Kapasitas yang Diinginkan, danSistem Berkas. TekanPerbarui Pengaturanuntuk menerapkan perubahan konfigurasi.
Repeat this procedure for any additional standard partitions with software RAID you want to create.
Creating a Logical Volume Managament (LVM) Layout
Logical Volume Management (LVM) menyajikan tampilan logis sederhana dari ruang penyimpanan fisik yang mendasari, seperti hard disk atau LUN. Partisi pada penyimpanan fisik diwakili sebagai volumes fisik yang dapat dikelompokkan bersama ke grup volume. Setiap grup volume dapat dibagi menjadi beberapa volume lojik, yang masing-masing analog dengan partisi disk standar. Oleh karena itu, volume lojik LVM berfungsi sebagai partisi yang dapat merentang ke beberapa disk fisik.
Lihat Memahami LVM untuk informasi tambahan tentang konsep di balik manajemen volume logis.
|
Some partition types - notably the |
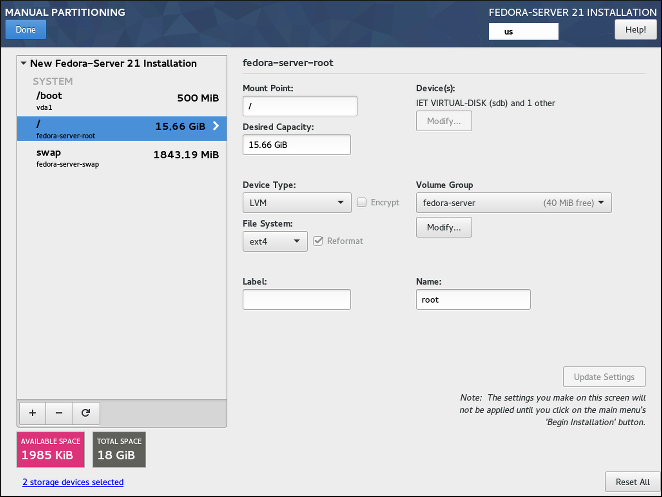
Ikuti prosedur di bawah ini untuk membuat volume lojik LVM dan grup volume.
-
Klik tombol
+di bagian bawah daftar yang menunjukkan titik kait yang ada. Jendela dialog baru akan terbuka. -
Di jendela dialog baru, tentukan titik kait yang ingin Anda buat volume lojik terpisah - misalnya,
/. Opsional, tentukan ukuran volume menggunakan unit standar seperti MB atau GB (misalnya,50GB). Kemudian, klikTambahkan titik kaituntuk menambahkan volume dan kembali ke layar partisi utama.Saat membuat titik kait untuk swap pada LVM, tentukan titik kait sebagai
swap. -
Titik kait sekarang telah dibuat dengan menggunakan pengaturan default, yang berarti telah dibuat sebagai volume lojik LVM, dan grup volume telah dibuat untuk berisi itu. Pilih titik kait yang baru dibuat di panel kiri untuk mengonfigurasinya lebih jauh. Jika Anda ingin menggunakan thin provisioning bagi volume ini, ubah opsi
Tipe PerantimenjadiLVM Thin provisioning. -
Di menu
Grup Volume, Anda dapat melihat bahwa volume telah ditetapkan ke grup volume yang dibuat secara otomatis, yang dinamai mengikuti varian Fedora yang Anda pasang (misalnya,fedora-server. Klik tombolUbahdi bawah menu tarik-turun untuk mengakses pengaturan grup volume. -
Dalam dialog
Konfigurasi Grup Volume, Anda dapat mengubah nama grup volume,Level RAID-nya (lihat Peranti, Sistem Berkas, dan Tipe RAID untuk informasi tentang tipe RAID yang tersedia), dan Anda juga dapat menentukan perangkat fisik mana (disk) tempat grup volume ini. Anda dapat memilih satu atau lebih disk yang akan digunakan untuk menyimpan grup volume ini dengan menekan Ctrl dan mengklik setiap disk dalam daftar.Jika Anda memilih tipe RAID redundan (seperti
RAID1 (Redundansi)), grup volume akan mengambil dua kali ukuran sebenarnya pada disk Anda. Sebuah grup volume 5 GB dengan RAID1 akan memakan ruang 10 GB.Anda juga dapat memastikan bahwa grup volume dienkripsi dengan memilih opsi
Enkripsi; ini akan memungkinkan enkripsi LUKS untuk seluruh kelompok volume. Lihat Panduan Keamanan Fedora, tersedia di https://docs.fedoraproject.org/, untuk informasi tentang enkripsi disk LUKS.Selain itu, Anda dapat menetapkan ukuran tetap untuk grup volume dengan memilih opsi
Tetapdari menuKebijakan ukurandan memasukkan ukuran untuk grup volume.Setelah Anda selesai mengkonfigurasi pengaturan grup volume, klik
Simpanuntuk kembali ke layar utamaPemartisian Manual.Dialog konfigurasi tidak memperbolehkan Anda untuk menentukan ukuran physical extent grup volume. Ukuran akan selalu ditetapkan ke nilai asali 4 MiB. Jika Anda ingin membuat grup volume dengan berbagai variasi fisik, Buatlah secara manual dengan beralih ke shell interaktif dan menggunakan perintah vgcreate, atau gunakan berkas Kickstart dengan perintah volgroup --pesize=size.
-
Jika Anda perlu membuat lebih dari satu grup volume, buka menu tarik turun
Grup Volumedan pilih opsiBuat grup volume baru. Sebuah jendela dialog baru akan terbuka, identik dengan yang dijelaskan pada langkah sebelumnya. Sekali lagi, pilih nama, perangkat penyimpanan, pengaturan enkripsi, tingkat RAID, dan kebijakan ukuran untuk grup baru, dan klikSimpan. Grup volume baru akan tersedia di menu tarik turunGrup Volume; Anda kemudian dapat melewati titik kait yang ada dan mengubah setelan ini untuk menetapkannya ke grup volume yang berbeda. -
Konfigurasikan pengaturan lain khusus untuk volume lojik -
Titik Kait,Kapasitas yang Diinginkan, danSistem Berkas. TekanPerbarui Pengaturanuntuk menerapkan perubahan konfigurasi.
Ulangi prosedur ini untuk setiap volume lojik tambahan yang ingin Anda buat. Perhatikan bahwa ketika membuat volume lojik LVM tambahan, grup volume baru tidak secara otomatis dibuat setiap saat; sebaliknya, volume tambahan ditetapkan ke grup yang ada.
Untuk setiap titik kait yang Anda buat, tinjau setelannya dan pastikan pengaturannya ditetapkan ke grup yang benar, sehingga memiliki kapasitas yang memadai, dan memiliki nama deskriptif sehingga Anda dapat mengidentifikasi volume nanti jika perlu.
Membuat suatu Tata Letak Btrfs
Btrfs is a type of file system, but it has several features characteristic of a storage device. It is designed to make the file system tolerant of errors, and to facilitate the detection and repair of errors when they occur. It uses checksums to ensure the validity of data and metadata, and maintains snapshots of the file system that can be used for backup or repair.
Creating a Btrfs layout is somewhat similar to LVM (described in Creating a Logical Volume Managament (LVM) Layout) with slightly different terminology. A Btrfs volume is the equivalent of an LVM volume group, and a Btrfs subvolume is similar to a LVM logical volume. An important difference to note is how Anaconda reports sizes for separate mount points: For LVM, the exact size of each logical volume is shown next to each mount point in the left pane, while with Btrfs, the total size of the entire volume is shown next to each subvolume.
|
Some partition types - notably the |
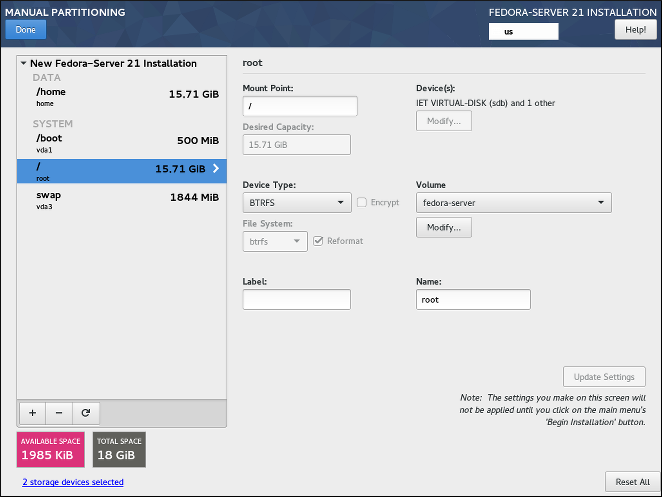
Ikuti prosedur di bawah untuk membuat volume dan sub volume Btrfs:
-
Klik tombol
+di bagian bawah daftar yang menunjukkan titik kait yang ada. Jendela dialog baru akan terbuka. -
Di jendela dialog baru, tentukan titik kait yang ingin Anda buat volume lojik terpisah - misalnya,
/. Opsional, tentukan ukuran volume menggunakan unit standar seperti MB atau GB (misalnya,50GB). Kemudian, klikTambahkan titik kaituntuk menambahkan volume dan kembali ke layar partisi utama.Saat membuat titik kait untuk swap pada Btrfs, tentukan titik kait sebagai
swap. -
The mount point has now been created using the default settings, which means it has been created as an LVM logical volume. Select the newly created mount point in the left pane to configure it further, and convert it to a Btrfs subvolume by changing the
Device Typeoption toBtrfs. Then, clickUpdate Settingsin the bottom right corner of the screen. -
In the
Volumemenu, you can see that the subvolume has been assigned to an automatically created volume, which is named after the Fedora variant you are installing (for example,fedora-server00. Click theModifybutton under the drop-down menu to access the volume settings. -
In the
Configure Volumedialog, you can change the volume’s name, itsRAID level(see Device, File System and RAID Types for information about available RAID types), and you can also specify which physical devices (disks) this volume should reside on. You can select one or more disks which will be used to hold this volume by holding down Ctrl and clicking each disk in the list.If you select a redundant RAID type (such as
RAID1 (Redundancy)), the volume will take up twice its actual size on your disks. A 5 GB volume with RAID1 will take up 10 GB of space.You can also make sure that the volume is encrypted by selecting the
Encryptoption; this will enable LUKS encryption for the entire volume. See the Fedora Security Guide, available at https://docs.fedoraproject.org/, for information about LUKS disk encryption.Selain itu, Anda dapat menetapkan ukuran tetap untuk volume dengan memilih opsi
Tetapdari menuKebijakan ukurandan memasukkan ukuran untuk grup volume.Setelah Anda selesai mengonfigurasi pengaturan volume Btrfs, klik
Simpanuntuk kembali ke layar utamaPemartisian Manual. -
If you need to create more than one Btrfs volume, open the
Volumedrop-down menu and select theCreate a new volume groupoption. A new dialog window will open, identical to the one described in the previous step. Again, select a name, storage devices, encryption settings, RAID level and size policy for the new volume, and clickSave. The new volume will then become available in theVolume Groupdrop-down menu; you can then go through your existing mount points and change this setting to assign them to a different volume. -
Configure other settings specific to the subvolume - its
Mount Point,Desired Capacity,File System, andName. PressUpdate Settingsto apply any changes to the configuration.
Ulangi prosedur ini untuk setiap sub volume Btrfs tambahan yang ingin Anda buat. Perhatikan bahwa ketika membuat sub volume tambahan, volume baru tidak secara otomatis dibuat setiap saat; sebaliknya, sebarang sub volume tambahan ditetapkan ke grup yang ada.
For each mount point you create, review its settings and make sure that it is assigned to the correct volume, that it has sufficient capacity, and that it has a descriptive name so you can identify the subvolume later if you need to.
Peranti, Sistem Berkas, dan Tipe RAID
Fedora mendukung beberapa jenis perangkat dan sistem berkas. Daftar di bawah ini menawarkan deskripsi singkat dari masing-masing perangkat, sistem berkas, dan tipe RAID yang tersedia serta catatan tentang penggunaannya.
Untuk memilih jenis perangkat atau sistem berkas partisi atau volume logis, pilih dalam daftar di Pemartisian Manual dan pilih Tipe Peranti dan`Sistem Berkas` dari masing-masing menu tarik-turun di sisi kanan layar. Kemudian, klik Perbarui Pengaturan dan ulangi proses ini untuk semua titik kait yang ingin Anda ubah.
To configure software RAID, make sure that you have enough physical hard drives selected as installation targets (the number of separate drives required for each type of RAID is noted in its description). Then, choose a RAID level when creating or modifying a Btrfs volume or LVM volume group, or select Software RAID as the device type to create software RAID with standard partitions. For detailed instructions, see Creating a Btrfs Layout, Creating a Logical Volume Managament (LVM) Layout, and Creating Software RAID as needed.
-
Partisi Standar- Sebuah partisi standar dapat berisi sistem berkas atau ruang swap. Partisi standar paling sering digunakan untuk/bootdan Boot BIOS dan partisi Sistem EFI. Volume logis LVM atau subvolume Btrfs direkomendasikan untuk sebagian besar kegunaan lainnya. Lihat Pengenalan ke Partisi Disk untuk informasi tambahan tentang konsep di balik partisi fisik. -
LVM- ChoosingLVMas theDevice Typecreates an LVM logical volume and a volume group to contain it (unless one already exists, in which case the new volume is assigned to the existing group). LVM can improve performance when using physical disks and allows you to use multiple disks for a single mount point. For information on how to create a logical volume, see Creating a Logical Volume Managament (LVM) Layout. Also see Understanding LVM for some additional information about LVM in general. -
LVM Thin Provisioning- Menggunakan thin provisioning, Anda dapat mengelola pool penyimpanan ruang bebas, yang dikenal sebagai thin pool, yang dapat dialokasikan untuk sebarang banyaknya perangkat bila diperlukan oleh aplikasi. Thin pool dapat diperluas secara dinamis bila diperlukan untuk alokasi ruang penyimpanan yang hemat biaya. -
RAID- Membuat dua atau lebih partisi RAID perangkat lunak memungkinkan Anda untuk membuat perangkat RAID perangkat lunak. Satu partisi RAID ditetapkan ke setiap disk pada sistem. Lihat Membuat RAID Perangkat Lunak untuk petunjuk tentang cara membuat RAID perangkat lunak. -
BTRFS- Btrfs adalah sistem berkas dengan beberapa fitur seperti perangkat. Hal ini mampu menangani dan mengelola lebih banyak berkas, berkas yang lebih besar, dan volume yang lebih besar daripada sistem berkas ext2, ext3, dan ext4. Lihat Membuat Tata Letak Btrfs untuk informasi lebih lanjut tentang membuat volume Btrfs.
-
ext4- Sistem berkas ext4 didasarkan pada sistem berkas ext3 dan sejumlah perbaikan. Ini termasuk dukungan untuk sistem berkas yang lebih besar dan berkas yang lebih besar, alokasi ruang disk yang lebih cepat dan lebih efisien, tidak ada batasan pada jumlah subdirektori dalam direktori, pemeriksaan sistem berkas yang lebih cepat, dan jurnal yang lebih handal. Ext4 adalah sistem berkas baku dan direkomendasikan untuk digunakan oleh Fedora Workstation dan Cloud. Ukuran maksimum yang didukung dari satu sistem berkas ext4 adalah 50 TB. -
ext3- Sistem berkas ext3 didasarkan pada sistem berkas ext2 dan memiliki satu keuntungan utama - penjurnalan. Menggunakan sistem berkas penjurnalan mengurangi waktu yang dihabiskan untuk memulihkan berkas sistem setelah crash, karena tidak perlu memeriksa sistem berkas untuk konsistensi metadata dengan menjalankan utilitas fsck setiap kali terjadi crash. -
ext2- Sebuah sistem berkas ext2 mendukung tipe berkas Unix standar, termasuk berkas biasa, direktori, atau taut simbolik. Ini menyediakan kemampuan untuk menetapkan nama berkas yang panjang, hingga 255 karakter. -
swap- Partisi swap digunakan untuk mendukung memori virtual. Dengan kata lain, data ditulis ke partisi swap ketika tidak cukup RAM untuk menyimpan data yang diproses sistem Anda. Sebuah partisi swap harus selalu dibuat; lihat Skema Partisi Yang Direkomendasikan untuk rincian seperti ukuran yang disarankan. -
xfs- XFS is a highly scalable, high-performance file system that supports file systems up to 16 exabytes (approximately 16 million terabytes), files up to 8 exabytes (approximately 8 million terabytes), and directory structures containing tens of millions of entries. XFS also supports metadata journaling, which facilitates quicker crash recovery. The maximum supported size of a single XFS file system is 500 TB. Starting with Fedora 22, XFS is the default and recommended file system on Fedora Server.Note that the size of an XFS file system can not currently be reduced without destroying and recreating the file system. If you expect that you will need to adjust the sizes of your file systems often, using XFS is not recommended, as it makes administration substantially more time-consuming.
-
vfat- Sistem berkas VFAT adalah sistem berkas Linux yang kompatibel dengan nama berkas panjang Microsoft Windows pada sistem berkas FAT. -
Boot BIOS- Partisi yang sangat kecil yang diperlukan untuk boot dari perangkat dengan tabel partisi GUID (GPT) pada sistem BIOS dan sistem UEFI dalam mode kompatibilitas BIOS. Lihat Skema Pemartisian Yang Direkomendasikan untuk rincian. -
Partisi Sistem EFI- Sebuah partisi kecil yang diperlukan untuk boot perangkat dengan tabel partisi GUID (GPT) pada sistem UEFI. Lihat Skema Pemartisian Yang Direkomendasikan untuk rincian.
-
RAID0 (Kinerja)- Mendistribusikan data di beberapa disk. RAID Level 0 menawarkan peningkatan kinerja melalui partisi standar dan dapat digunakan untuk pool penyimpanan beberapa disk ke dalam satu perangkat virtual yang besar. Perhatikan bahwa RAID Level 0 tidak menawarkan redundansi dan bahwa kegagalan satu perangkat dalam larik menghancurkan data di seluruh larik. RAID 0 memerlukan setidaknya dua disk. -
RAID1 (Redundansi)- Mencermin semua data dari satu partisi ke satu atau lebih disk lainnya. Perangkat tambahan dalam larik menyediakan peningkatan tingkat redundansi. RAID 1 memerlukan setidaknya dua disk. -
RAID4 (Error Checking)- Distributes data across multiple disks and uses one disk in the array to store parity information which safeguards the array in case any disk within the array fails. Because all parity information is stored on one disk, access to this disk creates a "bottleneck" in the array’s performance. Level 4 RAID requires at least three disks. -
RAID5 (Pemeriksaan Kesalahan Terdistribusi)- Mendistribusikan data dan informasi paritas di beberapa disk. Oleh karena itu, RAID Level 5 menawarkan keunggulan kinerja mendistribusikan data di beberapa disk, tetapi tidak berbagi hambatan kinerja RAID level 4 karena informasi paritas juga didistribusikan melalui larik. RAID 5 memerlukan setidaknya tiga disk. -
RAID6 (Pemeriksaan Kesalahan Redundan)- RAID Level 6 mirip dengan RAID Level 5, tapi bukan hanya menyimpan satu set data paritas, mereka menyimpan dua set. RAID 6 memerlukan setidaknya empat disk. -
RAID10 (Kinerja, Redundansi)- RAID Level 10 adalah RAID bersarang atau RAID hibrida. Mereka dibangun dengan mendistribusikan data melalui cermin set disk. Misalnya, jajaran RAID level 10 dibuat dari empat partisi RAID yang terdiri dari dua pasang cermin dari partisi striped. RAID 10 memerlukan setidaknya empat disk.
Skema Pemartisian Yang Direkomendasikan
Dalam kebanyakan kasus, setidaknya titik kait berikut harus selalu dibuat:
/boot- 500 MB-
This partition contains the operating system kernel, which allows Fedora to boot. It also contains other files used during the bootstrap process. Due to the limitations of most firmware, creating a separate, small standard partition for this directory is recommended. In most scenarios, a 500 MB
/bootpartition is adequate.Jika sistem Anda memiliki pengontrol RAID perangkat keras, berhati-hatilah bahwa beberapa jenis BIOS tidak mendukung boot darinya. Dalam hal ini, partisi
/bootharus dibuat pada partisi di luar larik RAID, seperti pada hard drive terpisah.Also note that the
/bootdirectory can not be placed on a LVM logical volume or a Btrfs subvolume. Use a standard partition. /(root) - 10 GB-
Di sinilah direktori root berada. Direktori root adalah tingkat paling atas struktur direktori. Secara baku, semua berkas ditulis ke partisi ini kecuali partisi yang berbeda dikait di path yang ditulisi (misalnya,
/bootatau/home). Jika Anda mengikuti skema yang direkomendasikan yang dijelaskan dalam bagian ini, ini akan menjadi partisi di mana sebagian besar paket perangkat lunak akan dipasang.For a minimal installation, a 5 GB root partition will be sufficient. However, for most common installations which include extra packages and a graphical user interface, the root partition should be at least 10 GB; with 20 GB being sufficient for most common use cases.
The
/mount point is the top of the Linux Filesystem Hierarchy, and is referred to as the root file system, or root. The/rootdirectory, sometimes pronounced "slash-root", is the home directory for therootuser. /home- setidaknya 10 GB-
To store user data separately from system data, create a dedicated mount point for the
/homedirectory. This partition should be sized based on the amount of data that will be stored locally, number of users, and so on. This will allow you to upgrade or reinstall Fedora without erasing user data files. During the installation, a separate/homepartition will be created if there are 50 GB or more free space for your Fedora installation.When using Fedora as a workstation for normal use with a graphical environment, this mount point should have the most disk space assigned to it, as it will likely hold the most data (user settings, images, videos, etc).
- swap - based on your system parameters
-
Swap partitions support virtual memory; data is written to them when there is not enough RAM to store the data your system is processing. This partition’s size is a function of system memory workload, not total system memory, and therefore is not equal to the total system memory size. Therefore, it is important to analyze what applications a system will be running and the load those applications will serve in order to determine the system memory workload. Application providers and developers should be able to provide some guidance.
When the system runs out of swap space, the kernel terminates processes as the system RAM memory is exhausted. Configuring too much swap space results in storage devices being allocated but idle and is a poor use of resources. Too much swap space can also hide memory leaks. The maximum size for a swap partition and other additional information can be found in the
mkswap(8)man page.The table below provides the recommended size of a swap partition depending on the amount of RAM in your system and whether you want sufficient memory for your system to hibernate. If you let the installation program partition your system automatically, the swap partition size will be established using these guidelines. Automatic partitioning setup assumes hibernation is not in use, and the maximum size of the swap partition is limited to 10% of the total size of the hard drive. If you want to set up enough swap space to allow for hibernation, or if you want to set the swap partition size to more than 10% of the system’s storage space, you must edit the partitioning layout manually.
Tabel 2. Recommended System Swap Space Amount of RAM in the system Recommended swap space Recommended swap space if allowing for hibernation less than 2 GB
2 times the amount of RAM
3 times the amount of RAM
2 GB - 8 GB
Equal to the amount of RAM
2 times the amount of RAM
8 GB - 64 GB
0.5 times the amount of RAM
1.5 times the amount of RAM
more than 64 GB
workload dependent
hibernation not recommended
At the border between each range listed above (for example, a system with 2 GB, 8 GB, or 64 GB of system RAM), discretion can be exercised with regard to chosen swap space and hibernation support. If your system resources allow for it, increasing the swap space may lead to better performance.
Distributing swap space over multiple storage devices - particularly on systems with fast drives, controllers and interfaces - also improves swap space performance.
- BIOS Boot (1 MB) or EFI System Partition (200 MB)
-
The GRUB2 boot loader can be installed either in the Master Boot Record (MBR) or the GUID Partition Table (GPT) of the boot device. In order to determine which of these methods to use, the installation program considers the following variations:
- Systems with BIOS firmware and UEFI systems in BIOS compatibility mode
-
If the disk is already formatted, the partitioning scheme is retained. If the disk is not formatted, or you have erased all existing partitions from the disk, the installer will choose the following:
-
MBR if the size of the disk is less than 2 TB (terabytes)
-
GPT if the size of the disk is more than 2 TB
You can force the installer to use GPT on disks smaller than 2 TB by using the inst.gpt boot option as described in Boot Options. However, the opposite is not possible - you can not use MBR on disks larger than 2 TB.
You need to create a BIOS Boot partition with a size of 1 MB to install on a system with BIOS firmware if the disk containing the boot loader uses GPT. If the disk uses a MBR, no special partition is necessary on a BIOS system.
-
- Systems with UEFI firmware
-
Only GPT is allowed on UEFI systems. In order to install on a formatted disk with a MBR, it must be reformated and relabeled. All data currently on the disk will be lost.
UEFI-based systems require an EFI System Partition at least 50 MB in size (recommended size is 200 MB), regardless of the partitioning scheme.
If your system requires either a BIOS Boot partition or an EFI System Partition based on the requirements detailed above, this partition must be created as a standard physical partition. It can not reside on an LVM volume or a Btrfs subvolume.
Also note that if your system does not require any of these partitions, they will not be shown in the
File Systemmenu in mount point options.
Many systems have more partitions than the minimum listed above. Choose partitions based on your particular needs. See Advice on Partitions for additional information and advice.
|
Only assign storage capacity to those partitions you require immediately. You may allocate free space at any time, to meet needs as they occur. |
If you are not sure how best to configure the partitions for your computer, accept the automatic default partition layout provided by the installation program as described in Installation Destination.
Saran tentang Partisi
Tidak ada cara terbaik untuk mempartisi setiap sistem; penyiapan optimal bergantung kepada bagaimana Anda berrencana untuk memakai sistem yang sedang dipasang. Namun, tips berikut mungkin membantu Anda menemukan tata letak optimal bagi kebutuhan Anda:
-
Pertimbangkan untuk mengenkripsi sebarang partisi dan volume yang mungkin memuat data sensitif. Enkripsi mencegah orang tanpa otorisasi mengakses data pada partisi, bahkan bila mereka punya akses ke peranti penyimpanan fisik. Dalam kebanyakan kasus, Anda mesti paling tidak mengenkripsi partisi
/home, yang memuat data pengguna. -
Dalam beberapa kasus, membuat titik kait terpisah untuk direktori selain
/,/boot, dan/homemungkin berguna; sebagai contoh, pada suatu server yang menjalankan sebuah basis data MySQL, memiliki suatu titik kait terpisah untuk/var/lib/mysqlmemungkinkan Anda mempertahankan basis data selama instalasi ulang tanpa mesti memulihkan dari cadangan setelahnya. Namun, memiliki titik kait terpisah yang tidak perlu akan membuat administrasi penyimpanan lebih sulit. -
Some special restrictions apply to certain directories with regards on which partitioning layouts can they be placed. Notably, the
/bootdirectory must always be on a physical partition (not on an LVM volume or a Btrfs subvolume), and/usrcan not be on a Btrfs subvolume. -
Bila Anda baru memakai Linux, pertimbangkan untuk membaca Linux Filesystem Hierarchy Standard di https://refspecs.linuxfoundation.org/FHS_2.3/fhs-2.3.html untuk informasi tentang berbagai direktori sistem dan isi mereka.
-
Setiap kernel yang terpasang pada sistem Anda memerlukan kira-kira 20 MB pada partisi
/boot. Ukuran partisi baku sebesar 500 MB untuk/bootmestinya cukup untuk kebanyakan penggunaan umum; naikkan ukuran partisi ini bila Anda berrencana untuk menyimpan banyak kernel yang terpasang pada saat yang sama. -
Direktori
/varmenyimpan isi untuk sejumlah aplikasi, termasuk server web Apache, dan dipakai oleh manajer paket DNF untuk menyimpan sementara pembaruan paket yang diunduh. Pastikan bahwa partisi atau volume yang memuat/varpunya paling tidak 3 GB. -
Isi direktori
/varbiasanya sangat sering berubah. Ini dapat menyebabkan masalah dengan solid state drive (SSD) yang lebih tua, karena mereka dapat menangani sejumlah lebih sedikit siklus baca/tulis sebelum menjadi tak bisa dipakai. Bila root sistem Anda ada pada SSD, pertimbangkan untuk membuat titik kait terpisah untuk/varpada HDD (magnetik) klasik. -
Direktori
/usrmemuat mayoritas perangkat lunak pada suatu instalasi Fedora umum. Maka partisi atau volume yang memuat direktori ini mesti paling tidak 5 GB untuk instalasi minimal, dan paling tidak 10 GB untuk instalasi dengan lingkungan grafis. -
Bila
/usratau/vardipartisi terpisah dari sisa volume root, proses boot menjadi lebih kompleks karena direktori-direktori ini memuat komponen yang kritis untuk boot. Dalam beberapa situasi, seperti misalnya ketika direktori ini ditempatkan pada drive iSCSI atau lokasi FCoE, sistem mungkin tidak bisa boot, atau mungkin hang dengan kesalahanPeranti sibukketika dimatikan atau reboot.Keterbatasan ini hanya berlaku untuk
/usratau/var, tidak ke direktori di bawah mereka. Sebagai contoh, suatu partisi terpisah untuk/var/wwwakan bekerja tanpa masalah. -
Pertimbangkan untuk membiarkan sebagian ruang dalam suatu grup volume LVM tidak dialokasikan. Ruang tak dialokasikan ini memberi Anda fleksibilitas bila kebutuhan ruang Anda berubah tapi Anda tidak ingin menghapus data dari volume lain. Anda juga dapat memilih tipe peranti
Thin provisioninguntuk partisi agar ruang yang tidak terpakai ditangani secara otomatis oleh volume. -
The size of an
XFSfile system can not be reduced - if you need to make a partition or volume with this file system smaller, you must back up your data, destroy the file system, and create a new, smaller one in its place. Therefore, if you expect needing to manipulate your partitioning layout later, you should use theext4file system instead. -
Gunakan Logical Volume Management (LVM) bila Anda mengantisipasi mengekspansi penyimpanan Anda dengan menambah lebih banyak hard disk setelah instalasi. Dengan LVM, Anda dapat membuat volume fisik pada drive baru, dan kemudian menugaskan mereka ke sebarang grup volume dan volume lojik sesuai kebutuhan - sebagai contoh, Anda dapat dengan mudah mengekspansi
/homesistem Anda (atau sebarang direktori lain yang berada pada suatu volume lojik). -
Membuat suatu partisi Boot BIOS atau suatu Partisi Sistem EFI mungkin perlu, bergantung pada firmware sistem Anda, ukuran drive boot, dan label disk drive boot. Lihat Skema Pemartisian Yang Disarankan untuk informasi tentang partisi ini. Perhatikan bahwa pemasang grafis tidak akan membiarkan Anda membuat Boot BIOS atau Partisi Sistem EFI bila sistem Anda tidak memerlukannya - dalam kasus itu, mereka akan disembunyikan dari menu.
-
Bila Anda perlu membuat sebarang perubahan ke konfigurasi penyimpanan Anda setelah instalasi, repositori Fedora menyediakan beberapa alat berbeda yang dapat membantu Anda melakukan ini. Bila Anda lebih suka alat baris perintah, cobalah system-storage-manager.
Kdump
|
This screen is disabled by default. To enable it during the installation, you must use the inst.kdump_addon=on option at the boot menu. See Advanced Installation Options for details, and The Boot Menu for instructions on using custom boot options. |
Use this screen to select whether or not Kdump will be activated on the installed system, and how much memory will be reserved for it if enabled.

Kdump is a kernel crash dumping mechanism which, in the event of a system crash, captures the contents of the system memory at the moment of failure. This captured memory can then be analyzed to find the cause of the crash. If Kdump is enabled, it must have a small portion of the system’s memory (RAM) reserved to itself. This reserved memory will not be accessible to the main kernel.
To enable Kdump on the installed system, check Enabled. Then, select either Automatic or Manual memory reservation settings, and if you selected Manual, enter the amount of memory to be reserved in megabytes into the Memory to be reserved field.
The amount of memory which you should reserve is determined based on your system’s architecture (AMD64 and Intel 64 will have different requirements than IBM Power, for example) as well as the total amount of system memory. In most cases, automatic reservation will be satisfactory. If you insist on manual settings, see the Red Hat Enterprise Linux 7 Kernel Crash Dump Guide for guidelines. This document also contains more in-depth information about how Kdump works, how to configure additional settings, and how to analyze a saved crash dump.
The Usable System Memory readout below the reservation input field shows how much memory will be accessible to your main system once your selected amount of RAM is reserved.
|
Additional settings, such as the location where kernel crash dumps will be saved, can only be configured after the installation using either the |
After configuring Kdump settings, click Done in the top left corner to return to Installation Summary.
Network & Hostname
The Network & Hostname screen is used to configure network interfaces. Options selected here will be available both during the installation (if needed for tasks such as downloading packages from a remote location) and on the installed system.
|
Network configuration is an expansive topic and many of the options available during the installation are beyond the scope of this document. For detailed information about networking, including both theoretical topics and specific instructions and examples, see the Fedora Networking Guide, available at https://docs.fedoraproject.org/. |
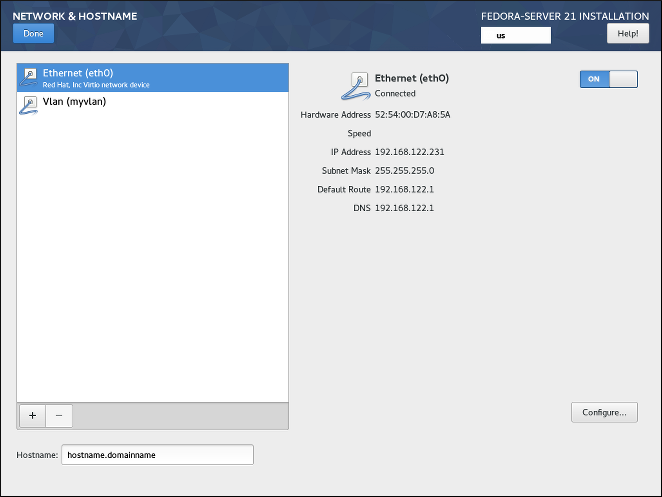
Locally accessible interfaces are automatically detected by the installation program and cannot be manually added or deleted. All detected interfaces are listed on the left side of the screen. Click an interface in the list to display its current configuration (such as IP and DNS address); the details are displayed on the right side of the screen.
Below the list of interfaces are two buttons. Use the + button to add a virtual network interface (Team, Bond or VLAN) as described in Adding a Virtual Network Interface. To remove a previously created virtual interface, select it in the list and click the - button.
To change settings such as IP addresses, DNS servers, or routing configuration for an existing interface (both virtual and physical), select the interface in the left pane and click Configure in the bottom right corner of the screen. Available settings are described in Editing Network Interface Configuration.
Use the ON/OFF switch in the top right corner to enable or disable the currently selected interface.
Below the list of connections, enter a host name for this computer in the Hostname input field. The host name can be either a fully-qualified domain name (FQDN) in the format hostname.domainname, or a short host name with no domain name. Many networks have a Dynamic Host Configuration Protocol (DHCP) service that automatically supplies connected systems with a domain name; to allow the DHCP service to assign the domain name to this machine, only specify the short host name.
Adding a Virtual Network Interface
To add a virtual network interface, click the + button at the bottom of the interface list. A new window will open, prompting you to select one of the three available types of virtual interfaces:
-
Bond- NIC (Network Interface Controller) Bonding, a method to bind multiple physical network interfaces together into a single bonded channel. -
Team- NIC Teaming, a new implementation to aggregate links, designed to provide a small kernel driver to implement the fast handling of packet flows, and various applications to do everything else in user space. -
Vlan(Virtual LAN) - A method to create multiple distinct broadcast domains which are mutually isolated.
Select the interface type you want to add, and click Add. Another dialog window will open, allowing you to edit any available settings for your chosen interface type. For information about available settings, see the respective sections of the Fedora Networking Guide, available at https://docs.fedoraproject.org/. Basic documentation is also available in Editing Network Interface Configuration.
|
To access the settings dialog again after you closed it, select the same interface in the list of configured interfaces and click |
Editing Network Interface Configuration
This section only details the most important settings for a typical wired connection used during installation. Many of the available options do not have to be changed in most installation scenarios and are not carried over to the installed system. Configuration of other types of networks is broadly similar, although the specific configuration parameters may be different. To learn more about network configuration after installation, see the Fedora Networking Guide, available at https://docs.fedoraproject.org/.
To configure a network connection manually, select that connection in the list on the left side of the screen, and click the Configure button. A dialog will appear that allows you to configure the selected connection. The configuration options presented depends on the connection type - the available options will be slightly different depending on whether it is a physical interface (wired or wireless network interface controller) or a virtual interface (Bond, Team or Vlan) which you previously configured in Adding a Virtual Network Interface.. A full description of all configuration settings for all connection types is beyond the scope of this document; see the Networking Guide for details.
The most common and useful options in the configuration dialog are:
- Enable or disable the connection by default
-
In the
Generaltab of the configuration dialog, you can select or unselect theAutomatically connect to this network when it is availablecheck box to allow or disallow this connection to connect by default. When enabled on a wired connection, this means the system will typically connect during startup (unless you unplug the network cable); on a wireless connection, it means that the interface will attempt to connect to any known wireless networks in range.Additionally, you can allow or disallow all users on the system from connecting to this network using the
All users may connect to this networkoption. If you disable this option, onlyrootwill be able to connect to this network.It is not possible to only allow a specific user other than
rootto use this interface, because no other users are created at this point during the installation. If you need a connection for a different user, you must configure it after the installation. - Set up static IPv4 or IPv6 settings
-
By default, both
IPv4andIPv6are set to automatic configuration depending on current network settings. This means that addresses such as the local IP address, DNS address, and other settings will be detected automatically each time the interface connects to a network. In many cases, this is sufficient, but you can also provide static configuration in theIPv4 SettingsandIPv6 Settings, respectively.To set static network configuration, navigate to one of the settings tabs and select a method other than
Automatic(for example,Manual) from theMethoddrop-down menu. This will enable theAddressesfield below.In the
IPv6 Settingstab, you can also set the method toIgnoreto disableIPv6on this interface.Then, click
Addon the right side and add a set of settings:Address,Netmask(forIPv4),Prefix(forIPv6), andGateway.The
DNS serversfield accepts one or more IP addresses of DNS servers - for example,10.0.0.1,10.0.0.8.The final option in both tabs is
Require IPvX addressing for this connection to complete. Select this option in theIPv4tab to only allow this connection ifIPv4was successful; the same principle applies to this setting in theIPv6tab. If this option remains disabled for bothIPv4andIPv6, the interface will be able to connect if configuration succeeds on either IP protocol. - Configure routes
-
In the
IPv4 SettingsandIPv4 Settingstabs, click theRoutesbutton in the bottom right corner to configure routing settings for a specific IP protocol on an interface. A new dialog will open, allowing you toAdda specific route.If you confire at least one static route, you can disallow all routes not specifically configured here by enabling the
Ignore automatically obtained routes.Select
Use this connection only for resources on its networkto prevent this connection from becoming the default route. This option can be selected even if you did not configure any static routes. Enabling this option means that this route will only be used when necessary to access certain resources, such as intranet pages which require a local or VPN connection. Another (default) route will be used for publicly available resources if possible. Note that unlike the additional routes configured in this dialog, this setting will be transferred to the installed system. Also note that this option is only useful when more than one interface is configured.When you finish configuring the interface’s routing settings, click
OKto return to the configuration dialog.
Once you finish configuring the interface, click Save in the configuration window’s bottom right corner to save your settings and return to Network & Hostname.
Configuration and Installation Progress
The Configuration screen is displayed after you finish configuring all required items in Installation Summary and press the Begin installation button. After this point, the installation process actually starts and changes are being made to your selected disks. It is not possible to go back to the Installation Summary and change any settings configured there; if you need to do so, you must wait for the installation process to finish, reboot your system, log in and change your settings on the installed system.
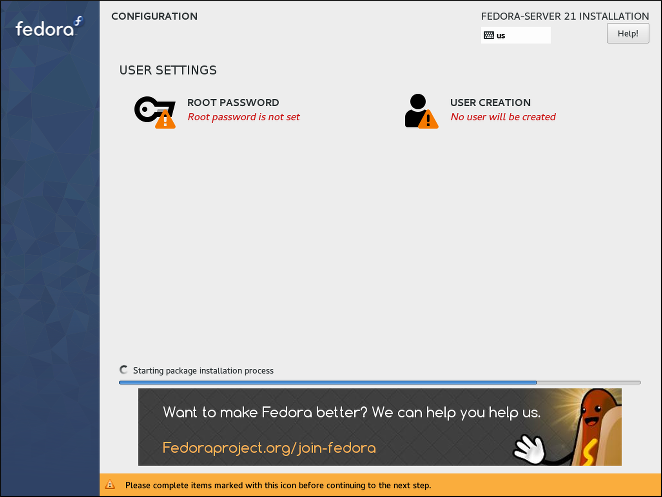
In the top part of the screen, two additional options are available, allowing you to configure authentication settings - the root password and an additional user account. Configuring the root password is required to finish the installation; creating a user account can be skipped. If you do so, you will be prompted to create a non-root user account after the installation finishes and your system reboots.
The bottom of the screen shows a progress bar and a message informing you of the current progress of the installation. When the installation finishes and the root password has been set, you can press the Finish configuration button to reboot your computer and log in to your newly installed Fedora system.
|
Sebelum Anda mengakhiri instalasi dan reboot, lepaskan media (CD, DVD, atau drive USB) yang Anda pakai untuk mengawali instalasi, atau pastikan bahwa sistem Anda mencoba boot dari hard drive sebelum mencoba media lepasan. Jika tidak, komputer Anda akan memulai installer lagi bukannya menjalankan sistem yang diinstal. |
Kata Sandi Root
Layar Kata Sandi Root digunakan untuk mengkonfigurasi kata sandi root untuk sistem Anda. Kata sandi ini akan digunakan untuk masuk ke akun administrator (juga dikenal sebagai pengguna super), yang digunakan untuk tugas administrasi sistem seperti menginstal dan memperbarui paket perangkat lunak dan mengubah konfigurasi seluruh sistem seperti pengaturan jaringan dan firewall, opsi penyimpanan, dan penambahan atau memodifikasi izin pengguna, grup, dan berkas.
The root account will always be created during the installation. However, you should always also create a normal user accont in Create User and use that account to log in to the system. Only switch to the administrator account only when you need to perform a task which requires administrator access.
|
The |

Setelah Anda memilih kata sandi yang kuat, masukkan di ruas Kata Sandi Root. Karakter yang Anda tulis akan ditampilkan sebagai titik untuk keamanan. Kemudian, ketikkan kata sandi yang sama ke dalam bidang Konfirmasi untuk memastikan Anda memasukkannya dengan benar. Kedua kata sandi yang dimasukkan harus sama.
Ketika Anda memasukkan kata sandi, itu akan dievaluasi dan penginstal akan menentukan kekuatan kata sandi. Jika pemasang menganggap kata sandi Anda lemah, sebuah pesan akan muncul di bagian bawah layar, menjelaskan aspek kata sandi pilihan Anda yang dianggap tidak cukup. Sebagai contoh:
Kata sandi yang Anda berikan lemah:Kata sandi kurang dari 5 karakter.
Jika pesan yang mirip dengan di atas muncul, sangat disarankan untuk memilih kata sandi yang berbeda dan lebih kuat.
Once you configure the superuser password, click Done in the top left corner to return to Configuration and Installation Progress. If you selected a weak password, you must press the button twice.
Create User
The Create User screen can be used to create and configure one normal (non-root) user account during the installation. Only one user account can be configured here; if you require more accounts, wait until the installation completes, reboot your system and then create other accounts using either the useradd command in a terminal, or a graphical utility for managing user accounts (for example, the Users screen in the Settings menu in GNOME).
|
Creating a normal user account is not required to finish the installation; however, it is highly recommended. If you do not create one, you will have to log in to the system as |
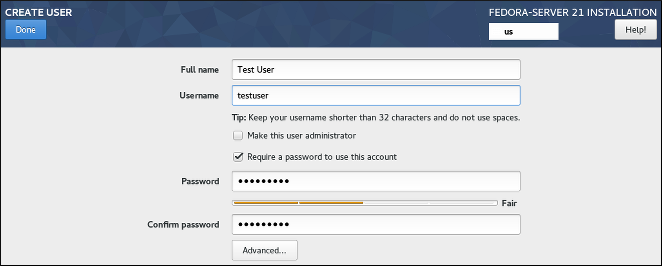
To configure a user account, fill out the Full name (for example, John Smith) and Username (for example, jsmith). The username will used to log in from a command line; if you install a graphical environment, then your graphical login manager will use Full name.
Make sure that the Require a password to use this account check box is enabled, enter a password you want to use for this account into the Password field. The characters you write will be displayed as dots for security. Then, repeat the same password in the Confirm password field below to ensure you entered it properly. Both entered passwords must be the same.
Ketika Anda memasukkan kata sandi, itu akan dievaluasi dan penginstal akan menentukan kekuatan kata sandi. Jika pemasang menganggap kata sandi Anda lemah, sebuah pesan akan muncul di bagian bawah layar, menjelaskan aspek kata sandi pilihan Anda yang dianggap tidak cukup. Sebagai contoh:
Kata sandi yang Anda berikan lemah:Kata sandi kurang dari 5 karakter.
Jika pesan yang mirip dengan di atas muncul, sangat disarankan untuk memilih kata sandi yang berbeda dan lebih kuat.
The Make this user administrator check box gives the user you are creatng administrative rights (by adding this user into the wheel group), allowing this user to use the sudo command to perform tasks normally only available to root using only the user password, instead of the root password. This may be more convenient, but can also pose a security risk.
|
If you give administrator privileges to an user, make sure that the account is protected by a strong password. Never give an user administrator privileges without requiring any password for the account. See the Fedora Security Guide, available at the https://docs.fedoraproject.org/, for detailed information about password security including guidelines for selecting strong passwords. |
To additional settings, click the Advanced button below the password input fields. A new dialog window titled Advanced User Configuration will open. This dialog is described in the following section.
Advanced User Configuration
The Advanced User Configuration dialog allows you to change the following settings for the new user account.
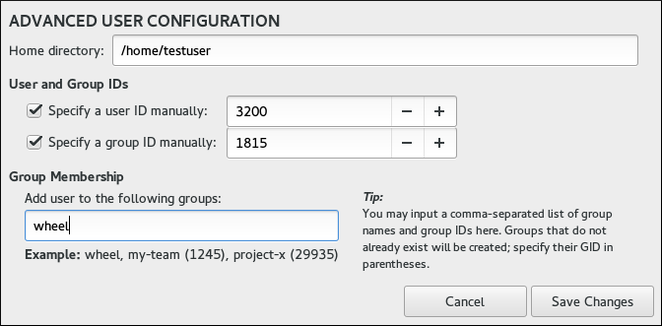
-
The user’s
Home directory(/home/usernameby default). -
The user’s ID (UID). The default value is 1000. UIDs 0-999 are reserved by the system so they can not be assigned to an user.
-
The the group ID (GID) of the user’s default group. The default group name will be the same as the user name, and its default GID is 1000. GIDs 0-999 are reserved by the system so they can not be assigned to an user’s group.
-
The user’s group membership. The user account you are creating will always have one default group membership (the user’s default group with an ID set in the
Specify a group ID manuallyfield). In theGroup Membershipfield, you can specify additional groups as a comma-separated list. Groups which do not already exist will be created; you can specify custom GIDs for them in parentheses. If you do not specify a custom GID for a new group, it will be assigned automatically.
Want to help? Learn how to contribute to Fedora Docs ›