Installing Using Anaconda
This chapter provides step-by-step instructions for installing Fedora using the Anaconda installer. The bulk of this chapter describes installation using the graphical user interface. A text mode is also available for systems with no graphical display, but this mode is limited in certain aspects (for example, custom partitioning is not possible in text mode).
If your system does not have the ability to use the graphical mode, you can:
-
Use Kickstart to automate the installation as described in Automating the Installation with Kickstart
-
Perform the graphical installation remotely by connecting to the installation system from another computer with a graphical display using the VNC (Virtual Network Computing) protocol - see Installing Using VNC
Introduction to Anaconda
The Fedora installer, Anaconda, is different from most other operating system installation programs due to its parallel nature. Most installers follow a fixed path: you must choose your language first, then you configure network, then installation type, then partitioning, etc. There is usually only one way to proceed at any given time.
In Anaconda you are only required to select your language and locale first, and then you are presented with a central screen, where you can configure most aspects of the installation in any order you like. This does not apply to all parts of the installation process, however - for example, when installing from a network location, you must configure the network before you can select which packages to install.
Some screens will be automatically configured depending on your hardware and the type of media you used to start the installation. You can still change the detected settings in any screen. Screens which have not been automatically configured, and therefore require your attention before you begin the installation, are marked by an exclamation mark. You can not start the actual installation process before you finish configuring these settings.
Additional differences appear in certain screens; notably the custom partitioning process is very different from other Linux distributions. These differences are described in each screen’s subsection.
Consoles and Logging During the Installation
The following sections describe how to access logs and an interactive shell during the installation. This is useful when troubleshooting problems, but should not be necessary in most cases.
Accessing Consoles
The Fedora installer uses the tmux terminal multiplexer to display and control several windows you can use in addition to the main interface. Each of these windows serves a different purpose - they display several different logs, which can be used to troubleshoot any issues during the installation, and one of the windows provides an interactive shell prompt with root privileges, unless this prompt was specifically disabled using a boot option or a Kickstart command.
|
In general, there is no reason to leave the default graphical installation environment unless you need to diagnose an installation problem. |
The terminal multiplexer is running in virtual console 1. To switch from the actual installation environment to tmux, press Ctrl+Alt+F1. To go back to the main installation interface which runs in virtual console 6, press Ctrl+Alt+F6.
|
If you choose text mode installation, you will start in virtual console 1 (tmux), and switching to console 6 will open a shell prompt instead of a graphical interface. |
The console running tmux has 5 available windows; their contents are described in the table below, along with keyboard shortcuts used to access them. Note that the keyboard shortcuts are two-part: first press Ctrl+b, then release both keys, and press the number key for the window you want to use.
You can also use Ctrl+b n and Ctrl+b p to switch to the next or previous tmux window, respectively.
| Shortcut | Contents |
|---|---|
Ctrl+b 1 |
Main installation program window. Contains text-based prompts (during text mode installation or if you use VNC direct mode), and also some debugging information. |
Ctrl+b 2 |
Interactive shell prompt with |
Ctrl+b 3 |
Installation log; displays messages stored in |
Ctrl+b 4 |
Storage log; displays messages related storage devices from kernel and system services, stored in |
Ctrl+b 5 |
Program log; displays messages from other system utilities, stored in |
In addition to displaying diagnostic information in tmux windows, Anaconda also generates several log files, which can be transferred from the installation system. These log files are described in Log Files Generated During the Installation, and directions for transferring them from the installation system are available in Transferring Log Files from the Installation System.
Saving Screenshots
You can press Shift+Print Screen at any time during the graphical installation to capture the current screen. These screenshots are saved to /tmp/anaconda-screenshots.
Additionally, you can use the autostep --autoscreenshot command in a Kickstart file to capture and save each step of the installation automatically. See autostep (optional) - Go Through Every Screen for details.
Installing in Text Mode
Text mode installation offers an interactive, non-graphical interface for installing Fedora. This may be useful on systems with no graphical capabilities; however, you should always consider the available alternatives before starting a text-based installation. Text mode is limited in the amount of choices you can make during the installation.
There are two alternatives to text mode which can both be used even if the installation system does not have a graphical display. You can either connect to the installation system using VNC and perform an interactive graphical installation remotely (see Installing Using VNC), or you can create a Kickstart file to perform the installation automatically (see Automating the Installation with Kickstart).
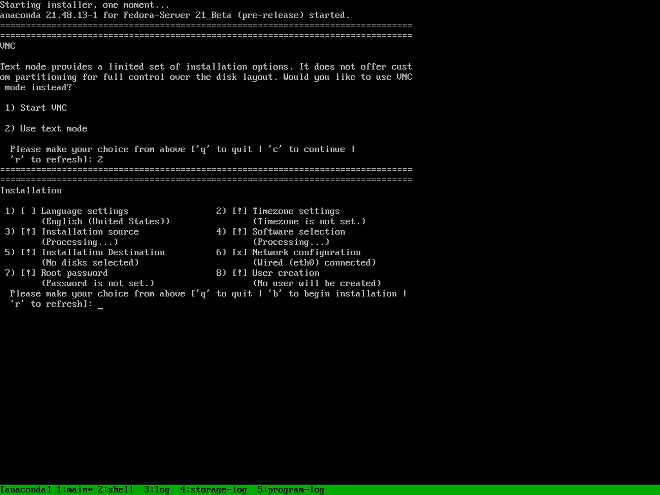
Installation in text mode follows a pattern similar to the graphical installation: There is no single fixed progression; you can configure many settings in any order you want using the main status screen. Screens which have already been configured, either automatically or by you, are marked as [x], and screens which require your attention before the installation can begin are marked with [!]. Available commands are displayed below the list of available options.
Limits of interactive text mode installation include:
-
The installer will always use the English language and the US English keyboard layout. You can configure your language and keyboard settings, but these settings will only apply to the installed system, not to the installation.
-
You can not configure any advanced storage methods (LVM, software RAID, FCoE, zFCP and iSCSI).
-
It is not possible to configure custom partitioning; you must use one of the automatic partitioning settings. You also cannot configure where the boot loader will be installed.
To start a text mode installation, boot the installation with the inst.text boot option used either at the boot command line in the boot menu, or in your PXE server configuration. See Booting the Installation for information about booting and using boot options.
Installing in the Graphical User Interface
The graphical installation interface is the preferred method of manually installing Fedora. It allows you full control over all available settings, including custom partitioning and advanced storage configuration, and it is also localized to many languages other than English, allowing you to perform the entire installation in a different language. The graphical mode is used by default when you boot the system from local media (a CD, DVD or a USB flash drive).
The sections below discuss each screen available in the installation process. Note that due to the installer’s parallel nature, most of the screens do not have to be completed in the order in which they are described here.
Each screen in the graphical interface contains a Help button. This button opens the Yelp help browser displaying the section of the Fedora Installation Guide relevant to the current screen.
You can also control the graphical installer with your keyboard. Use Tab and Shift+Tab to cycle through active control elements (buttons, check boxes, etc.) on the current screen, Up and Down arrow keys to scroll through lists, and Left and Right to scroll through horizontal toolbars or table entries. Space or Enter can be used to select or remove a highlighted item from selection and to expand and collapse drop-down menus.
Additionally, elements in each screen can be toggled using their respective shortcuts. These shortcuts are highlighted (underlined) when you hold down the Alt key; to toggle that element, press Alt+X, where X is the highlighted letter.
Your current keyboard layout is displayed in the top right hand corner. Only one layout is configured by default; if you configure more than layout in the Keyboard Layout screen (Keyboard Layout), you can switch between them by clicking the layout indicator.
Écran de bienvenue et de sélection de la langue
Le premier écran affiché immédiatement après le démarrage de l’installateur graphique est l’écran de bienvenue.
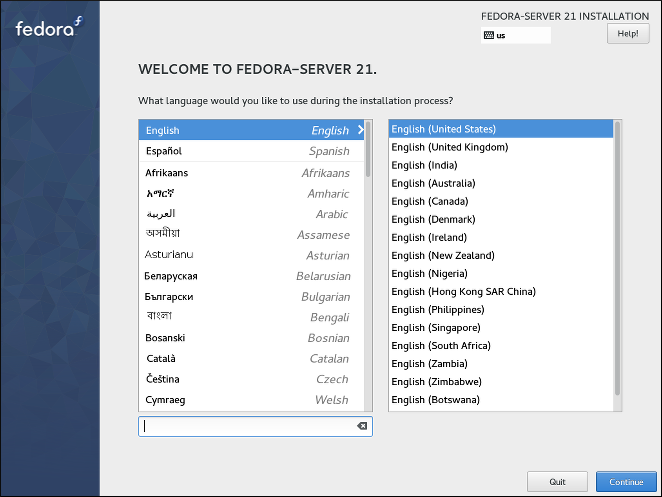
Tout d’abord, sélectionnez votre langue préférée dans la colonne de gauche, puis sélectionnez votre région dans la colonne de droite. Vous pouvez utiliser le champ de saisie de texte en bas à gauche pour rechercher votre langue au lieu de la chercher dans la liste comportant plus de 70 langues.
La langue que vous sélectionnez sur cet écran sera utilisée lors de l’installation, et sera également utilisée par défaut sur le système installé. Vous pouvez changer la langue du système installé plus tard, mais une fois que vous aurez cliqué sur Continuer sur cet écran, vous ne pourrez plus revenir en arrière pour changer la langue utilisée à l’intérieur de l’installateur lui-même.
Une langue est présélectionnée par défaut en haut de la liste. Si l’accès au réseau est configuré à ce stade (par exemple, si vous avez démarré à partir d’un serveur réseau au lieu d’un média local), la langue présélectionnée sera déterminée en fonction de la détection automatique de la localisation à l’aide du module GeoIP. Sinon, si vous avez utilisé l’option inst.lang= à la ligne de commande de démarrage ou dans la configuration de votre serveur PXE, cette langue sera sélectionnée par défaut, mais vous pouvez toujours la modifier.
Après avoir sélectionné votre langue et votre région, cliquez sur Continuer pour confirmer votre sélection et passez à Résumé de l’installation.
|
Si vous installez une préversion de Fedora, un message sera affiché après que vous aurez cliqué sur |
Résumé de l’installation
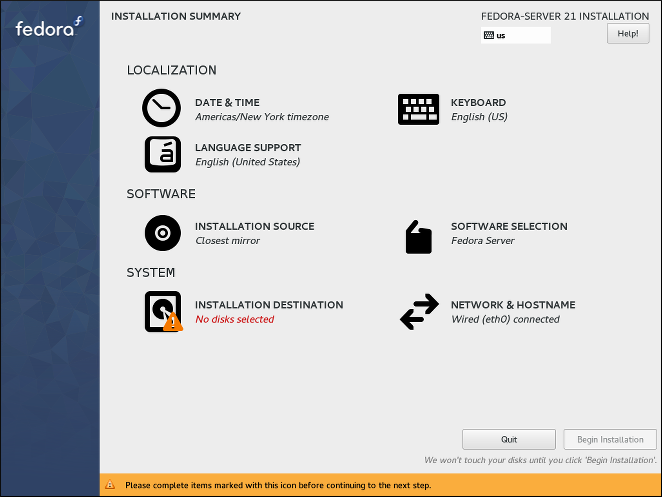
L’écran Résumé de l’installation est l’endroit central pour configurer l’installation. La plupart des options qui peuvent être configurées pendant l’installation sont accessibles à partir de cet écran.
|
Si vous avez utilisé une option Kickstart ou une option de démarrage pour spécifier un dépôt d’installation réseau, mais qu’aucun réseau n’est disponible au début de l’installation, le programme d’installation affichera l’écran |
L’écran de résumé est constitué de plusieurs liens vers d’autres écrans, séparés en catégories. Ces liens peuvent se trouver dans plusieurs états différents, qui sont indiqués graphiquement :
-
Un symbole d’avertissement (triangle jaune avec un point d’exclamation) à côté d’une icône signifie qu’un écran requiert votre attention avant que vous ne commenciez l’installation. Cela se produit généralement avec l’écran
Destination de l’installation, car même s’il existe une variante de partitionnement automatique par défaut, vous devez toujours au moins confirmer cette sélection, même si vous ne voulez effectuer aucune modification. -
Si un lien est grisé, cela signifie que l’installateur est en train de configurer cette section, et que vous devez attendre que la configuration soit terminée avant d’accéder à cet écran. Cela se produit généralement lorsque vous changez la source d’installation dans l’écran
Source d’installationet que l’installateur sonde la nouvelle source et rassemble la liste des paquets disponibles. -
Les écrans avec du texte noir et sans symbole d’avertissement sont des écrans qui ne requièrent pas votre attention. Vous pouvez modifier les paramètres de ces écrans, mais il n’est pas nécessaire de le faire pour terminer l’installation. Cela se produit généralement avec les paramètres de localisation, car ceux-ci sont soit détectés automatiquement, soit configurés sur l’écran précédent où vous sélectionnez votre langue et votre région.
Un message d’avertissement est affiché au bas de l’écran de résumé, et le bouton Commencer l’installation est grisé, tant qu’au moins un élément n’a pas encore été configuré.

Chaque écran comporte également, sous son titre, un texte explicatif indiquant les paramètres actuellement configurés dans cet écran. Ce texte peut être concaténé ; dans ce cas, déplacez le curseur de votre souris dessus et attendez qu’une infobulle contenant le texte complet apparaisse.

Une fois que vous avez configuré tout ce qui est nécessaire à l’installation, vous pouvez appuyer sur le bouton Commencer l’installation pour lancer l’installation de Fedora. Cela vous amènera à l’écran Configuration et état d’avancement de l’installation. Notez que, comme le dit le texte sous ce bouton, rien ne sera écrit sur votre disque dur avant que vous n’appuyiez sur ce bouton. Vous pouvez appuyer sur Quitter à tout moment ; cela annulera toutes les modifications que vous avez faites dans l’installateur jusqu’à présent et redémarrera le système.
Date & Time
The Date & Time screen allows you to configure time and date-related settings for your system. This screen is automatically configured based on the settings you selected in Welcome Screen and Language Selection, but you can change your date, time and location settings before you begin the installation.
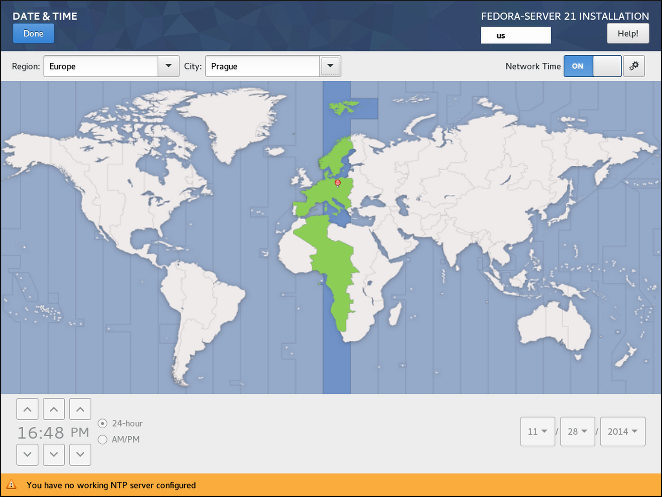
First, select your Region using the drop-down menu in the top left corner of the screen. Then, select your City, or the city closest to your location in the same time zone. Selecting a specific location helps Fedora ensure that your time is always set correctly including automatic time changes for daylight savings time if applicable.
You can also select a time zone relative to Greenwich Mean Time (GMT) without setting your location to a specific region. To do so, select Etc as your region.
|
The list of cities and regions comes from the Time Zone Database (tzdata) public domain, which is maintained by the Internet Assigned Numbers Authority (IANA). The Fedora Project can not add cities or regions into this database. You can find more information at the IANA official website. |
The switch labeled Network Time in the top right corner of the screen can be used to enable or disable network time synchronization using the Network Time Protocol (NTP). Enabling this option will keep your system time correct as long as the system can access the internet. By default, four NTP pools are configured; you can add others and disable or remove the default ones by clicking the gear wheel button next to the switch.
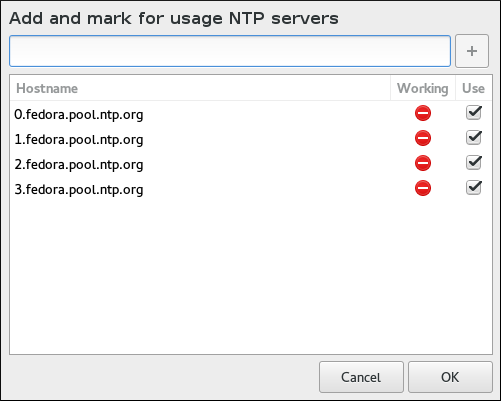
If you disable network time synchronization, the controls at the bottom of the screen will become active, and you will be able to set the current time and date manually.
After configuring your time and date settings, press the Done button in the top left corner to return to Installation Summary.
Keyboard Layout
The Keyboard Layout screen allows you to set up one or more keyboard layouts for your system and a way to switch between them. One keyboard layout is configured automatically based on your selection in Welcome Screen and Language Selection, but you can change this layout and add additional ones before you begin the installation.
Keyboard layouts are a separate setting from system languages, and these two settings can be mixed as you see fit.
|
All settings configured in this screen will be available on the installed system, and they will also become immediately available inside the installer. You can use the keyboard icon in the top right corner of any screen, or the keyboard switch you configured in this screen, to cycle between your configured layouts. |
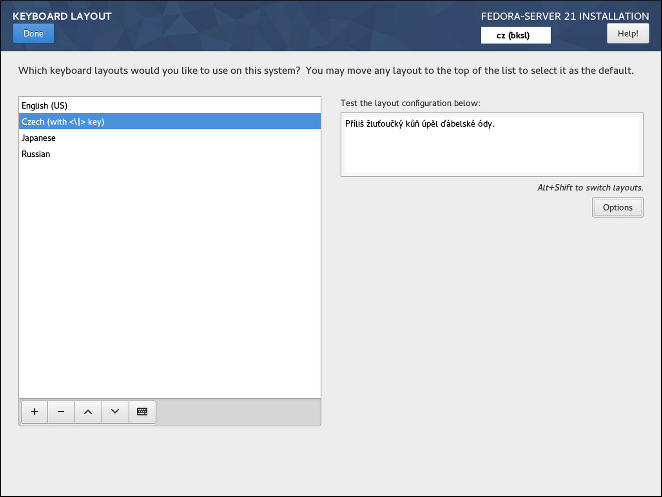
The left half of the screen contains a window listing all currently configured layouts. The order in which the layouts are displayed is important - the same order will be used when switching between layouts, and the first listed layout will be the default on your system.
The text field on the right side of the screen can be used to test the currently selected layout.
You can click a layout in the list to highlight it. At the bottom of the list, there is a set of buttons:
-
The
+button adds a new layout. When you press this button, a new window opens with a list of all available layouts, grouped by language. You can find a layout by browsing the list, or you can use the search bar at the bottom of this window. When you find the layout you want to add, highlight it and pressAdd. -
The
-button removes the currently highlighted layout. -
The up and down buttons can be used to move the highlighted layout up or down in the list.
-
The keyboard button opens a new window which offers a visual representation of the highlighted layout.
|
If you use a layout that cannot accept Latin characters, such as |
You can also optionally configure a keyboard switch which can be used to cycle between available layouts. To do so, click the Options button on the right side of the screen. The Layout Switching Options dialog will open, allowing you to configure one or more keys or key combinations for switching. Select one or more key combinations using the check boxes next to them, and click OK to confirm your selection.
After you finish configuring keyboard layouts and switches, click Done in the top left corner to return to Installation Summary.
Langues supportées
The Language Support screen allows you to configure language settings for your system. The default language is determined by your selection in Welcome Screen and Language Selection and support for this language can not be removed. You can only add additional languages, which will be available on the installed system - not during the installation.
If you want to change the default language, or the language used during the installation, you must reboot your system, start the installer again, and select a different language in Welcome Screen and Language Selection.
|
Adding support for another language does not automatically configure the corresponding keyboard layout. Layouts are a separate setting configured in Keyboard Layout. |
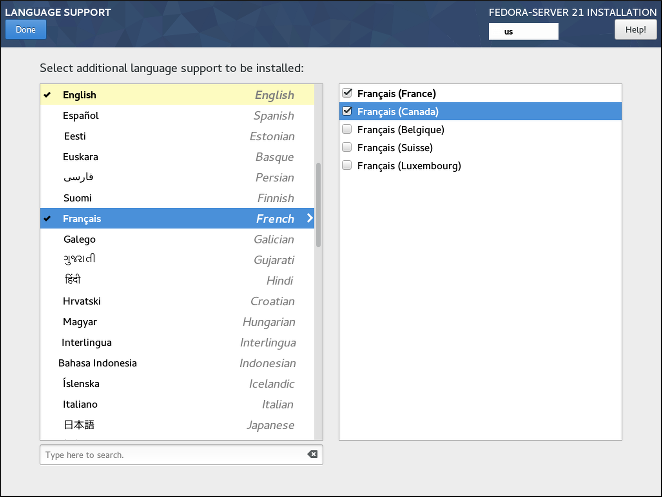
The left panel contains a list of available language groups such as English or Bulgarian. If at least one language from a group is selected, a check mark will be displayed next to the group, and the list entry will be highlighted. This allows you to easily see which languages you have configured support for.
To add support for one or more additional languages, click a group in the left panel, and then select one or more regional variations in the right panel using check boxes next to list entries. Repeat this process for all languages you want to install support for.
|
Enabling support for some languages (typically languages which use non-Latin script) will install additional packages - for example, enabling support for one or more languages from the |
Once you have made your selections, click Done in the top left corner to return to Installation Summary.
Source de l’installation
L’écran Source d’installation vous permet de spécifier un emplacement (local ou sur le réseau) à partir duquel les paquets seront téléchargés et installés sur votre système. Cet écran sera configuré automatiquement dans la plupart des cas, mais vous pouvez modifier vos paramètres ou ajouter des sources supplémentaires.
|
Normally, when you first enter the |
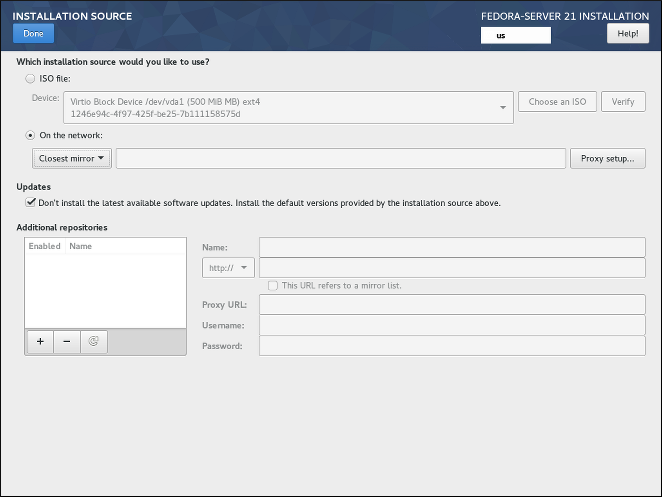
Les options suivantes sont disponibles. Notez qu’elles ne sont pas toutes affichées.
- Support d’installation auto-détecté
-
C’est l’option sélectionnée par défaut si vous avez démarré l’installateur à partir d’un support contenant une source d’installation, comme un DVD en direct. Aucune configuration supplémentaire n’est nécessaire. Vous pouvez cliquer sur le bouton
Vérifierpour vérifier l’intégrité du support. - Fichier ISO
-
Cette option apparaît si le programme d’installation détecte un disque dur partitionné avec des systèmes de fichiers montables pendant le démarrage. Sélectionnez cette option, cliquez sur le bouton Choose an ISO et naviguez jusqu’à l’emplacement du fichier ISO d’installation sur votre système. Vous pouvez cliquer sur le bouton
Vérifierpour vérifier l’intégrité du fichier. - Sur le réseau
-
Utilisez cette option pour télécharger les paquets à installer à partir d’un emplacement réseau au lieu d’un support local. Il s’agit de la sélection par défaut sur le support d’installation réseau.
Dans la plupart des cas, l’option
Miroir le plus prochedisponible dans le menu déroulant de sélection de protocole est préférable. Si cette option est sélectionnée, les paquets de votre système seront téléchargés depuis l’emplacement le plus approprié (miroir).Pour configurer manuellement une source d’installation réseau, utilisez le menu déroulant pour spécifier le protocole à utiliser lors du téléchargement de paquets. Ce paramètre dépend du serveur que vous souhaitez utiliser. Saisissez ensuite l’adresse du serveur (sans le protocole) dans le champ d’adresse. Si vous choisissez NFS, un second champ de saisie apparaîtra où vous pourrez spécifier des
options de montage NFSpersonnalisées.Lorsque vous sélectionnez une source d’installation NFS, vous devez spécifier l’adresse avec un caractère deux-points (
:) séparant le nom d’hôte du chemin. Par exemple :server.example.com:/path/to/directoryPour configurer un proxy pour une source HTTP ou HTTPS, cliquez sur le bouton Proxy setup. Cochez
Activé le HTTP proxy`et saisissez l’URL dans la case `Proxy URL. Si le serveur proxy nécessite une authentification, cochez la case Utiliser l’authentification et saisissez votre nom d’utilisateur et votre mot de passe. Cliquer sur OK pour terminer la configuration.Si votre URL HTTP ou HTTPS fait référence à une liste de miroirs de dépôt, cochez la case sous le champ d’adresse.
You can also specify additional repositories in the Additional repositories section to gain access to more installation environments and software add-ons. All environments and add-ons will be available for selection in Software Selection once you finish configuring the sources.
Pour ajouter un dépôt, cliquez sur le bouton +. Pour supprimer un dépôt, sélectionnez-en un dans la liste et cliquez sur le bouton -. Cliquez sur l’icône fléchée pour revenir à la liste précédente des dépôts, c.-à-d. pour remplacer les entrées actuelles par celles qui étaient présentes au moment où vous êtes entré dans l’écran Source d’installation. Pour activer ou désactiver un dépôt, cochez la case dans la colonne Activé à chaque entrée de la liste.
Vous pouvez nommer votre dépôt supplémentaire et le configurer de la même manière que le dépôt primaire sur le réseau en utilisant les champs de saisie à droite de la section.
Une fois que vous avez sélectionné votre source d’installation, cliquez sur `Terminé`dans le coin supérieur gauche pour revenir à Résumé de l’installation.
Software Selection
The Software Selection screen allows you to choose a Base Environment and Add-ons. These options control which software packages will be installed on your system during the installation process.
This screen is only available if Installation Source is properly configured and only after the installer has downloaded package metadata from the source.
|
It is not possible to select specific packages during a manual installation. You can only select pre-defined environments and add-ons. If you need to control exactly which packages are installed, you must use a Kickstart file and define the packages in the %packages section. See Automating the Installation with Kickstart for information about Kickstart installations. |
The availability of environments and add-ons depends on your installation source. By default, the selection depends on the installation media you used to start the installation; Fedora Server installation image will have different environments and add-ons available for selection than, for example, the Fedora Cloud image. You can change this by configuring a different installation source containing different environments.
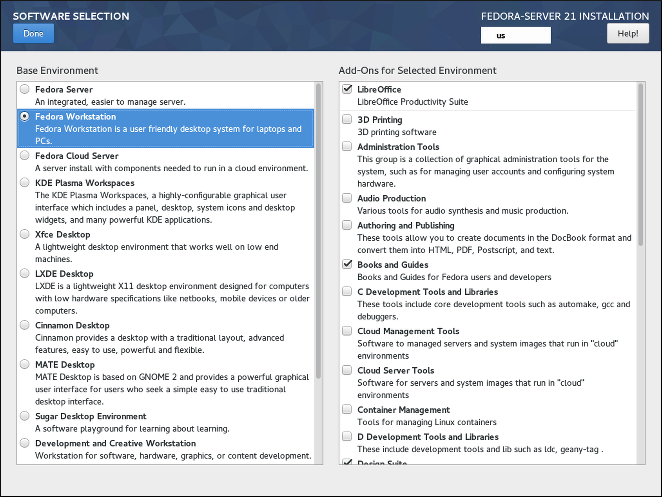
To configure your software selection, first choose an environment on the left side of the screen. Only one environment can be chosen, even if more are available. Then, on the right side of the screen, select one or more add-ons which you want to install by marking the check boxes next to each add-on.
The list of add-ons is divided into two parts by a horizontal line. Add-ons above this line are defined as part of your chosen environment; if you select a different environment, the add-ons available here will change. The add-ons displayed below the separator are not specific to your chosen environment.
Environments and add-ons are defined using a comps.xml file in your installation source (for example, in the repodata/ directory on the full Fedora Server installation DVD). Review this file to see exactly which packages will be installed as part of a certain environment or add-on. For more information about the comps.xml file, see %packages (required) - Package Selection.
After you finish configuring your software selection, click Done in the top left corner to return to Installation Summary.
Destination de l’installation
The Installation Destination screen allows you to configure storage options - namely, which disks will be used as the installation target for your Fedora installation. At least one disk must always be selected for the installation to proceed.
For information about the theory and concepts behind disk partitioning in Linux, see Recommended Partitioning Scheme.
|
If you plan to use a disk which already contains some data - for example, if you want to shrink an existing Microsoft Windows partition and install Fedora as a second system or if you are upgrading a previous release of Fedora, make sure to back up any important data first. Manipulating partitions always carries a risk - if the process is interrupted or fails for any reason (installer error, hardware failure, power outage, etc.), any data already on the disk may become impossible to recover. |
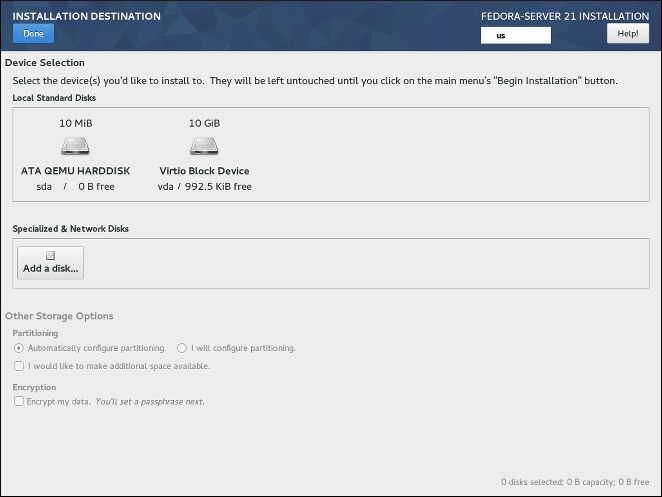
Dans le haut de l’écran, tous les périphériques de stockage disponibles localement (disques durs SATA, IDE et SCSI, clés USB, etc.) sont affichés dans la section Disques standard locaux. Les disques locaux sont détectés au démarrage du programme d’installation - tous les périphériques de stockage connectés après le démarrage de l’installation ne seront pas affichés.
If you need to configure additional local storage devices, select I will configure partitioning and press Done to move to Manual Partitioning. Then, connect any new hard drives you want to make available during the installation, and press the button marked by a circular arrow in the set of controls below the list of mount points on the left side of the screen. In the dialog window that opens, press Rescan Disks and wait until the scanning process completes. Then, press OK to return to Installation Destination; all detected disks including any new ones will be displayed in the Local Standard Disks section.
The Specialized & Network Disks section below shows advanced network storage (such as iSCSI and FCoE disks) currently configured. When you first open this screen, no such devices will be displayed because they can not be automatically detected; to search for network storage devices, press Add a disk button and proceed with Installation Destination - Specialized & Network Disks. Any network storage you configure will then show up in the Specialized & Network Disks the same way local disks are shown above.
All storage devices which will be used to install Fedora have a black circle icon with a white check mark on them. Disks not marked by this icon will not be used during the installation - they will be ignored if you choose automatic partitioning, and they will not be available in manual partitioning.
|
USB storage devices such as flash drives and external disks will be shown in the |

After you select all disks you want to install Fedora, select one of the two options in the Other Storage Options section:
-
Automatically configure partitioning- If this option is selected, then after you pressDonein the top left corner of the screen, the installer will determine the total amount of space on all selected disks, and it will create a Logical Volume Management (LVM) layout suitable for your system. The specifics of this layout depend on whether your system uses BIOS or UEFI firmware, the total amount of free space on your disks, and the amount of RAM on your system (which determines the size of your swap space).With automatic partitioning, you can also select the
I would like to make additional space availableoption below. Use this option if you want to reclaim space from an existing partitioning layout - for example, if a disk you want to use already contains a different operating system, and you want to make this system’s partitions smaller to allow more room for Fedora. TheReclaim spacedialog which opens if this option is selected is described later in this section. -
I will configure partitioning- Select this option and pressDonein the top left corner of the screen to configure your system’s partitioning layout manually. This requires some knowledge of the theory behind disk partitions and related concepts, but gives you full control over the way the system will be installed. For instructions for manual partitioning, see Manual Partitioning.
Additionally, you can select Encrypt my data; this will encrypt all partitions except the ones needed to boot the system (such as /boot) using Linux Unified Key Setup (LUKS). Encrypting your hard drive is recommended. For detailed information about LUKS encryption, see the Fedora Security Guide, available at https://docs.fedoraproject.org/.
|
If you lose the LUKS passphrase, any encrypted partitions and the data on them will become completely inaccessible. There is no way to recover a lost passphrase. However, if you perform a Kickstart installation, you can save encryption passphrases and create backup encryption passphrases during the installation. See Automating the Installation with Kickstart for information about Kickstart installations. |
To control which one of your selected storage devices will contain the boot loader, click the Full disk summary and bootloader link in the bottom left corner of the screen, and follow the instructions in Boot Loader Installation. Note that while in most cases it is sufficient to leave the boot loader in the default location, some configurations (for example, systems which require chain loading from another boot loader) will require the boot drive to be specified manually.
After you select storage devices, choose between automatic and manual partitioning, configure encryption and boot loader location, press Done in the top left corner of the screen. Then, depending on your settings, the following will happen:
-
If you chose to encrypt your hard drive, the
Disk Encryption Passphrasedialog will appear. Enter your chosen passphrase into thePassphraseandConfirmfields. When you do so, the passphrase will be automatically evaluated and its strength will be displayed, along with suggestions on how to make it stronger if the installer has determined it to be weak. For information about creating strong passwords, see Fedora Security Guide. -
If you selected automatic partitioning and the
I would like to make additional space available, or if there is not enough free space on your selected hard drives to install Fedora, theReclaim Spacedialog will appear. This dialog lists all disk devices you have configured and all partitions on those devices. The bottom right corner of the dialog displays information about how much space the system needs for at least a minimal installation and how much space you have reclaimed.If you use the
Reclaim Spacedialog to delete a partition, all data on that partition will be lost. If you want to preserve your data, use theShrinkoption, not theDeleteoption.First, review the displayed list of available storage devices. The
Reclaimable Spacecolumn shows how much space can be reclaimed from each entry. To reclaim space, select a disk or partition, and press either theDeletebutton to delete that partition (or all partitions on a selected disk), orShrinkto use free space on a partition while preserving existing data. Alternatively, you can pressDelete allin the bottom right corner; this will delete all existing partitions on all disks and make this space available to Fedora, but all existing data on all disks will be lost.After you free enough space for your Fedora installation, press
Reclaim spaceto finish.No changes to any disks will be made until you press
Begin Installationin Installation Summary. TheReclaim Spacedialog only marks partitions for resizing or deletion, but no such action is performed immediately. -
If you selected the
I will configure partitioningoption, pressingDonewill open theManual Partitioningscreen. See Manual Partitioning for further instructions.
Installation du chargeur d’amorçage
Fedora utilise GRUB2 (GRand Unified Bootloader version 2) comme chargeur d’amorçage. Le chargeur d’amorçage est le premier programme qui s’exécute au démarrage de l’ordinateur et qui est responsable du chargement et du transfert du contrôle vers un système d’exploitation. GRUB2 peut démarrer tout système d’exploitation compatible (y compris Microsoft Windows) et peut également utiliser le chargement en chaine pour transférer le contrôle à d’autres chargeurs d’amorçage pour les systèmes d’exploitation non pris en charge.
|
L’installation de GRUB2 peut écraser votre chargeur d’amorçage existant. |
Si vous avez d’autres systèmes d’exploitation déjà installés, le programme d’installation de Fedora tentera de détecter et de configurer automatiquement le chargeur d’amorçage pour les démarrer. Vous pouvez configurer manuellement tout système d’exploitation supplémentaire après avoir terminé l’installation, s’il n’est pas détecté correctement. Pour des instructions sur l’édition de la configuration de GRUB2, voir le Guide de l’administrateur système de Fedora, disponible sur https://docs.fedoraproject.org/
Si vous installez le système Fedora avec plus d’un disque, vous pouvez spécifier manuellement l’endroit où le chargeur d’amorçage doit être installé. Cliquez sur le lien Résumé complet du disque et chargeur d’amorçage en bas de l’écran Destination de l’installation. La boite de dialogue Disques sélectionnés apparaitra. Le chargeur d’amorçage sera installé sur le périphérique de votre choix, ou sur un système UEFI, la partition EFI système sera créée sur ce périphérique lors du partitionnement guidé.
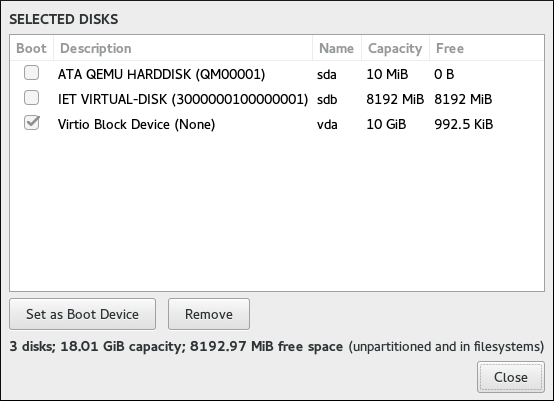
Dans la colonne Amorçage, une icône coche marque l’un des périphériques comme étant le périphérique de démarrage prévu. Pour changer de périphérique d’amorçage, sélectionnez un périphérique dans la liste et cliquez sur le bouton Définir comme périphérique d’amorçage pour y installer le chargeur d’amorçage à la place. Un seul périphérique peut être défini comme périphérique d’amorçage.
Pour refuser l’installation d’un nouveau chargeur d’amorçage, sélectionnez le périphérique actuellement marqué pour l’amorçage et cliquez sur le bouton Ne pas installer le chargeur d’amorçage. Ceci enlèvera la coche et assurera que GRUB2 ne soit installé sur aucun périphérique.
|
Si vous choisissez de ne pas installer de chargeur d’amorçage pour une raison quelconque, vous ne pourrez pas démarrer le système directement et vous devrez utiliser une autre méthode d’amorçage, telle qu’un chargeur d’amorçage commercial autonome. N’utilisez cette option que si vous êtes sûr de disposer d’une autre méthode pour amorcer votre système. |
Le chargeur d’amorçage peut également nécessiter la création d’une partition spéciale, selon que votre système utilise un BIOS ou un micrologiciel UEFI et selon que le disque d’amorçage possède une étiquette Table de partition GUID (GPT) ou Master Boot Record (MBR, également connu sous le nom de msdos). Si vous utilisez le partitionnement automatique, l’installateur créera cette partition si nécessaire. Pour plus de détails, référez-vous à Schéma de partitionnement recommandé.
Installation Destination - Specialized & Network Disks
This part of the Installation Destination screen allows you to configure non-local storage devices, namely iSCSI and FCoE storage. This section will mostly be useful to advanced users who have a need for networked disks. For instructions on setting up local hard drives, see Installation Destination.
|
This section only explains how to make existing network disks available inside the installer. It does not explain how to set up your network or a storage server, only how to connect to them. |
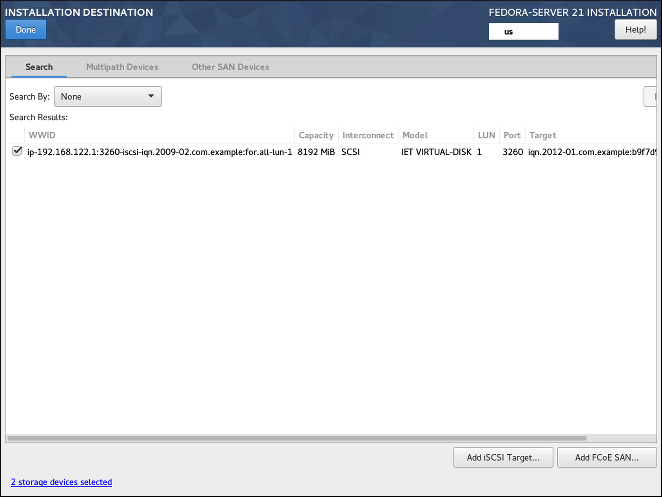
The screen contains a list of all currently available (discovered) network storage devices. When the screen is opened for the first time, the list will be empty in most cases because no network storage has been discovered - the installer makes no attempt at discovering this unless you configure network disks using a Kickstart file.
To add one or more storage devices to the screen so you can search them and use them in the installation, click Add iSCSI Target or Add FCoE SAN in the bottom right corner of the screen, and follow the instructions in Add iSCSI Target or Add FCoE SAN, depending on which type of network storage you want to add.
Network storage devices successfully discovered and configured by the installer will then be displayed in the main list, along with identifying information such as Name, WWID, Model and Target. To sort the list by a specific column (for example WWID), click the column’s heading.
|
On lower display resolutions, the list may be too wide to fit on the screen, and some of the columns or buttons may be hidden initially. Use the horizontal scroll bar at the bottom of the list to move your view and see all available table columns and controls. |
There are three tabs on the top of the list, which display different information:
- Search
-
Displays all available devices, regardless of their type, and allows you to filter them either by their World Wide Identifier (WWID) or by the port, target, or logical unit number (LUN) at which they are accessed.
- Multipath Devices
-
Storage devices accessible through more than one path, such as through multiple SCSI controllers or Fiber Channel ports on the same system.
The installation program only detects multipath storage devices with serial numbers that are 16 or 32 characters long.
- Other SAN Devices
-
Devices available on a Storage Area Network (SAN).
Depending on the tab you are currently in, you can filter the discovered devices by using the Filter By field. Some of the filtering options are automatically populated based on discovered devices (for example, if you select Filter By: Vendor, another drop-down menu will appear showing all vendors of all discovered devices). Other filters require your input (for example when filtering by WWID), and present you with a text input field instead of a drop-down menu.
In the list (regardless of how it is filtered), each device is presented on a separate row, with a check box to its left. Mark the check box to make the device available during the installation process; this will cause this device (node) to be shown in the Specialized & Network Disks section in Installation Destination. There, you can select the disk as an installation target and proceed with either manual or automatic partitioning.
|
Devices that you select here are not automatically wiped by the installation process. Selecting a device on this screen does not, in itself, place data stored on the device at risk. Also note that any devices that you do not select here to form part of the installed system can be added to the system after installation by modifying the |
When you have selected the storage devices to make available during installation, click Done to return to Installation Destination.
Add iSCSI Target
To use iSCSI storage devices, the installer must be able to discover them as iSCSI targets and be able to create an iSCSI session to access them. Both of these steps may require a user name and password for Challenge Handshake Authentication Protocol (CHAP) authentication.
You can also configure an iSCSI target to authenticate the iSCSI initiator on the system to which the target is attached (reverse CHAP), both for discovery and for the session. Used together, CHAP and reverse CHAP are called mutual CHAP or two-way CHAP. Mutual CHAP provides the greatest level of security for iSCSI connections, particularly if the user name and password are different for CHAP authentication and reverse CHAP authentication.
Follow the procedure below to add an iSCSI storage target to your system.
-
Click the
Add iSCSI Targetbutton in the bottom right corner of the Installation Destination - Specialized & Network Disks screen. A new dialog window titledAdd iSCSI Storage Targetwill open. -
Enter the IP address of the iSCSI target in the
Target IP Addressfield. -
Provide a name in the
iSCSI Initiator Namefield for the iSCSI initiator in iSCSI Qualified Name (IQN) format. A valid IQN entry contains:-
The string
iqn.(including the period). -
A date code specifying the year and month in which your organization’s Internet domain or subdomain name was registered, represented as four digits for the year, a dash, and two digits for the month, followed by a period. For example, represent September 2010 as
2010-09. -
Your organization’s Internet domain or subdomain name, presented in reverse order (with the top-level domain first). For example, represent the subdomain storage.example.com as
com.example.storage. -
A colon (
:) followed by a string which uniquely identifies this particular iSCSI initiator within your domain or subdomain. For example,:diskarrays-sn-a8675309A complete IQN will therefore look as follows:
iqn.2010-09.com.example.storage:diskarrays-sn-a8675309An example using the correct format is also displayed below the input field for reference.
For more information about IQNs, see 3.2.6. iSCSI Names in RFC 3720 - Internet Small Computer Systems Interface (iSCSI), available from https://tools.ietf.org/html/rfc3720#section-3.2.6 and 1. iSCSI Names and Addresses in RFC 3721 - Internet Small Computer Systems Interface (iSCSI) Naming and Discovery, available from https://tools.ietf.org/html/rfc3721#section-1.
-
-
Specify the type of authentication to use for iSCSI discovery using the
Discovery Authentication Typedrop-down menu. Depending on which type of authentication you selected, additional input fields (such asCHAP UsernameandCHAP Passwordmay then become visible. Fill in your authentication credentials; these should be provided by your organization. -
Click the
Start Discoverybutton. The installer will now attempt to discover an iSCSI target based on the information you provided, and if the target requires CHAP or reverse CHAP authentication, it will attempt to use the credentials you provided. This process may take some time (generally less than 30 seconds), depending on your network.If the discovery was not successful, an error message will be displayed in the dialog window. This message will vary based on which part of the discovery failed. If the installer did not find the target you specified at all, you should check the IP address; if the problem is an authentication error, make sure you entered all CHAP and reverse CHAP credentials correctly and that you have access to the iSCSI target.
The
No nodes discoverederror message may also mean that all nodes on the address you specified are already configured. During discovery, Anaconda ignores nodes which have already been added.If the discovery was successful, you will see a list of all discovered nodes.
-
Select one or more nodes you want to log in to by marking or unmarking the check box next to each node discovered on the target. Below the list, select again the type of authentication you want to use; you can also select the
Use the credentials from discoveryoption if the CHAP/reverse CHAP user name and password you used to discover the target are also valid for logging in to it.After selecting all nodes you want to use, click
Log Into initiate an iSCSI session. Anaconda will attempt to log in to all selected nodes. If the login process is succesful, theAdd iSCSI Storage Targetdialog will close, and all nodes you have configured will now be shown in the list of network disks in Installation Destination - Specialized & Network Disks.
You can repeat this procedure to discover additional iSCSI targets, or to add more nodes from a previously configured target. However, note that once you click the Start Discovery button for the first time, you will not be able to change the iSCSI Initiator Name. If you made an error when configuring the initiator name, you must restart the installation.
Add FCoE SAN
The following procedure explains how to add Fibre Channel over Ethernet (FCoE) storage devices and make them available during the installation:
-
Click the
Add FCoE SANbutton in the bottom right corner of Installation Destination - Specialized & Network Disks. A new dialog window will open. -
Select the network interface (
NIC) which is connected to your FCoE switch from the drop-down menu. Note that this network interface must be configured and connected - see Network & Hostname. -
Below the
NICdrop-down menu are two choices:Use DCB-
Data Center Bridging (DCB) is a set of enhancements to the Ethernet protocols designed to increase the efficiency of Ethernet connections in storage networks and clusters. This option should only be enabled for network interfaces that require a host-based DCBX client. Configurations on interfaces that implement a hardware DCBX client should leave this check box empty.
Use auto vlan-
This option indicates whether VLAN discovery should be performed. If this box is checked, then the FCoE Initiation Protocol (FIP) VLAN discovery protocol will run on the Ethernet interface once the link configuration has been validated. If they are not already configured, network interfaces for any discovered FCoE VLANs will be automatically created and FCoE instances will be created on the VLAN interfaces. This option is enabled by default.
-
After you select which interface and options to use, click
Add FCoE Disk(s). Discovered FCoE storage devices will be displayed under theOther SAN Devicestab in Installation Destination - Specialized & Network Disks.
Partitionnement manuel
L’écran de Partitionnement manuel vous permet de créer manuellement une configuration de l’espace de stockage pour votre système Fedora, ce qui vous donne un meilleur contrôle sur le stockage de votre système.
In most other installers for both Linux and other operating systems, disk partitioning usually takes a "bottom-up" approach. In these installers, you first create underlying devices such as LVM physical volumes, then you create a layout such as LVM on top of them, then you create file systems on top of logical volumes, and the last step is usually assigning a mount point to each volume as needed.
Anaconda uses an opposite approach. First, you create all separate mount points you need, and everything needed to create them (creating a volume group, logical volumes inside it, and physical volumes where the volume group will reside) is performed automatically. You can then adjust the automatic settings as you require.
|
No permanent changes will be made to your disks during the actual partitioning process. The configuration you have selected will only be written to your system after you press the |
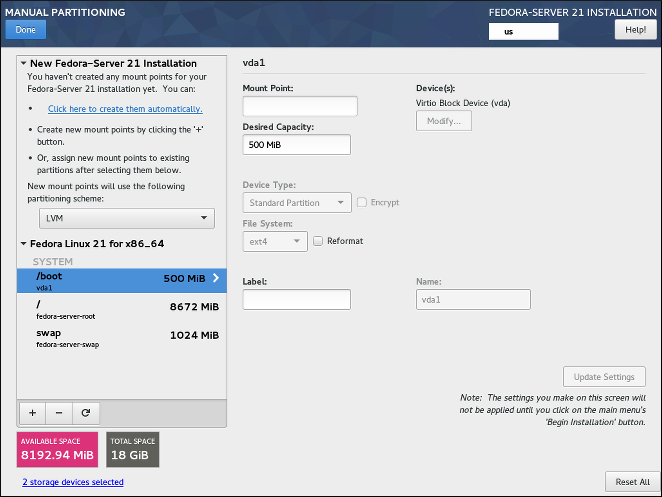
When you first open the Manual Partitioning screen, the column on the left side will display all previously existing partitions on all drives which you selected as installation targers in Installation Destination. If none of the selected drives contain any existing partitions, then a message informing you that no mount points currently exist will appear.
Here, you can choose a partitioning scheme such as LVM or BTRFS and click the Click here to create them automatically to prompt the installer to create a basic partitioning layout; this layout follows the guidelines described in Recommended Partitioning Scheme. The created layout is a basic layout where partition/volume sizes are determined automatically based on the total amount of available space.
Click the + button to add a mount point. In the dialog window that opens, choose a mount point such as / or /home, and the desired capacity for the mount point (such as 10GB or 500MB). Note that specifying the mount point is mandatory, but you do not have to specify the capacity at this point; this is useful when adding a mount point which you want to make larger than the current available space permits. Then, click Add mount point to add it to the list using the default settings, which means it will be created as a logical volume, and a new volume group will be created for it unless one already exists.
Then, select the newly created mount point in the list on the left side. A set of controls will display on the right side of the screen, allowing you to change its mount point, the device on which it will physically reside, its capacity, file system, etc. When you change any settings, press Update Settings on the bottom right. This will save the adjusted configuration; you can now create another mount point, or select a different existing one and adjust its settings as well.
|
For a description of available device and file system types, see Device, File System and RAID Types. |
To remove a mount point, select it in the list and press the - button below.
The exact steps for configuring your storage depend on your specific needs and your system configuration. Procedures for creating specific layouts are described further in this chapter. Before you start, you should also review Recommended Partitioning Scheme and Advice on Partitions for a list of requirements and tips for partitioning your disks for Fedora.
Below the list of existing mount points are two fields, showing you how much free space is left on your storage devices and how much total space they have.
Click the X storage devices selected to view a summary of currently selected storage devices; this may help you with orientation in more complicated storage schemas. Devices displayed here are the ones you have selected in Installation Destination. If you want to add or remove any storage devices from your configuration, return to that screen and change your selection.
You can press the Reset All button in the bottom right corner at any time to reset the storage configuration to the state it was in when you last opened the Manual Partitioning screen. This means that if you modify the storage configuration, leave the screen, and then come back, the Reset button will reset the configuration back to the already modified state, discarding only the changes you have made recently, not all changes to the storage configuration since you booted the installer.
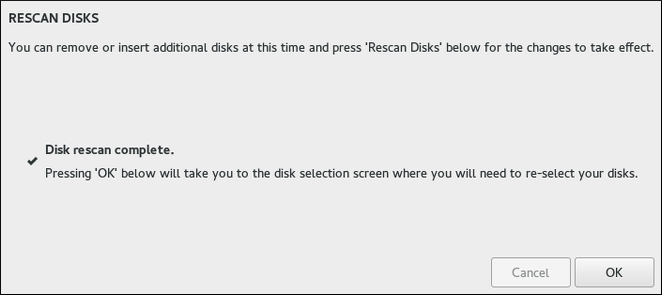
To discard all changes, and to also detect any new drives which have not been detected when the installer started (usually when you attached a new drive after you started), press the button marked by a circular arrow in the set of controls below the list of mount points on the left side of the screen. In the dialog window that opens, press Rescan Disks and wait until the scanning process completes. Then, press OK to return to Installation Destination; all detected disks including any new ones will be displayed in the Local Standard Disks section.
After you finish configuring your system storage, press Done in the top left corner to save the configuration and return to the Installation Summary screen. At this point, the installer will check if your storage configuration is valid. If an error was detected, a message will be displayed at the bottom of the screen. Click the message to open a dialog window explaining what kind of error has been detected (for example, you put /boot on a Btrfs subvolume, or you did not create a BIOS Boot partition when your system requires one).
If such a message is displayed, go back and fix any issues found by the installer; otherwise you will not be able to proceed with the installation. You can also press Done again to return to the Installation Summary anyway, but a storage configuration error will prevent you from starting the actual installation process.
If no error message is displayed and if you made any changes since the last time you have visited this screen, a summary dialog will appear, displaying a detailed list of the changes you made. Review the list and click Accept Changes to proceed with Installation Summary, or click Cancel & Return to Custom Partitioning if you want to make any more changes.
Creating Standard Partitions
Standard partitions are the most common type of partition, with the widest support across operating systems. For example, Microsoft Windows uses exclusively physical partitions and can not natively work with LVM or Btrfs. Most Fedora partitioning setups will also require at least one standard partition for the /boot directory, and possibly also another standard partition with the BIOS Boot or EFI System file system to store the boot loader.
See An Introduction to Disk Partitions for additional information about the concepts behind physical partitions.
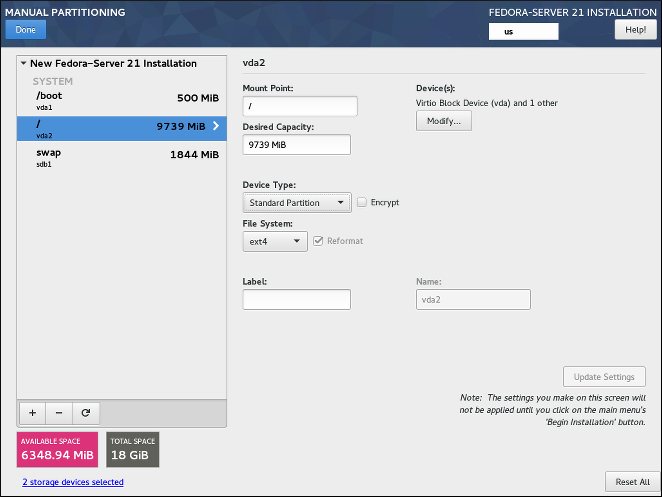
Follow the procedure below to create mount points on standard physical partitions:
-
Click the
+button at the bottom of the list showing existing mount points. A new dialog window will open. -
In the new dialog window, specify a mount point for which you want to create a separate mount point - for example,
/. Optionally, specify a size for the partition using standard units such as MB or GB (for example,50GB). Then, clickAdd mount pointto add the mount point and return to the main partitioning screen.When creating a swap partition, specify the mount point as
swap. For a BIOS Boot partition, usebiosboot. For an EFI System Partition, use/boot/efi.For information about these partition types, see Recommended Partitioning Scheme.
-
The mount point has now been created using the default settings, which means it has been created as an LVM logical volume. Select the newly created mount point in the left pane to configure it further, and convert it to a physical partition by changing the
Device Typeoption toStandard Partition. Then, clickUpdate Settingsin the bottom right corner of the screen. -
In the
Device(s)section on the right side of the screen, you can see that the partition has been assigned to one or more hard drives. Click theModifybutton to configure on which drive this partition will be created. -
In the
Configure Mount Pointdialog, you can specify which physical devices (disks) this volume may reside on. You can select one or more disks which will be used to hold this volume by holding down Ctrl and clicking each disk in the list. If you select multiple disks here, Anaconda will determine where exactly the partition should be created based on how you configured the rest of the installation. If you want to make sure that this partition is placed on a specific hard drive, select only that drive and unselect all others.After you finish configuring the partition’s location, click
Saveto return to the mainManual Partitioningscreen. -
Configure other settings specific to the partition - its
Mount Point,Desired Capacity, andFile System. PressUpdate Settingsto apply any changes to the configuration.
Repeat this procedure for any additional standard partitions you want to create.
Creating Software RAID
Redundant arrays of independent disks (RAIDs) are constructed from multiple storage devices that are arranged to provide increased performance and, in some configurations, greater fault tolerance. See Device, File System and RAID Types a description of different kinds of RAIDs.
A RAID device is created in one step, and disks are added or removed as necessary. One RAID partition per physical disk is allowed for each device, so the number of disks available to the installation program determines which levels of RAID device are available to you. For example, if your system has two hard drives, the installation program will not allow you to create a RAID10 device, which requires 4 separate partitions.
|
This section only explains how to create software RAID with standard (physical) partitions. However, you can also configure LVM volume groups and Btrfs volumes to use RAID and place their logical volumes or Btrfs subvolumes on top of this RAID array. See Creating a Logical Volume Managament (LVM) Layout and Creating a Btrfs Layout for instructions on creating RAID in LVM and Btrfs. |
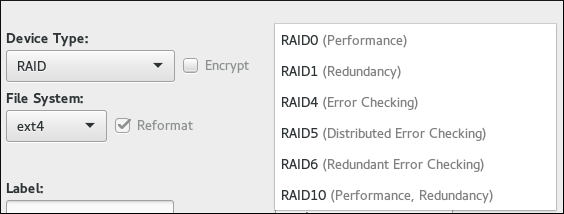
|
RAID configuration options are only visible if you have selected two or more disks for installation. At least two disks are required to create a RAID device, and some RAID layouts will require more. Requirements for different types of RAID are described in Device, File System and RAID Types. |
Follow the procedure below to create software RAID:
-
Click the
+button at the bottom of the list showing existing mount points. A new dialog window will open. -
In the new dialog window, specify a mount point for which you want to create a separate software RAID partition - for example,
/. Optionally, specify a size for the new partition using standard units such as MB or GB (for example,50GB). Then, clickAdd mount pointto add the mount point and return to the main partitioning screen.When creating a mount point for swap on software RAID, specify the mount point as
swap. -
The mount point has now been created using the default settings, which means it has been created as an LVM logical volume. Select the newly created mount point in the left pane to configure it further, and convert it to a software RAID partition by changing the
Device Typeoption toRAID. -
Choose a RAID type from the
RAID Leveldrop-down menu. Available RAID types and their requirements are described in Device, File System and RAID Types. -
In the
Device(s)section on the right side of the screen, you can see that the partition has been assigned to several physical disks. Click theModifybutton to configure on which drives this partition will be created. -
In the
Configure Mount Pointdialog, you can specify which physical devices (disks) this partition may reside on. You can select one or more disks which will be used to hold this partition by holding down Ctrl and clicking each disk in the list. If you want to make sure that this partition is placed on a specific set of hard drives, select only those drives and unselect all others.After you finish configuring the partition’s location, click
Saveto return to the mainManual Partitioningscreen. -
Configure other settings specific to the partition - its
Mount Point,Desired Capacity, andFile System. PressUpdate Settingsto apply any changes to the configuration.
Repeat this procedure for any additional standard partitions with software RAID you want to create.
Creating a Logical Volume Managament (LVM) Layout
Logical Volume Management (LVM) presents a simple logical view of underlying physical storage space, such as hard drives or LUNs. Partitions on physical storage are represented as physical volumes that can be grouped together into volume groups. Each volume group can be divided into multiple logical volumes, each of which is analogous to a standard disk partition. Therefore, LVM logical volumes function as partitions which can span multiple physical disks.
See Understanding LVM for additional information about the concepts behind Logical Volume Management.
|
Some partition types - notably the |
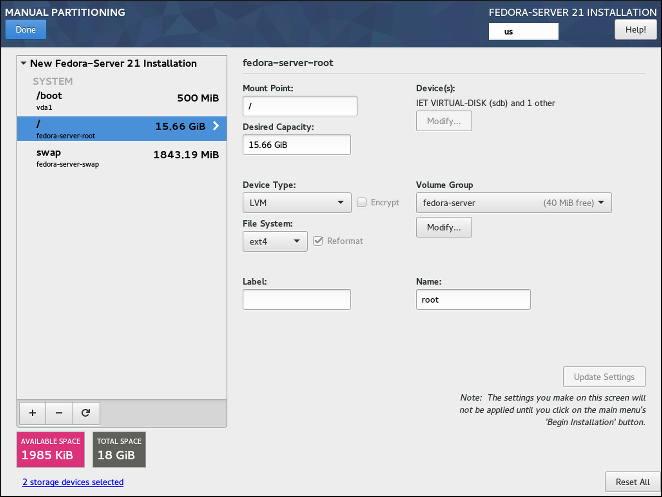
Follow the procedure below to create LVM logical volumes and volume groups.
-
Click the
+button at the bottom of the list showing existing mount points. A new dialog window will open. -
In the new dialog window, specify a mount point for which you want to create a separate logical volume - for example,
/. Optionally, specify a size for the volume using standard units such as MB or GB (for example,50GB). Then, clickAdd mount pointto add the volume and return to the main partitioning screen.When creating a mount point for swap on LVM, specify the mount point as
swap. -
The mount point has now been created using the default settings, which means it has been created as an LVM logical volume, and a volume group has been created to contain it. Select the newly created mount point in the left pane to configure it further. If you want to use thin provisioning for this volume, change the
Device Typeoption toLVM Thin Provisioning. -
In the
Volume Groupmenu, you can see that the volume has been assigned to an automatically created volume group, which is named after the Fedora variant you are installing (for example,fedora-server. Click theModifybutton under the drop-down menu to access the volume group settings. -
In the
Configure Volume Groupdialog, you can change the volume group’s name, itsRAID level(see Device, File System and RAID Types for information about available RAID types), and you can also specify which physical devices (disks) this volume group should reside on. You can select one or more disks which will be used to hold this volume group by holding down Ctrl and clicking each disk in the list.If you select a redundant RAID type (such as
RAID1 (Redundancy)), the volume group will take up twice its actual size on your disks. A 5 GB volume group with RAID1 will take up 10 GB of space.You can also make sure that the volume group is encrypted by selecting the
Encryptoption; this will enable LUKS encryption for the entire volume group. See the Fedora Security Guide, available at https://docs.fedoraproject.org/, for information about LUKS disk encryption.Additionally, you can set a fixed size for the volume group by selecting the
Fixedoption from theSize policymenu and entering a size for the volume group.After you finish configuring the volume group settings, click
Saveto return to the mainManual Partitioningscreen.The configuration dialog does not allow you to specify the size of the volume group’s physical extents. The size will always be set to the default value of 4 MiB. If you want to create a volume group with different physical extents, create it manually by switching to an interactive shell and using the vgcreate command, or use a Kickstart file with the volgroup --pesize=size command.
-
If you need to create more than one volume group, open the
Volume Groupdrop-down menu and select theCreate a new volume groupoption. A new dialog window will open, identical to the one described in the previous step. Again, select a name, storage devices, encryption settings, RAID level and size policy for the new group, and clickSave. The new volume group will then become available in theVolume Groupdrop-down menu; you can then go through your existing mount points and change this setting to assign them to a different volume group. -
Configure other settings specific to the logical volume - its
Mount Point,Desired Capacity,File System, andName. PressUpdate Settingsto apply any changes to the configuration.
Repeat this procedure for any additional logical volumes you want to create. Note that when creating additional LVM logical volumes, a new volume group is not automatically created each time; instead, any additional volumes are assigned to an existing group.
For each mount point you create, review its settings and make sure that it is assigned to the correct group, that it has sufficient capacity, and that it has a descriptive name so you can identify the volume later if you need to.
Creating a Btrfs Layout
Btrfs is a type of file system, but it has several features characteristic of a storage device. It is designed to make the file system tolerant of errors, and to facilitate the detection and repair of errors when they occur. It uses checksums to ensure the validity of data and metadata, and maintains snapshots of the file system that can be used for backup or repair.
Creating a Btrfs layout is somewhat similar to LVM (described in Creating a Logical Volume Managament (LVM) Layout) with slightly different terminology. A Btrfs volume is the equivalent of an LVM volume group, and a Btrfs subvolume is similar to a LVM logical volume. An important difference to note is how Anaconda reports sizes for separate mount points: For LVM, the exact size of each logical volume is shown next to each mount point in the left pane, while with Btrfs, the total size of the entire volume is shown next to each subvolume.
|
Some partition types - notably the |
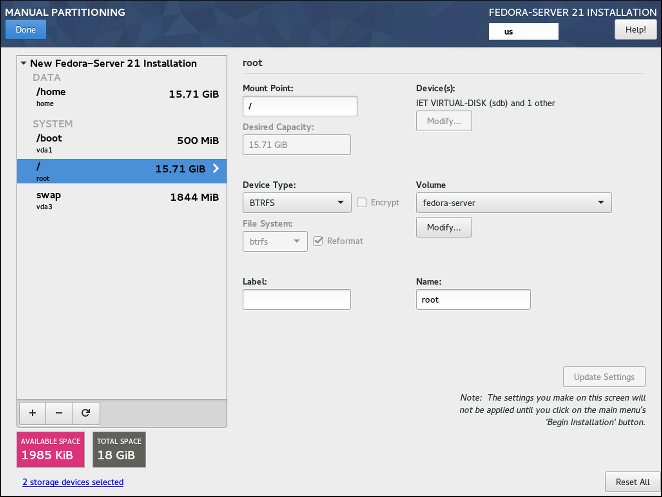
Follow the procedure below to create Btrfs volumes and subvolumes:
-
Click the
+button at the bottom of the list showing existing mount points. A new dialog window will open. -
In the new dialog window, specify a mount point for which you want to create a separate logical volume - for example,
/. Optionally, specify a size for the volume using standard units such as MB or GB (for example,50GB). Then, clickAdd mount pointto add the volume and return to the main partitioning screen.When creating a mount point for swap on Btrfs, specify the mount point as
swap. -
The mount point has now been created using the default settings, which means it has been created as an LVM logical volume. Select the newly created mount point in the left pane to configure it further, and convert it to a Btrfs subvolume by changing the
Device Typeoption toBtrfs. Then, clickUpdate Settingsin the bottom right corner of the screen. -
In the
Volumemenu, you can see that the subvolume has been assigned to an automatically created volume, which is named after the Fedora variant you are installing (for example,fedora-server00. Click theModifybutton under the drop-down menu to access the volume settings. -
In the
Configure Volumedialog, you can change the volume’s name, itsRAID level(see Device, File System and RAID Types for information about available RAID types), and you can also specify which physical devices (disks) this volume should reside on. You can select one or more disks which will be used to hold this volume by holding down Ctrl and clicking each disk in the list.If you select a redundant RAID type (such as
RAID1 (Redundancy)), the volume will take up twice its actual size on your disks. A 5 GB volume with RAID1 will take up 10 GB of space.You can also make sure that the volume is encrypted by selecting the
Encryptoption; this will enable LUKS encryption for the entire volume. See the Fedora Security Guide, available at https://docs.fedoraproject.org/, for information about LUKS disk encryption.Additionally, you can set a fixed size for the volume by selecting the
Fixedoption from theSize policymenu and entering a size for the volume group.After you finish configuring the Btrfs volume settings, click
Saveto return to the mainManual Partitioningscreen. -
If you need to create more than one Btrfs volume, open the
Volumedrop-down menu and select theCreate a new volume groupoption. A new dialog window will open, identical to the one described in the previous step. Again, select a name, storage devices, encryption settings, RAID level and size policy for the new volume, and clickSave. The new volume will then become available in theVolume Groupdrop-down menu; you can then go through your existing mount points and change this setting to assign them to a different volume. -
Configure other settings specific to the subvolume - its
Mount Point,Desired Capacity,File System, andName. PressUpdate Settingsto apply any changes to the configuration.
Repeat this procedure for any additional Btrfs subvolumes you want to create. Note that when creating additional subvolumes, a new volume is not automatically created each time; instead, any additional subvolumes are assigned to an existing volume.
For each mount point you create, review its settings and make sure that it is assigned to the correct volume, that it has sufficient capacity, and that it has a descriptive name so you can identify the subvolume later if you need to.
Device, File System and RAID Types
Fedora supports multiple types of devices and file systems. The lists below offer a short description of each available device, file system and RAID type and notes on their usage.
To select a device type or a file system of a partition or a logical volume, select it in the list in Manual Partitioning and select a Device Type and a File System from their respective drop-down menus on the right side of the screen. Then, click Update Settings and repeat this process for all mount points you want to modify.
To configure software RAID, make sure that you have enough physical hard drives selected as installation targets (the number of separate drives required for each type of RAID is noted in its description). Then, choose a RAID level when creating or modifying a Btrfs volume or LVM volume group, or select Software RAID as the device type to create software RAID with standard partitions. For detailed instructions, see Creating a Btrfs Layout, Creating a Logical Volume Managament (LVM) Layout, and Creating Software RAID as needed.
-
Standard Partition- A standard partition can contain a file system or swap space. Standard partitions are most commonly used for/bootand the BIOS Boot and EFI System partitions. LVM logical volumes or Btrfs subvolumes are recommended for most other uses. See An Introduction to Disk Partitions for additional information about the concepts behind physical partitions. -
LVM- ChoosingLVMas theDevice Typecreates an LVM logical volume and a volume group to contain it (unless one already exists, in which case the new volume is assigned to the existing group). LVM can improve performance when using physical disks and allows you to use multiple disks for a single mount point. For information on how to create a logical volume, see Creating a Logical Volume Managament (LVM) Layout. Also see Understanding LVM for some additional information about LVM in general. -
LVM Thin Provisioning- Using thin provisioning, you can manage a storage pool of free space, known as a thin pool, which can be allocated to an arbitrary number of devices when needed by applications. The thin pool can be expanded dynamically when needed for cost-effective allocation of storage space. -
RAID- Creating two or more software RAID partitions allows you to create a software RAID device. One RAID partition is assigned to each disk on the system. See Creating Software RAID for instructions on creating software RAID. -
BTRFS- Btrfs is a file system with several device-like features. It is capable of addressing and managing more files, larger files, and larger volumes than the ext2, ext3, and ext4 file systems. See Creating a Btrfs Layout for more information about creating Btrfs volumes.
-
ext4- The ext4 file system is based on the ext3 file system and features a number of improvements. These include support for larger file systems and larger files, faster and more efficient allocation of disk space, no limit on the number of subdirectories within a directory, faster file system checking, and more robust journaling. Ext4 is the default and recommended file system used by Fedora Workstation and Cloud. The maximum supported size of a single ext4 file system is 50 TB. -
ext3- The ext3 file system is based on the ext2 file system and has one main advantage - journaling. Using a journaling file system reduces time spent recovering a file system after a crash, as there is no need to check the file system for metadata consistency by running the fsck utility every time a crash occurs. -
ext2- An ext2 file system supports standard Unix file types, including regular files, directories, or symbolic links. It provides the ability to assign long file names, up to 255 characters. -
swap- Swap partitions are used to support virtual memory. In other words, data is written to a swap partition when there is not enough RAM to store the data your system is processing. A swap partition should always be created; see Recommended Partitioning Scheme for details such as the recommended size. -
xfs- XFS is a highly scalable, high-performance file system that supports file systems up to 16 exabytes (approximately 16 million terabytes), files up to 8 exabytes (approximately 8 million terabytes), and directory structures containing tens of millions of entries. XFS also supports metadata journaling, which facilitates quicker crash recovery. The maximum supported size of a single XFS file system is 500 TB. Starting with Fedora 22, XFS is the default and recommended file system on Fedora Server.Note that the size of an XFS file system can not currently be reduced without destroying and recreating the file system. If you expect that you will need to adjust the sizes of your file systems often, using XFS is not recommended, as it makes administration substantially more time-consuming.
-
vfat- The VFAT file system is a Linux file system that is compatible with Microsoft Windows long file names on the FAT file system. -
BIOS Boot- A very small partition required for booting from a device with a GUID partition table (GPT) on BIOS systems and UEFI systems in BIOS compatibility mode. See Recommended Partitioning Scheme for details. -
EFI System Partition- A small partition required for booting a device with a GUID partition table (GPT) on a UEFI system. See Recommended Partitioning Scheme for details.
-
RAID0 (Performance)- Distributes data across multiple disks. Level 0 RAID offers increased performance over standard partitions and can be used to pool the storage of multiple disks into one large virtual device. Note that Level 0 RAIDs offer no redundancy and that the failure of one device in the array destroys data in the entire array. RAID 0 requires at least two disks. -
RAID1 (Redundancy)- Mirrors all data from one partition onto one or more other disks. Additional devices in the array provide increasing levels of redundancy. RAID 1 requires at least two disks. -
RAID4 (Error Checking)- Distributes data across multiple disks and uses one disk in the array to store parity information which safeguards the array in case any disk within the array fails. Because all parity information is stored on one disk, access to this disk creates a "bottleneck" in the array’s performance. Level 4 RAID requires at least three disks. -
RAID5 (Distributed Error Checking)- Distributes data and parity information across multiple disks. Level 5 RAIDs therefore offer the performance advantages of distributing data across multiple disks, but do not share the performance bottleneck of level 4 RAIDs because the parity information is also distributed through the array. RAID 5 requires at least three disks. -
RAID6 (Redundant Error Checking)- Level 6 RAIDs are similar to level 5 RAIDs, but instead of storing only one set of parity data, they store two sets. RAID 6 requires at least four disks. -
RAID10 (Performance, Redundancy)- Level 10 RAIDs are nested RAIDs or hybrid RAIDs. They are constructed by distributing data over mirrored sets of disks. For example, a level 10 RAID array constructed from four RAID partitions consists of two mirrored pairs of striped partitions. RAID 10 requires at least four disks.
Recommended Partitioning Scheme
In most cases, at least the following mount points should always be created:
/boot- 500 MB-
This partition contains the operating system kernel, which allows Fedora to boot. It also contains other files used during the bootstrap process. Due to the limitations of most firmware, creating a separate, small standard partition for this directory is recommended. In most scenarios, a 500 MB
/bootpartition is adequate.If your system has a hardware RAID controller, be aware that some BIOS types do not support booting from it. In that case, the
/bootpartition must be created on a partition outside of the RAID array, such as on a separate hard drive.Also note that the
/bootdirectory can not be placed on a LVM logical volume or a Btrfs subvolume. Use a standard partition. /(root) - 10 GB-
This is where the root directory is located. The root directory is the top level of the directory structure. By default, all files are written to this partition unless a different partition is mounted in the path being written to (for example,
/bootor/home). If you follow the recommended scheme described in this section, this will be the partition where most software packages will be installed.For a minimal installation, a 5 GB root partition will be sufficient. However, for most common installations which include extra packages and a graphical user interface, the root partition should be at least 10 GB; with 20 GB being sufficient for most common use cases.
The
/mount point is the top of the Linux Filesystem Hierarchy, and is referred to as the root file system, or root. The/rootdirectory, sometimes pronounced "slash-root", is the home directory for therootuser. /home- at least 10 GB-
To store user data separately from system data, create a dedicated mount point for the
/homedirectory. This partition should be sized based on the amount of data that will be stored locally, number of users, and so on. This will allow you to upgrade or reinstall Fedora without erasing user data files. During the installation, a separate/homepartition will be created if there are 50 GB or more free space for your Fedora installation.When using Fedora as a workstation for normal use with a graphical environment, this mount point should have the most disk space assigned to it, as it will likely hold the most data (user settings, images, videos, etc).
- swap - based on your system parameters
-
Swap partitions support virtual memory; data is written to them when there is not enough RAM to store the data your system is processing. This partition’s size is a function of system memory workload, not total system memory, and therefore is not equal to the total system memory size. Therefore, it is important to analyze what applications a system will be running and the load those applications will serve in order to determine the system memory workload. Application providers and developers should be able to provide some guidance.
When the system runs out of swap space, the kernel terminates processes as the system RAM memory is exhausted. Configuring too much swap space results in storage devices being allocated but idle and is a poor use of resources. Too much swap space can also hide memory leaks. The maximum size for a swap partition and other additional information can be found in the
mkswap(8)man page.The table below provides the recommended size of a swap partition depending on the amount of RAM in your system and whether you want sufficient memory for your system to hibernate. If you let the installation program partition your system automatically, the swap partition size will be established using these guidelines. Automatic partitioning setup assumes hibernation is not in use, and the maximum size of the swap partition is limited to 10% of the total size of the hard drive. If you want to set up enough swap space to allow for hibernation, or if you want to set the swap partition size to more than 10% of the system’s storage space, you must edit the partitioning layout manually.
Tableau 2. Recommended System Swap Space Amount of RAM in the system Recommended swap space Recommended swap space if allowing for hibernation less than 2 GB
2 times the amount of RAM
3 times the amount of RAM
2 GB - 8 GB
Equal to the amount of RAM
2 times the amount of RAM
8 GB - 64 GB
0.5 times the amount of RAM
1.5 times the amount of RAM
more than 64 GB
workload dependent
hibernation not recommended
At the border between each range listed above (for example, a system with 2 GB, 8 GB, or 64 GB of system RAM), discretion can be exercised with regard to chosen swap space and hibernation support. If your system resources allow for it, increasing the swap space may lead to better performance.
Distributing swap space over multiple storage devices - particularly on systems with fast drives, controllers and interfaces - also improves swap space performance.
- BIOS Boot (1 MB) or EFI System Partition (200 MB)
-
The GRUB2 boot loader can be installed either in the Master Boot Record (MBR) or the GUID Partition Table (GPT) of the boot device. In order to determine which of these methods to use, the installation program considers the following variations:
- Systems with BIOS firmware and UEFI systems in BIOS compatibility mode
-
If the disk is already formatted, the partitioning scheme is retained. If the disk is not formatted, or you have erased all existing partitions from the disk, the installer will choose the following:
-
MBR if the size of the disk is less than 2 TB (terabytes)
-
GPT if the size of the disk is more than 2 TB
You can force the installer to use GPT on disks smaller than 2 TB by using the inst.gpt boot option as described in Boot Options. However, the opposite is not possible - you can not use MBR on disks larger than 2 TB.
You need to create a BIOS Boot partition with a size of 1 MB to install on a system with BIOS firmware if the disk containing the boot loader uses GPT. If the disk uses a MBR, no special partition is necessary on a BIOS system.
-
- Systems with UEFI firmware
-
Only GPT is allowed on UEFI systems. In order to install on a formatted disk with a MBR, it must be reformated and relabeled. All data currently on the disk will be lost.
UEFI-based systems require an EFI System Partition at least 50 MB in size (recommended size is 200 MB), regardless of the partitioning scheme.
If your system requires either a BIOS Boot partition or an EFI System Partition based on the requirements detailed above, this partition must be created as a standard physical partition. It can not reside on an LVM volume or a Btrfs subvolume.
Also note that if your system does not require any of these partitions, they will not be shown in the
File Systemmenu in mount point options.
Many systems have more partitions than the minimum listed above. Choose partitions based on your particular needs. See Advice on Partitions for additional information and advice.
|
Only assign storage capacity to those partitions you require immediately. You may allocate free space at any time, to meet needs as they occur. |
If you are not sure how best to configure the partitions for your computer, accept the automatic default partition layout provided by the installation program as described in Installation Destination.
Advice on Partitions
There is no best way to partition every system; the optimal setup depends on how you plan to use the system being installed. However, the following tips may help you find the optimal layout for your needs:
-
Consider encrypting any partitions and volumes which might contain sensitive data. Encryption prevents unauthorized people from accessing the data on the partitions, even if they have access to the physical storage device. In most cases, you should at least encrypt the
/homepartition, which contains user data. -
In some cases, creating separate mount points for directories other than
/,/bootand/homemay be useful; for example, on a server running a MySQL database, having a separate mount point for/var/lib/mysqlwill allow you to preserve the database during a reinstallation without having to restore it from backup afterwards. However, having unnecessary separate mount points will make storage administration more difficult. -
Some special restrictions apply to certain directories with regards on which partitioning layouts can they be placed. Notably, the
/bootdirectory must always be on a physical partition (not on an LVM volume or a Btrfs subvolume), and/usrcan not be on a Btrfs subvolume. -
If you are new to Linux, consider reviewing the Linux Filesystem Hierarchy Standard at https://refspecs.linuxfoundation.org/FHS_2.3/fhs-2.3.html for information about various system directories and their contents.
-
Each kernel installed on your system requires approximately 20 MB on the
/bootpartition. The default partition size of 500 MB for/bootshould suffice for most common uses; increase the size of this partition if you plan to keep many kernels installed at the same time. -
The
/vardirectory holds content for a number of applications, including the Apache web server, and is used by the DNF package manager to temporarily store downloaded package updates. Make sure that the partition or volume containing/varhas at least 3 GB. -
The contents of the
/vardirectory usually change very often. This may cause problems with older solid state drives (SSDs), as they can handle a lower number of read/write cycles before becoming unusable. If your system root is on an SSD, consider creating a separate mount point for/varon a classic (platter) HDD. -
The
/usrdirectory holds the majority of software on a typical Fedora installation. The partition or volume containing this directory should therefore be at least 5 GB for minimal installations, and at least 10 GB for installations with a graphical environment. -
If
/usror/varis partitioned separately from the rest of the root volume, the boot process becomes much more complex because these directories contain boot-critical components. In some situations, such as when these directories are placed on an iSCSI drive or an FCoE location, the system may either be unable to boot, or it may hang with aDevice is busyerror when powering off or rebooting.This limitation only applies to
/usror/var, not to directories below them. For example, a separate partition for/var/wwwwill work without issues. -
Consider leaving a portion of the space in an LVM volume group unallocated. This unallocated space gives you flexibility if your space requirements change but you do not wish to remove data from other volumes. You can also select the
Thin provisioningdevice type for the partition to have the unused space handled automatically by the volume. -
The size of an
XFSfile system can not be reduced - if you need to make a partition or volume with this file system smaller, you must back up your data, destroy the file system, and create a new, smaller one in its place. Therefore, if you expect needing to manipulate your partitioning layout later, you should use theext4file system instead. -
Use Logical Volume Management (LVM) if you anticipate expanding your storage by adding more hard drives after the installation. With LVM, you can create physical volumes on the new drives, and then assign them to any volume group and logical volume as you see fit - for example, you can easily expand your system’s
/home(or any other directory residing on a logical volume). -
Creating a BIOS Boot partition or an EFI System Partition may be necessary, depending on your system’s firmware, boot drive size, and boot drive disk label. See Recommended Partitioning Scheme for information about these partitions. Note that the graphical installer will not let you create a BIOS Boot or EFI System Partition if your system does not require one - in that case, they will be hidden from the menu.
-
If you need to make any changes to your storage configuration after the installation, Fedora repositories offer several different tools which can help you do this. If you prefer a command line tool, try system-storage-manager.
Kdump
|
This screen is disabled by default. To enable it during the installation, you must use the inst.kdump_addon=on option at the boot menu. See Advanced Installation Options for details, and The Boot Menu for instructions on using custom boot options. |
Use this screen to select whether or not Kdump will be activated on the installed system, and how much memory will be reserved for it if enabled.

Kdump is a kernel crash dumping mechanism which, in the event of a system crash, captures the contents of the system memory at the moment of failure. This captured memory can then be analyzed to find the cause of the crash. If Kdump is enabled, it must have a small portion of the system’s memory (RAM) reserved to itself. This reserved memory will not be accessible to the main kernel.
To enable Kdump on the installed system, check Enabled. Then, select either Automatic or Manual memory reservation settings, and if you selected Manual, enter the amount of memory to be reserved in megabytes into the Memory to be reserved field.
The amount of memory which you should reserve is determined based on your system’s architecture (AMD64 and Intel 64 will have different requirements than IBM Power, for example) as well as the total amount of system memory. In most cases, automatic reservation will be satisfactory. If you insist on manual settings, see the Red Hat Enterprise Linux 7 Kernel Crash Dump Guide for guidelines. This document also contains more in-depth information about how Kdump works, how to configure additional settings, and how to analyze a saved crash dump.
The Usable System Memory readout below the reservation input field shows how much memory will be accessible to your main system once your selected amount of RAM is reserved.
|
Additional settings, such as the location where kernel crash dumps will be saved, can only be configured after the installation using either the |
After configuring Kdump settings, click Done in the top left corner to return to Installation Summary.
Réseau & nom d’hôte
L’écran « Réseau & nom d’hôte » est utilisé pour configurer les interfaces réseau. Les options sélectionnées ici seront disponibles à la fois pendant l’installation (si nécessaire pour des tâches telles que le téléchargement de paquets à partir d’un emplacement distant) et sur le système installé.
|
La configuration réseau est un sujet étendu et beaucoup d’options disponibles pendant l’installation ne sont pas abordés dans ce document. Pour des informations détaillées sur le réseautage, y compris sur des sujets théoriques, des instructions et exemples spécifiques, voir le Fedora Networking Guide, disponible à l’adresse https://docs.fedoraproject.org/. |
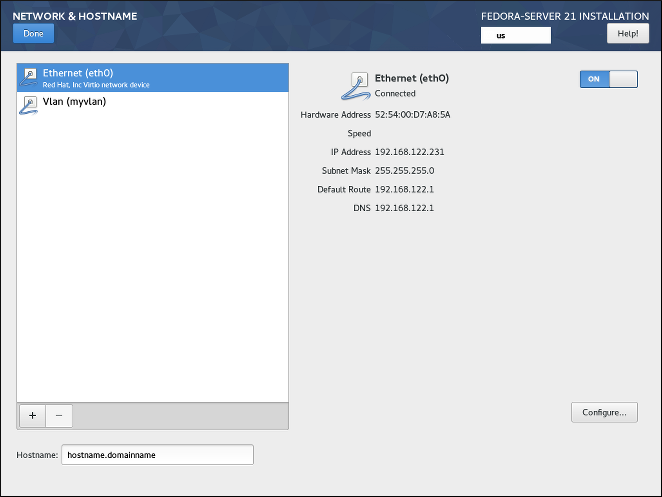
Les interfaces accessibles localement sont automatiquement détectées par le programme d’installation et ne peuvent pas être ajoutées ou supprimées manuellement. Toutes les interfaces détectées sont répertoriées sur le côté gauche de l’écran. Cliquez sur une interface dans la liste pour afficher sa configuration actuelle (telle que l’adresse IP et l’adresse DNS) ; les détails sont affichés sur le côté droit de l’écran.
Sous la liste des interfaces se trouvent deux boutons. Utilisez le bouton « + » pour ajouter une interface réseau virtuelle (Team, Bond ou VLAN) comme décrit dans Ajout d’une interface réseau virtuelle. Pour supprimer une interface virtuelle créée précédemment, sélectionnez-la dans la liste et cliquez sur le bouton « - ».
Pour modifier des paramètres tels que les adresses IP, serveurs DNS ou la configuration de routage d’une interface existante (virtuelle et physique), sélectionnez l’interface dans le volet gauche et cliquez sur « Configurer » dans le coin inférieur droit de l’écran. Les paramètres disponibles sont décrits dans Modification de la configuration de l’interface réseau.
Utilisez le commutateur 'ON’/'OFF' dans le coin supérieur droit pour activer ou désactiver l’interface actuellement sélectionnée.
Sous la liste des connexions, entrez un nom d’hôte pour cet ordinateur dans le champ de saisie Nom d’hôte. Le nom d’hôte peut être un name_nom de domaine fully qualifié (FQDN) au format _hostname.domainname ou un nom d’hôte court sans nom de domaine. De nombreux réseaux disposent d’un service Dynamic Host Configuration Protocol (DHCP) qui fournit automatiquement un nom de domaine aux systèmes connectés ; pour permettre au service DHCP d’attribuer le nom de domaine à cette machine, spécifiez uniquement le nom d’hôte court.
Ajout d’une interface réseau virtuelle
Pour ajouter une interface de réseau virtuelle, cliquez sur le bouton + en bas de la liste des interfaces. Une nouvelle fenêtre s’ouvrira, vous invitant à sélectionner l’un des trois types d’interfaces virtuelles disponibles :
-
Bond- NIC (Network Interface Controller) Bonding, une méthode pour lier plusieurs interfaces réseau physiques ensemble en un seul canal lié. -
Team- NIC Teaming, une nouvelle implémentation pour agréger les liens, conçue pour fournir un petit pilote de noyau pour implémenter la gestion rapide des flux de paquets, et diverses applications pour faire tout le reste dans l’espace utilisateur. -
Vlan(Virtual LAN) - Une méthode pour créer plusieurs domaines de diffusion distincts qui sont mutuellement isolés.
Sélectionnez le type d’interface que vous souhaitez ajouter, puis cliquez sur Ajouter. Une autre fenêtre de dialogue s’ouvrira, vous permettant de modifier les paramètres disponibles pour le type d’interface choisi. Pour plus d’informations sur les paramètres disponibles, voir les sections respectives du Fedora Networking Guide, disponible à l’adresse https://docs.fedoraproject.org/. La documentation de base est également disponible dans Modification de la configuration de l’interface réseau.
|
Pour accéder à nouveau à la boîte de dialogue des paramètres après l’avoir fermée, sélectionnez la même interface dans la liste des interfaces configurées et cliquez sur |
Editing Network Interface Configuration
This section only details the most important settings for a typical wired connection used during installation. Many of the available options do not have to be changed in most installation scenarios and are not carried over to the installed system. Configuration of other types of networks is broadly similar, although the specific configuration parameters may be different. To learn more about network configuration after installation, see the Fedora Networking Guide, available at https://docs.fedoraproject.org/.
To configure a network connection manually, select that connection in the list on the left side of the screen, and click the Configure button. A dialog will appear that allows you to configure the selected connection. The configuration options presented depends on the connection type - the available options will be slightly different depending on whether it is a physical interface (wired or wireless network interface controller) or a virtual interface (Bond, Team or Vlan) which you previously configured in Adding a Virtual Network Interface.. A full description of all configuration settings for all connection types is beyond the scope of this document; see the Networking Guide for details.
The most common and useful options in the configuration dialog are:
- Enable or disable the connection by default
-
In the
Generaltab of the configuration dialog, you can select or unselect theAutomatically connect to this network when it is availablecheck box to allow or disallow this connection to connect by default. When enabled on a wired connection, this means the system will typically connect during startup (unless you unplug the network cable); on a wireless connection, it means that the interface will attempt to connect to any known wireless networks in range.Additionally, you can allow or disallow all users on the system from connecting to this network using the
All users may connect to this networkoption. If you disable this option, onlyrootwill be able to connect to this network.It is not possible to only allow a specific user other than
rootto use this interface, because no other users are created at this point during the installation. If you need a connection for a different user, you must configure it after the installation. - Set up static IPv4 or IPv6 settings
-
By default, both
IPv4andIPv6are set to automatic configuration depending on current network settings. This means that addresses such as the local IP address, DNS address, and other settings will be detected automatically each time the interface connects to a network. In many cases, this is sufficient, but you can also provide static configuration in theIPv4 SettingsandIPv6 Settings, respectively.To set static network configuration, navigate to one of the settings tabs and select a method other than
Automatic(for example,Manual) from theMethoddrop-down menu. This will enable theAddressesfield below.In the
IPv6 Settingstab, you can also set the method toIgnoreto disableIPv6on this interface.Then, click
Addon the right side and add a set of settings:Address,Netmask(forIPv4),Prefix(forIPv6), andGateway.The
DNS serversfield accepts one or more IP addresses of DNS servers - for example,10.0.0.1,10.0.0.8.The final option in both tabs is
Require IPvX addressing for this connection to complete. Select this option in theIPv4tab to only allow this connection ifIPv4was successful; the same principle applies to this setting in theIPv6tab. If this option remains disabled for bothIPv4andIPv6, the interface will be able to connect if configuration succeeds on either IP protocol. - Configure routes
-
In the
IPv4 SettingsandIPv4 Settingstabs, click theRoutesbutton in the bottom right corner to configure routing settings for a specific IP protocol on an interface. A new dialog will open, allowing you toAdda specific route.If you confire at least one static route, you can disallow all routes not specifically configured here by enabling the
Ignore automatically obtained routes.Select
Use this connection only for resources on its networkto prevent this connection from becoming the default route. This option can be selected even if you did not configure any static routes. Enabling this option means that this route will only be used when necessary to access certain resources, such as intranet pages which require a local or VPN connection. Another (default) route will be used for publicly available resources if possible. Note that unlike the additional routes configured in this dialog, this setting will be transferred to the installed system. Also note that this option is only useful when more than one interface is configured.When you finish configuring the interface’s routing settings, click
OKto return to the configuration dialog.
Once you finish configuring the interface, click Save in the configuration window’s bottom right corner to save your settings and return to Network & Hostname.
Configuration and Installation Progress
The Configuration screen is displayed after you finish configuring all required items in Installation Summary and press the Begin installation button. After this point, the installation process actually starts and changes are being made to your selected disks. It is not possible to go back to the Installation Summary and change any settings configured there; if you need to do so, you must wait for the installation process to finish, reboot your system, log in and change your settings on the installed system.
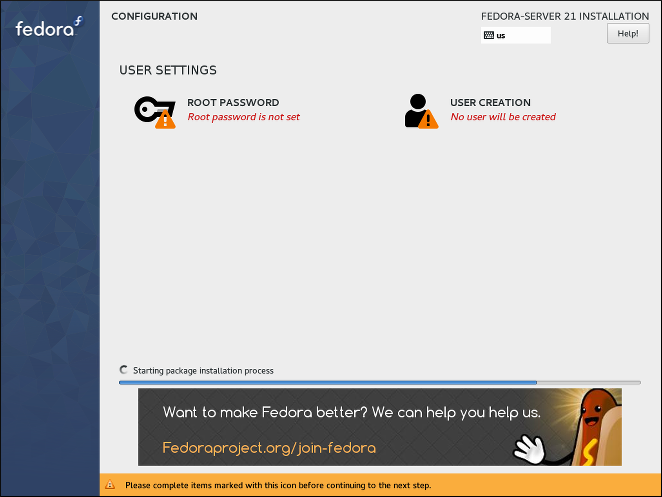
In the top part of the screen, two additional options are available, allowing you to configure authentication settings - the root password and an additional user account. Configuring the root password is required to finish the installation; creating a user account can be skipped. If you do so, you will be prompted to create a non-root user account after the installation finishes and your system reboots.
The bottom of the screen shows a progress bar and a message informing you of the current progress of the installation. When the installation finishes and the root password has been set, you can press the Finish configuration button to reboot your computer and log in to your newly installed Fedora system.
|
Avant de terminer l’installation et de redémarrer, retirez le support (CD, DVD ou clé USB) que vous avez utilisé pour démarrer l’installation ou assurez-vous que votre système tente de démarrer à partir du disque dur avant d’essayer un support amovible. Sinon, votre ordinateur redémarrera le programme d’installation au lieu du système installé. |
Mot de passe root
The Root Password screen is used to configure the root password for your system. This password will be used to log into the administrator (also known as superuser) account, which is used for system administration tasks such as installing and updating software packages and changing system-wide configuration such as network and firewall settings, storage options and adding or modifying users, groups and file permissions.
The root account will always be created during the installation. However, you should always also create a normal user accont in Create User and use that account to log in to the system. Only switch to the administrator account only when you need to perform a task which requires administrator access.
|
The |

Once you choose a strong password, enter it in the Root Password field. The characters you write will be displayed as dots for security. Then, type the same password into the Confirm field to ensure you entered it properly. Both entered passwords must be the same.
Au fur et à mesure que vous entrez le mot de passe, il sera évalué et l’installateur déterminera la force du mot de passe. Si l’installateur considère que votre mot de passe est faible, un message apparaitra en bas de l’écran, expliquant quel aspect du mot de passe choisi est considéré comme insuffisant. Par exemple :
Le mot de passe que vous avez fourni est faible :Le mot de passe fait moins de 5 caractères.
Si un message similaire à celui ci-dessus apparait, il est fortement recommandé de choisir un mot de passe différent et plus fort.
Once you configure the superuser password, click Done in the top left corner to return to Configuration and Installation Progress. If you selected a weak password, you must press the button twice.
Créer un utilisateur
L’écran Créer un utilisateur peut être utilisé pour créer et configurer un compte utilisateur normal (non root) pendant l’installation. Un seul compte d’utilisateur peut être configuré ici ; si vous avez besoin de plusieurs comptes, attendez que l’installation soit terminée, redémarrez votre système et créez ensuite d’autres comptes en utilisant soit la commande useradd dans un terminal, soit un utilitaire graphique pour gérer les comptes d’utilisateurs (par exemple, l’écran Utilisateurs dans le menu Paramètres de GNOME).
|
Il n’est pas nécessaire de créer un compte d’utilisateur normal pour terminer l’installation ; cependant, cela est fortement recommandé. Si vous n’en créez pas, vous devrez vous connecter directement au système en tant que |
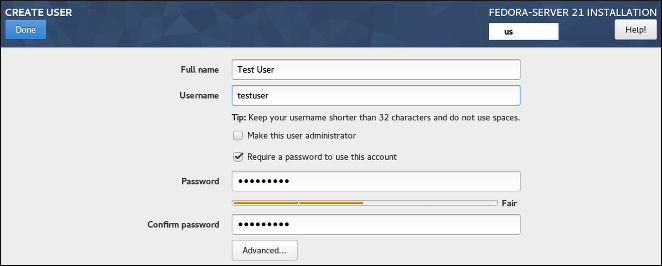
Pour configurer un compte utilisateur, remplissez le Nom complet (par exemple, Jean Dupont) et le Nom d’utilisateur (par exemple, jdupont). Le nom d’utilisateur sera utilisé pour se connecter à partir d’une ligne de commande ; si vous installez un environnement graphique, alors votre gestionnaire de connexion graphique utilisera le nom complet.
Veuillez vous assurez que la case Demander un mot de passe pour utiliser ce compte est cochée, entrez le mot de passe que vous souhaitez utiliser pour ce compte dans le champ Mot de passe. Les caractères que vous entrez seront affichés sous forme de points pour des raisons de sécurité. Ensuite, répétez le même mot de passe dans le champ Confirmer le mot de passe en dessous pour vous assurer que vous l’avez entré correctement. Les deux mots de passe saisis doivent être identiques.
Au fur et à mesure que vous entrez le mot de passe, il sera évalué et l’installateur déterminera la force du mot de passe. Si l’installateur considère que votre mot de passe est faible, un message apparaitra en bas de l’écran, expliquant quel aspect du mot de passe choisi est considéré comme insuffisant. Par exemple :
Le mot de passe que vous avez fourni est faible :Le mot de passe fait moins de 5 caractères.
Si un message similaire à celui ci-dessus apparait, il est fortement recommandé de choisir un mot de passe différent et plus fort.
La case à cocher Faire de cet utilisateur un administrateur donne à l’utilisateur que vous créez des droits d’administration (en ajoutant cet utilisateur dans le groupe wheel), permettant à cet utilisateur d’utiliser la commande sudo pour effectuer des tâches normalement réservées à root en utilisant uniquement le mot de passe de l’utilisateur, au lieu du mot de passe root. Cela peut être plus pratique, mais peut aussi poser un risque de sécurité.
|
Si vous donnez des privilèges d’administrateur à un utilisateur, assurez-vous que le compte est protégé par un mot de passe fort. Ne donnez jamais à un utilisateur des privilèges d’administrateur sans exiger un mot de passe pour le compte. Voir le Guide de sécurité de Fedora, disponible sur le lien suivant : https://docs.fedoraproject.org/[], pour des informations détaillées sur la sécurité des mots de passe, ainsi que des directives pour la sélection de mots de passe forts. |
Pour configurer des paramètres supplémentaires, cliquez sur le bouton Avancé situé sous les champs de saisie du mot de passe. Une nouvelle fenêtre de dialogue intitulée Configuration avancée de l’utilisateur s’ouvrira. Cette fenêtre est décrite dans la section suivante.
Configuration avancée de l’utilisateur
La boite de dialogue Configuration avancée de l’utilisateur vous permet de modifier les paramètres suivants pour le nouveau compte utilisateur.
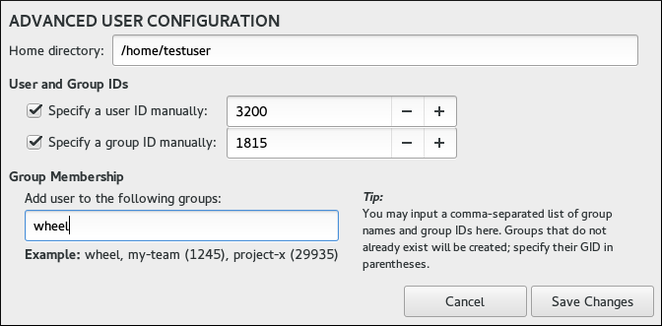
-
Le dossier
Homede l’utilisateur (/home/usernamepar défaut). -
L’ID de l’utilisateur (UID). La valeur par défaut est 1000. Les UID de 0 à 999 sont réservés par le système et ne peuvent donc pas être attribués à un utilisateur.
-
L’ID de groupe (GID) du groupe par défaut de l’utilisateur. Le nom du groupe par défaut sera le même que le nom de l’utilisateur, et son GID par défaut est 1000. Les GID de 0 à 999 sont réservés par le système et ne peuvent donc pas être attribués à un groupe d’utilisateurs.
-
L’appartenance à un groupe de l’utilisateur. Le compte utilisateur que vous créez aura toujours une appartenance de groupe par défaut (le groupe par défaut de l’utilisateur avec un ID défini dans le champ
Spécifier un ID de groupe manuellement). Dans le champMembres des groupes, vous pouvez spécifier des groupes supplémentaires sous la forme d’une liste séparée par des virgules. Les groupes qui n’existent pas encore seront créés ; vous pouvez spécifier des GID personnalisés pour eux entre parenthèses. Si vous ne spécifiez pas de GID personnalisé pour un nouveau groupe, celui-ci sera attribué automatiquement.
Want to help? Learn how to contribute to Fedora Docs ›