Instalando Usando Anaconda
Este capítulo fornece instruções passo a passo para instalar o Fedora usando o instalador Anaconda. A maior parte deste capítulo descreve a instalação usando a interface gráfica do usuário. Um modo de texto também está disponível para sistemas sem exibição gráfica, mas esse modo é limitado em certos aspectos (por exemplo, o particionamento personalizado não é possível no modo de texto).
Se o seu sistema não puder usar o modo gráfico, você pode:
-
Usa o Kickstart para automatizar a instalação conforme descrito em Automatizando a Instalação com Kickstart
-
Executar a instalação gráfica remotamente conectando-se ao sistema de instalação de outro computador com uma tela gráfica usando o protocolo VNC (Virtual Network Computing) - consulte Instalando Usando VNC
Introdução ao Anaconda
O instalador do Fedora, Anaconda, é diferente da maioria dos outros programas de instalação de sistema operacional devido à sua natureza paralela. A maioria dos instaladores segue um caminho fixo: você deve escolher primeiro seu idioma, depois configurar a rede, o tipo de instalação, o particionamento etc. Geralmente, há apenas uma maneira de proceder a qualquer momento.
No Anaconda, você só precisa selecionar seu idioma e local primeiro e, em seguida, é apresentada uma tela central, onde pode configurar a maioria dos aspectos da instalação na ordem que desejar. No entanto, isso não se aplica a todas as partes do processo de instalação - por exemplo, ao instalar de um local de rede, você deve configurar a rede antes de selecionar quais pacotes instalar.
Algumas telas serão configuradas automaticamente dependendo do seu hardware e do tipo de mídia que você usou para iniciar a instalação. Você ainda pode alterar as configurações detectadas em qualquer tela. As telas que não foram configuradas automaticamente e, portanto, requerem sua atenção antes de iniciar a instalação, são marcadas por um ponto de exclamação. Você não pode iniciar o processo de instalação real antes de terminar de definir essas configurações.
Diferenças adicionais aparecem em certas telas; notavelmente, o processo de particionamento personalizado é muito diferente de outras distribuições Linux. Essas diferenças são descritas na subseção de cada tela.
Consoles e Registro de Logs Durante a Instalação
As seções a seguir descrevem como acessar os logs e um shell interativo durante a instalação. Isso é útil ao solucionar problemas, mas não deve ser necessário na maioria dos casos.
Acessando Consoles
O instalador do Fedora usa o multiplexador de terminal tmux para exibir e controlar várias janelas que você pode usar além da interface principal. Cada uma dessas janelas tem um propósito diferente - elas exibem vários logs diferentes, que podem ser usados para solucionar quaisquer problemas durante a instalação, e uma das janelas fornece um prompt de shell interativo com privilégios de root, a menos que este prompt tenha sido especificamente desabilitado usando uma opção de inicialização ou um comando Kickstart.
|
Em geral, não há razão para deixar o ambiente de instalação gráfico padrão, a menos que você precise diagnosticar um problema de instalação. |
O multiplexador de terminal esta sendo executado no console virtual 1. Para mudar do ambiente de instalação real para tmux, pressione Ctrl+Alt+F1. Para voltar para a interface principal da instalação, que é executada no console virtual 6, pressione Ctrl+Alt+F6.
|
Se você escolher a instalação em modo texto, você iniciará no console virtual 1 (tmux) e alternar para o console 6 abrirá um prompt de shell em vez de uma interface gráfica. |
O console executando o tmux possui 5 janelas disponíveis; seu conteúdo é descrito na tabela a seguir, junto com os atalhos de teclado usados para acessá-los. Observe que os atalhos de teclado têm duas partes: primeiro pressione Ctrl+b, em seguida, solte as duas teclas e pressione a tecla numérica da janela que deseja usar.
Você também pode usar Ctrl+b n e Ctrl+b p para alternar para a janela seguinte e a anterior do tmux, respectivamente.
| Atalho | Conteúdo |
|---|---|
Ctrl+b 1 |
Janela principal do programa de instalação. Contém prompts baseados em texto (durante a instalação em modo texto ou se você usar o modo direto VNC) e também algumas informações de depuração. |
Ctrl+b 2 |
Prompt de shell interativo com privilégios de |
Ctrl+b 3 |
Registro de instalação; exibe mensagens armazenadas em |
Ctrl+b 4 |
Registro de armazenamento; exibe mensagens relacionadas a dispositivos de armazenamento do kernel e serviços do sistema, armazenados em |
Ctrl+b 5 |
Registro do programa; exibe mensagens de outros utilitários do sistema, armazenados em |
Além de exibir informações de diagnóstico nas janelas tmux, Anaconda também gera vários arquivos de log, que podem ser transferidos do sistema de instalação. Esses arquivos de log são descritos em Arquivos de Log Gerados Durante a Instalação e as instruções para transferi-los do sistema de instalação estão disponíveis em Transferindo Arquivos de Log do Sistema de Instalação.
Salvando Capturas de Tela
Você pode pressionar Shift+Print Screen a qualquer momento durante a instalação gráfica para capturar a tela atual. Estas capturas de tela são salvas em /tmp/anaconda-screenshots.
Além disso, você pode usar o comando autostep --autoscreenshot em um arquivo Kickstart para capturar e salvar cada etapa da instalação automaticamente. Consulte autostep (opcional) - Percorrer Todas as Telas para obter detalhes.
Instalando no Modo Texto
A instalação em modo texto oferece uma interface interativa e não gráfica para a instalação de Fedora. Isso pode ser útil em sistemas sem recursos gráficos; entretanto, você deve sempre considerar as alternativas disponíveis antes de iniciar uma instalação baseada em texto. O modo de texto é limitado na quantidade de escolhas que você pode fazer durante a instalação.
Existem duas alternativas para o modo de texto que podem ser usadas mesmo se o sistema de instalação não tiver um display gráfico. Você pode se conectar ao sistema de instalação usando VNC e executar uma instalação gráfica interativa remotamente (consulte Instalando Usando VNC), ou você pode criar um arquivo Kickstart para executar a instalação automaticamente (consulte Automatizando a Instalação com Kickstart).
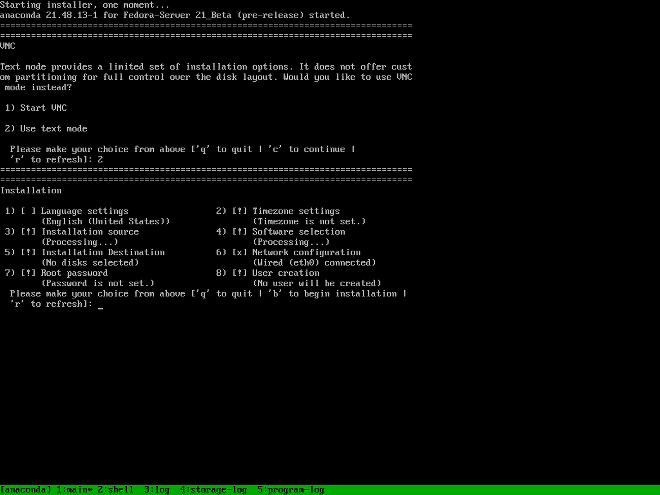
A instalação em modo texto segue um padrão semelhante à instalação gráfica: não há uma única progressão fixa; você pode definir várias configurações em qualquer ordem que desejar usando a tela de status principal. As telas que já foram configuradas, automaticamente ou por você, são marcadas como [x], e as telas que requerem sua atenção antes que a instalação possa começar são marcadas com [!]. Os comandos disponíveis são exibidos abaixo da lista de opções disponíveis.
Os limites da instalação em modo de texto interativo incluem:
-
O instalador sempre usará o idioma inglês e o layout de teclado inglês americano. Você pode definir as configurações de idioma e teclado, mas essas configurações se aplicarão apenas ao sistema instalado, não à instalação.
-
Você não pode configurar nenhum método de armazenamento avançado (LVM, RAID de software, FCoE, zFCP e iSCSI).
-
Não é possível configurar o particionamento customizado; você deve usar uma das configurações de particionamento automático. Você também não pode configurar onde o carregador de inicialização será instalado.
Para iniciar uma instalação em modo texto, inicialize a instalação com a opção de inicialização inst.text usada na linha de comando de inicialização do menu de inicialização ou na configuração do servidor PXE. Veja Inicializando a Instalação para informações sobre inicialização e uso das opções de inicialização.
Instalando na Interface Gráfica do Usuário
A interface gráfica de instalação é o método preferido de instalação manual do Fedora. Ela permite a você controle total sobre todas as configurações disponíveis, incluindo particionamento personalizado e configuração de armazenamento avançada, e também está localizado em muitos idiomas além do inglês, permitindo que você execute toda a instalação em um idioma diferente. O modo gráfico é usado por padrão quando você inicializa o sistema a partir da mídia local (um CD, DVD ou uma unidade flash USB).
As seções a seguir discutem cada tela disponível no processo de instalação. Observe que, devido à natureza paralela do instalador, a maioria das telas não precisa ser concluída na ordem em que são descritas aqui.
Cada tela da interface gráfica contém um botão Ajuda. Este botão abre o navegador de ajuda do Yelp exibindo a seção do Guia de Instalação do Fedora relevante para a tela atual.
Você também pode controlar o instalador gráfico com o teclado. Use Tab e Shift+Tab para percorrer os elementos de controle ativos (botões, caixas de seleção, etc.) na tela atual, Acima e Abaixo teclas de seta para rolar através listas e Esquerda e Direita para rolar pelas barras de ferramentas horizontais ou entradas da tabela. Espaço ou Enter pode ser usado para selecionar ou remover um item destacado da seleção e para expandir e recolher os menus suspensos.
Além disso, os elementos em cada tela podem ser alternados usando seus respectivos atalhos. Esses atalhos são destacados (sublinhados) quando você mantém pressionada a tecla Alt; para alternar esse elemento, pressione Alt+X, onde X é a letra destacada.
Your current keyboard layout is displayed in the top right hand corner. Only one layout is configured by default; if you configure more than layout in the Keyboard Layout screen (Keyboard Layout), you can switch between them by clicking the layout indicator.
Tela de Boas-vindas e Seleção de Idioma
A primeira tela exibida imediatamente depois que o instalador gráfico inicia é a tela de Boas-vindas.
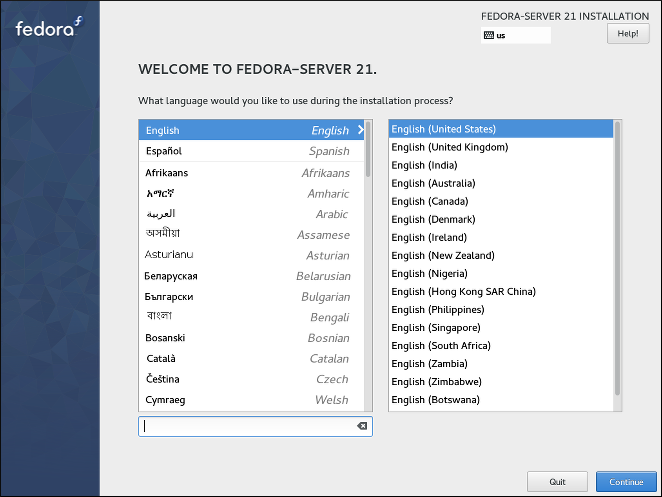
Primeiro, selecione seu idioma preferido na coluna da esquerda, e então selecione sua localização na coluna da direita. Você pode usar o campo de entrada de texto no canto inferior esquerdo para pesquisar pelo seu idioma ao invés de procurar por ele na lista completa com mais de 70 idiomas.
O idioma que você seleciona nesta tela será usado durante a instalação, e também será usado por padrão no sistema instalado. Você pode mudar o idioma para o sistema instalado mais tarde, mas uma vez que você clique em Continuar nessa tela, não será possível voltar e alterar o idioma usado dentro do próprio instalador.
Um idioma é pré-selecionado por padrão no topo da lista. Se o acesso a rede está configurado neste ponto (por exemplo, se você inicializou a partir de uma rede de servidor em vez de uma mídia local), o idioma pré-selecionado será determinado baseado na detecção de localização automática usando o módulo GeoIP. Alternativamente, se você usou a opção inst.lang= na linha de comando de inicialização ou na sua configuração de servidor PXE, esse idioma será selecionado por padrão, mas você ainda poderá alterá-lo.
Após selecionar seu idioma e localidade, clique em Continuar para confirmar sua escolha e prosseguir para Resumo da Instalação.
|
Se você está instalando uma versão de pré-lançamento do Fedora, uma mensagem será exibida depois que você clicar em |
Resumo da Instalação
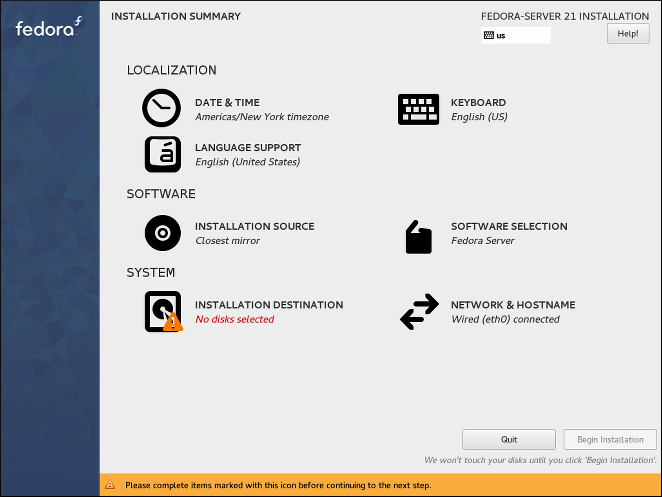
A tela Resumo da Instalação é o local central para configurar uma instalação. A maioria das opções que podem ser configuradas durante a instalação podem ser acessadas aqui.
|
Se você usou uma opção de Kickstart ou uma opção de inicialização para especificar um repositório de instalação em uma rede, mas nenhuma rede está disponível no início da instalação, o instalador exibirá a tela |
A tela de resumo consiste em vários links para outras telas, separados em categorias. Esses links podem estar em vários estados diferentes, que são indicados graficamente:
-
Um *símbolo de advertência * (triângulo amarelo com um ponto de exclamação) próximo a um ícone significa que uma tela requer sua atenção antes de iniciar a instalação. Isso normalmente acontece com a tela
Destino da Instalação, porque embora haja uma variante de particionamento automático padrão, você sempre deve pelo menos confirmar esta seleção, mesmo se não quiser fazer nenhuma alteração. -
Se um link estiver acinzentado, significa que o instalador está atualmente configurando esta seção e você deve aguardar a conclusão da configuração antes de acessar essa tela. Isso normalmente acontece quando você altera a fonte de instalação na tela
Fonte de Instalaçãoe o instalador está investigando a nova localização da fonte e reunindo uma lista de pacotes disponíveis. -
Telas com texto preto e nenhum símbolo de aviso significam que esta tela não requer sua atenção. Você ainda pode alterar suas configurações nessas telas, mas não é necessário fazer isso para concluir a instalação. Isso normalmente acontece com as configurações de localização, já que elas são detectadas automaticamente ou configuradas na tela anterior, onde você seleciona seu idioma e local.
Uma mensagem de aviso é exibida na parte inferior da tela de resumo e o botão Iniciar a Instalação fica acinzentado, desde que pelo menos um item não tenha sido configurado ainda.

Cada tela também possui um texto explicativo abaixo de seu título, mostrando as configurações atualmente configuradas naquela tela. Este texto pode ser concatenado; nesse caso, mova o cursor do mouse sobre ele e espere até que uma dica de ferramenta com o texto completo apareça.

Depois de configurar tudo o que é necessário para a instalação, você pode pressionar o botão Iniciar a instalação para iniciar a instalação do Fedora. Isso o levará a Configuração e Progresso da Instalação. Observe que, como diz o texto abaixo deste botão, nada será gravado em seu disco rígido antes de você pressioná-lo. Você pode pressionar Sair a qualquer momento; isso descartará todas as alterações feitas no instalador até agora e reinicializará o sistema.
Data & Hora
A tela Hora & data permite que você defina as configurações relacionadas à data e hora para o seu sistema. Esta tela é configurada automaticamente com base nas configurações que você selecionou em Tela de boas-vindas e seleção de idioma, mas você pode alterar suas configurações de data, hora e local antes de iniciar a instalação.
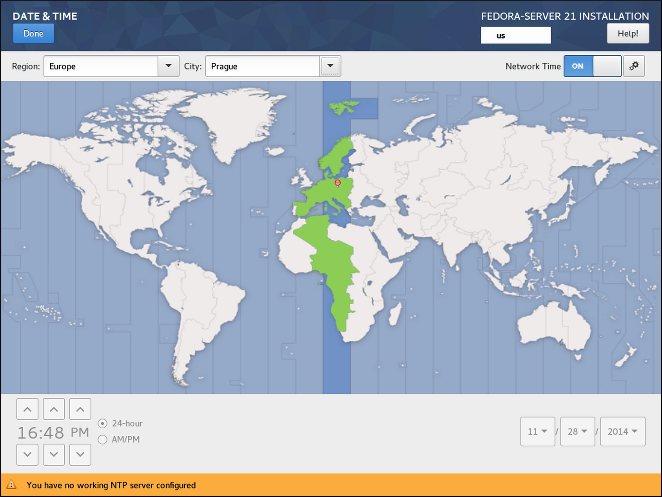
Primeiro, selecione sua Região usando o menu suspenso no canto superior esquerdo da tela. Em seguida, selecione sua Cidade, ou a cidade mais próxima de sua localização no mesmo fuso horário. Selecionar um local específico ajuda o Fedora a garantir que seu horário seja sempre definido corretamente, incluindo mudanças automáticas de horário de verão, se aplicável.
Você também pode selecionar um fuso horário relativo ao Horário de Greenwich (GMT) sem definir sua localização para uma região específica. Para fazer isso, selecione Etc como sua região.
|
A lista de cidades e regiões vem do domínio público do banco de dados de fuso horário (tzdata), que é mantido pelo Internet Assigned Numbers Authority (IANA). O Projeto Fedora não pode adicionar cidades ou regiões a este banco de dados. Você pode encontrar mais informações no site oficial do IANA. |
A chave chamada Horário da Rede no canto superior direito da tela pode ser usada para habilitar ou desabilitar a sincronização de hora da rede usando o Network Time Protocol (NTP). Ativar esta opção manterá a hora do sistema correta, desde que o sistema possa acessar a Internet. Por padrão, quatro pools NTP são configurados; você pode adicionar outros e desativar ou remover os padrão clicando no botão de roda dentada ao lado do botão.
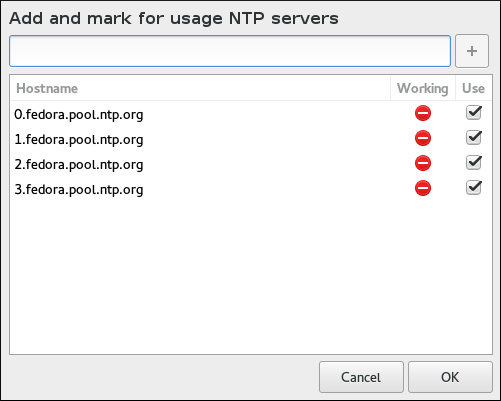
Se você desativar a sincronização de horário da rede, os controles na parte inferior da tela ficarão ativos e você poderá definir a hora e a data atuais manualmente.
Depois de definir as configurações de data e hora, pressione o botão Pronto no canto superior esquerdo para retornar a Resumo da Instalação.
Layout de Teclado
A tela Layout do teclado permite que você configure um ou mais layouts de teclado para o seu sistema e uma forma de alternar entre eles. Um layout de teclado é configurado automaticamente com base em sua seleção em Tela de boas-vindas e seleção de idioma, mas você pode alterar esse layout e adicionar outros antes de iniciar a instalação.
Os layouts de teclado são uma configuração separada dos idiomas do sistema e essas duas configurações podem ser combinadas conforme você achar necessário.
|
Todas as configurações definidas nesta tela estarão disponíveis no sistema instalado e também estarão disponíveis imediatamente dentro do instalador. Você pode usar o ícone do teclado no canto superior direito de qualquer tela ou a chave do teclado configurada nesta tela para alternar entre os layouts configurados. |
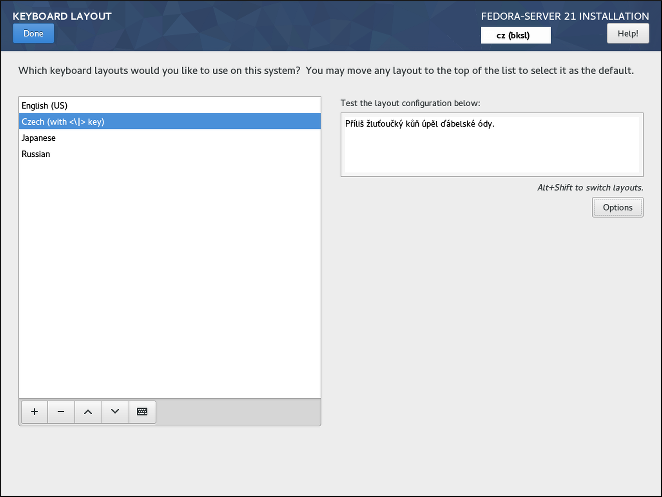
A metade esquerda da tela contém uma janela listando todos os layouts configurados atualmente. A ordem em que os layouts são exibidos é importante - a mesma ordem será usada ao alternar entre os layouts, e o primeiro layout listado será o padrão em seu sistema.
O campo de texto no lado direito da tela pode ser usado para testar o layout atualmente selecionado.
Você pode clicar em um layout na lista para realçá-lo. No final da lista, há um conjunto de botões:
-
O botão
+adiciona um novo layout. Ao pressionar este botão, uma nova janela é aberta com uma lista de todos os layouts disponíveis, agrupados por idioma. Você pode encontrar um layout navegando na lista ou pode usar a barra de pesquisa na parte inferior desta janela. Quando encontrar o layout que deseja adicionar, realce-o e pressioneAdd. -
O botão
-remove o layout atualmente destacado. -
Os botões para cima e para baixo podem ser usados para mover o layout destacado para cima ou para baixo na lista.
-
O botão do teclado abre uma nova janela que oferece uma representação visual do layout destacado.
|
Se você usar um layout que não aceita caracteres latinos, como |
Você também pode configurar opcionalmente um alternador de teclado que pode ser usado para alternar entre os layouts disponíveis. Para fazer isso, clique no botão Opções no lado direito da tela. A caixa de diálogo Opções de Alteração de Layout abrirá, permitindo que você configure uma ou mais teclas ou combinações de teclas para a troca. Selecione uma ou mais combinações de teclas usando as caixas de seleção ao lado delas e clique em OK para confirmar sua seleção.
Depois de terminar de configurar os layouts de teclado e opções, clique em Pronto no canto superior esquerdo para retornar ao Resumo da Instalação.
Suporte a Idioma
A tela Suporte a idioma permite definir as configurações de idioma do seu sistema. O idioma padrão é determinado por sua seleção em Tela de boas-vindas e seleção de idioma e o suporte para este idioma não pode ser removido. Você só pode adicionar idiomas adicionais, que estarão disponíveis no sistema instalado – não durante a instalação.
Se você deseja alterar o idioma padrão, ou o idioma usado durante a instalação, você deve reinicializar seu sistema, iniciar o instalador novamente e selecionar um idioma diferente em Tela de boas-vindas e seleção de idioma.
|
Adicionar suporte a outro idioma não configura automaticamente o layout de teclado correspondente. Os layouts são uma configuração separada configurada em Layout de teclado. |
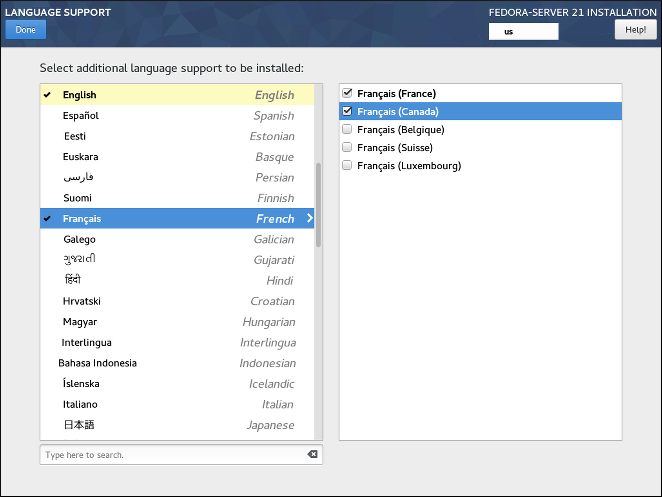
O painel esquerdo contém uma lista de grupos de idiomas disponíveis, como Inglês ou` Búlgaro`. Se pelo menos um idioma de um grupo for selecionado, uma marca de seleção será exibida ao lado do grupo e a entrada da lista será destacada. Isso permite que você veja facilmente para quais idiomas você configurou o suporte.
Para adicionar suporte para um ou mais idiomas adicionais, clique em um grupo no painel esquerdo e selecione uma ou mais variações regionais no painel direito usando as caixas de seleção ao lado das entradas da lista. Repita esse processo para todos os idiomas para os quais deseja instalar o suporte.
|
Habilitar o suporte para alguns idiomas (normalmente idiomas que usam script não latino) instalará pacotes adicionais - por exemplo, habilitar o suporte para um ou mais idiomas do grupo |
Uma vez que você tenha selecionado sua fonte de instalação, clique em Pronto no canto superior esquerdo para retornar ao Resumo da Instalação.
Fonte de Instalação
A tela Fonte de Instalação permite que você especifique uma localização (local ou na rede) da qual os pacotes serão baixados e instalados no seu sistema. A tela será configurada automaticamente na maioria dos casos, mas você pode mudar suas configurações ou adicionar fontes adicionais.
|
Normalmente, quando você entra pela primeira vez na tela |
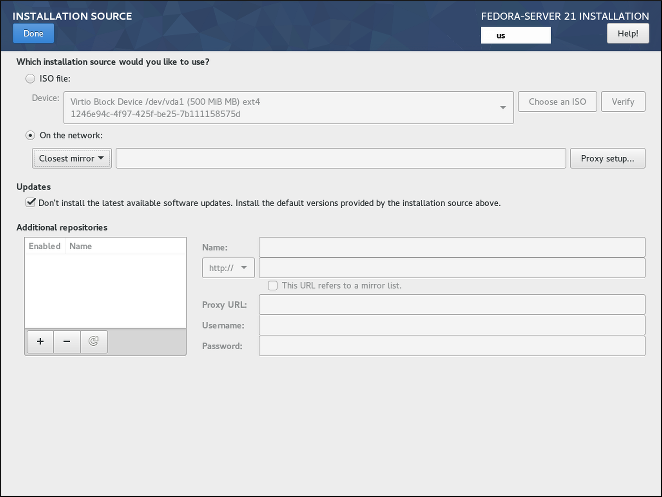
As opções a seguir estão disponíveis. Note que nem todas elas podem ser exibidas.
- Detectar automaticamente a mídia de instalação
-
Esta é a opção selecionada por padrão se você iniciar o instalador a partir de uma mídia contendo uma fonte de instalação, como um DVD live. Nenhuma configuração adicional é necessária. Você pode clicar no botão
Verificarpara checar a integridade da mídia. - Arquivo ISO
-
Esta opção aparecerá se o programa de instalação detectar uma unidade de disco rígido com um sistema de arquivo montável durante a inicialização. Selecione esta opção, clique no botão Escolher uma ISO, e procure pelos arquivos ISO de instalação localizados no seu sistema. Você pode clicar no botão
Verificarpara chegar a integridade dos arquivos. - Na rede
-
Use esta opção para baixar pacotes para serem instalados a partir de uma rede em vez de uma mídia local. Esta é a seleção padrão na mídia de instalação de rede.
Na maioria dos casos, a opção
Espelho mais próximodisponível pelo menu suspenso de seleção de protocolo é preferível. Se essa opção está selecionada, os pacotes para seu sistema serão baixados a partir do local mais adequado (espelho).Para configurar manualmente um fonte de instalação baseada em rede, use o menu suspenso para especificar o protocolo a ser usado quando estiver baixando pacotes. Esta configuração depende do servidor que você quer usar. Então, digite o endereço do servidor (sem o protocolo) no campo endereço. Se você escolher NFS, um segundo campo de entrada aparecerá, onde você pode especificar
opções de montagem NFSpersonalizadas.Quando selecionar uma fonte de instalação NFS, você deve especificar o endereço com o caractere dois pontos (
:) separando o nome de host do caminho. Por exemplo:server.example.com:/caminho/do/diretorioPara configurar um proxy para uma fonte HTTP ou HTTPS, clique no botão Configurar proxy . Marque
Habilitar proxy HTTPe digite o URL na caixaURL do Proxy. Se o servidor proxy requer autenticação, marqueUsar Autenticaçãoe digite seu nome de usuário e senha. Clique em OK para finalizar a configuração.Se o seu URL HTTP ou HTTPS refere-se a uma lista de espelhos de repositório, marque a caixa de seleção sob o campo de endereço.
Você também pode especificar repositórios adicionais na seção Repositórios adicionais para obter acesso a mais ambientes de instalação e add-ons de software. Todos os ambientes e add-ons estarão disponíveis para seleção em Seleção de Software uma vez que você termine de configurar as fontes.
Para adicionar um repositório, clique no botão +. Para excluir um repositório, selecione um na lista e clique no botão -. Clique no ícone de seta para reverter para a última lista de repositórios, por exemplo, para substituir entradas atuais com aquelas que estavam presentes no momento que você entrou na tela Fonte de Instalação. Para ativar ou desativar um repositório, clique a caixa de seleção na coluna Habilitado em cada entrada da lista.
Você pode nomear seu repositório adicional e configurá-lo da mesma maneira que o repositório primário na rede usando os campos de entrada no lado direito da seção.
Uma vez que você tenha selecionado sua fonte de instalação, clique em Pronto no canto superior esquerdo para retornar ao Resumo da Instalação.
Seleção de Programas
A tela Seleção de Programas permite que você escolha um Ambiente Base e Complementos. Essas opções controlam quais pacotes de software serão instalados em seu sistema durante o processo de instalação.
Esta tela está disponível apenas se Fonte de instalação está configurada corretamente e somente após o instalador ter baixado os metadados do pacote da fonte.
|
Não é possível selecionar pacotes específicos durante uma instalação manual. Você só pode selecionar ambientes e complementos predefinidos. Se você precisa controlar exatamente quais pacotes são instalados, você deve usar um arquivo Kickstart e definir os pacotes na seção %packages. Veja Automatizando a Instalação com o Kickstart para informações sobre as instalações do Kickstart. |
A disponibilidade de ambientes e complementos depende de sua fonte de instalação. Por padrão, a seleção depende da mídia de instalação usada para iniciar a instalação; A imagem de instalação do Fedora Server terá diferentes ambientes e complementos disponíveis para seleção do que, por exemplo, a imagem da Fedora Cloud. Você pode alterar isso configurando uma fonte de instalação diferente contendo ambientes diferentes.
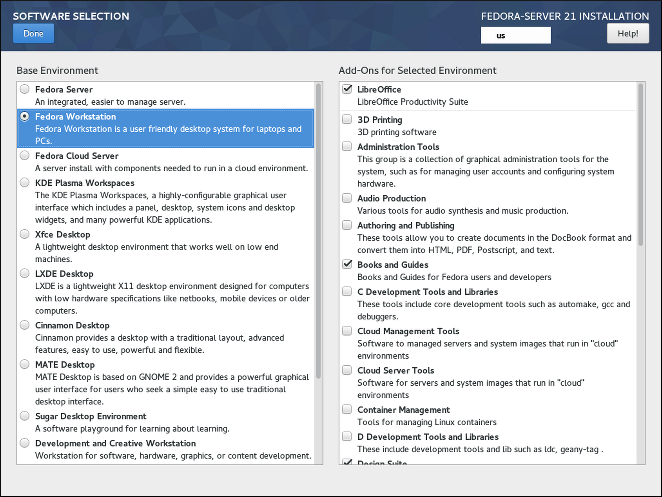
Para configurar sua seleção de programas, primeiro escolha um ambiente no lado esquerdo da tela. Apenas um ambiente pode ser escolhido, mesmo se houver mais disponíveis. Em seguida, no lado direito da tela, selecione um ou mais complementos que deseja instalar marcando as caixas de seleção ao lado de cada complemento.
A lista de complementos é dividida em duas partes por uma linha horizontal. Os complementos acima desta linha são definidos como parte do ambiente escolhido; se você selecionar um ambiente diferente, os complementos disponíveis aqui serão alterados. Os complementos exibidos abaixo do separador não são específicos para o ambiente escolhido.
Ambientes e complementos são definidos usando um arquivo comps.xml em sua fonte de instalação (por exemplo, no diretório`repodata/` no DVD de instalação do Fedora Server completo). Revise este arquivo para ver exatamente quais pacotes serão instalados como parte de um determinado ambiente ou complemento. Para obter mais informações sobre o arquivo comps.xml , consulte %packages (obrigatório) - Seleção de Pacotes.
Uma vez que você tenha finalizado a configuração da seleção de programas, clique em Pronto no canto superior esquerdo para retornar ao Resumo da Instalação.
Destino da Instalação
A tela Destino da Instalação permite que você configure as opções de armazenamento - ou seja, quais discos serão usados como destino de instalação para sua instalação do Fedora. Pelo menos um disco deve sempre ser selecionado para que a instalação continue.
Para obter informações sobre a teoria e os conceitos por trás do particionamento de disco no Linux, consulte Esquema de particionamento recomendado.
|
Se você planeja usar um disco que já contém alguns dados - por exemplo, se deseja reduzir uma partição existente do Microsoft Windows e instalar o Fedora como um segundo sistema ou se estiver atualizando uma versão anterior do Fedora, certifique-se de para fazer backup de todos os dados importantes primeiro. Manipular partições sempre traz um risco - se o processo for interrompido ou falhar por qualquer motivo (erro do instalador, falha de hardware, falta de energia, etc.), qualquer dado que já esteja no disco pode se tornar impossível de recuperar. |
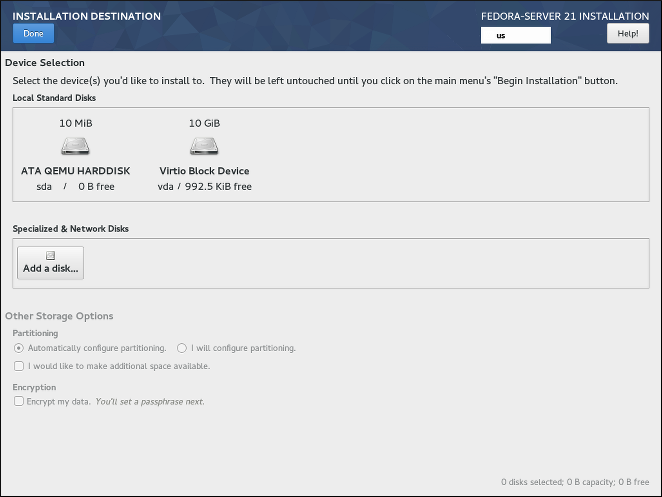
Na parte superior da tela, todos os dispositivos de armazenamento disponíveis localmente (discos rígidos SATA, IDE e SCSI, unidades flash USB, etc.) são exibidos na seção 'Discos Locais Padrão'. Os discos locais são detectados quando o instalador é iniciado - quaisquer dispositivos de armazenamento conectados após o início da instalação não serão exibidos.
If you need to configure additional local storage devices, select I will configure partitioning and press Done to move to Manual Partitioning. Then, connect any new hard drives you want to make available during the installation, and press the button marked by a circular arrow in the set of controls below the list of mount points on the left side of the screen. In the dialog window that opens, press Rescan Disks and wait until the scanning process completes. Then, press OK to return to Installation Destination; all detected disks including any new ones will be displayed in the Local Standard Disks section.
A seção Discos especializados e de rede abaixo mostra o armazenamento de rede avançado (como discos iSCSI e FCoE) atualmente configurado. Quando você abre esta tela pela primeira vez, nenhum desses dispositivos será exibido porque eles não podem ser detectados automaticamente; para procurar dispositivos de armazenamento de rede, pressione o botão Adicionar um disco e prossiga com Destino da instalação - Discos especializados e de rede. Qualquer armazenamento de rede que você configurar aparecerá em Discos especializados e de rede da mesma forma que os discos locais são mostrados acima.
Todos os dispositivos de armazenamento que serão usados para instalar o Fedora têm um ícone de círculo preto com uma marca de seleção branca. Os discos não marcados por este ícone não serão usados durante a instalação - eles serão ignorados se você escolher o particionamento automático e não estarão disponíveis no particionamento manual.
|
Dispositivos de armazenamento USB, como pendrives e discos externos, também serão mostrados nos 'Discos Locais Padrão' e estarão disponíveis para seleção da mesma forma que os discos rígidos internos. Certifique-se de não selecionar nenhum armazenamento removível como destino de instalação, a menos que você realmente queira fazê-lo. Se você acidentalmente usar uma unidade removível para instalar o Fedora e depois desconectá-lo, seu sistema provavelmente ficará inutilizável. |

After you select all disks you want to install Fedora, select one of the two options in the Other Storage Options section:
-
Automatically configure partitioning- If this option is selected, then after you pressDonein the top left corner of the screen, the installer will determine the total amount of space on all selected disks, and it will create a Logical Volume Management (LVM) layout suitable for your system. The specifics of this layout depend on whether your system uses BIOS or UEFI firmware, the total amount of free space on your disks, and the amount of RAM on your system (which determines the size of your swap space).Com o particionamento automático, você também pode selecionar a opção 'Gostaria de disponibilizar espaço adicional' abaixo. Use esta opção se quiser recuperar espaço de um layout de particionamento existente - por exemplo, se um disco que você deseja usar já contém um sistema operacional diferente e deseja tornar as partições desse sistema menores para permitir mais espaço para o Fedora. A caixa de diálogo
Recuperar espaçoque se abre se esta opção for selecionada é descrita mais adiante nesta seção. -
I will configure partitioning- Select this option and pressDonein the top left corner of the screen to configure your system’s partitioning layout manually. This requires some knowledge of the theory behind disk partitions and related concepts, but gives you full control over the way the system will be installed. For instructions for manual partitioning, see Manual Partitioning.
Adicionalmente, você pode selecionar Criptografar meus dados; isso irá criptografar todas as partições, exceto as necessárias para inicializar o sistema (como /boot) usando Linux Unified Key Setup (LUKS). Criptografar seu disco rígido é recomendado. Para obter informações detalhadas sobre a criptografia LUKS, consulte o Guia de Segurança do Fedora, disponível no https://docs.fedoraproject.org/.
|
Se você perder a senha do LUKS, quaisquer partições criptografadas e os dados nelas ficarão completamente inacessíveis. Não há como recuperar uma senha perdida. No entanto, se você executar uma instalação do Kickstart, poderá salvar senhas de criptografia e criar senhas de criptografia de backup durante a instalação. Veja Automatizando a Instalação com o Kickstart para informações sobre as instalações do Kickstart. |
Para controlar qual dos dispositivos de armazenamento selecionados conterá o carregador de inicialização, clique no link Resumo completo do disco e carregador de inicialização no canto inferior esquerdo da tela e siga as instruções em Instalação do Carregador de Inicialização. Observe que, embora na maioria dos casos seja suficiente deixar o carregador de inicialização no local padrão, algumas configurações (por exemplo, sistemas que exigem carregamento de cadeia de outro carregador de inicialização) exigirão que a unidade de inicialização seja especificada manualmente.
Depois de selecionar os dispositivos de armazenamento, escolha entre o particionamento automático e manual, configure a criptografia e a localização do carregador de inicialização, pressione 'Concluído' no canto superior esquerdo da tela. Então, dependendo de suas configurações, o seguinte acontecerá:
-
Se você optar por criptografar seu disco rígido, a caixa de diálogo
Senha de Criptografia de Discoserá exibida. Digite a senha escolhida nos camposSenhaeConfirme. Quando você fizer isso, a senha será avaliada automaticamente e sua força será exibida, juntamente com sugestões sobre como torná-la mais forte se o instalador determinar que ela é fraca. Para obter informações sobre como criar senhas fortes, consulte Guia de Segurança do Fedora. -
Se você selecionou o particionamento automático e
Eu gostaria de adicionar espaço disponível no disco., ou se não houver espaço livre suficiente nos discos rígidos selecionados para instalar o Fedora, a caixa de diálogoRecuperar espaçoaparecerá. Esta caixa de diálogo lista todos os dispositivos de disco que você configurou e todas as partições nesses dispositivos. O canto inferior direito da caixa de diálogo exibe informações sobre quanto espaço o sistema precisa para pelo menos uma instalação mínima e quanto espaço você recuperou.Se você usar a caixa de diálogo
Recuperar espaçopara excluir uma partição, todos os dados dessa partição serão perdidos. Se você quiser preservar seus dados, use a opçãoReduzir, não a opçãoExcluir.Primeiro, revise a lista exibida de dispositivos de armazenamento disponíveis. A coluna
Espaço Recuperávelmostra quanto espaço pode ser recuperado de cada entrada. Para recuperar espaço, selecione um disco ou partição e pressione o botãoExcluirpara excluir essa partição (ou todas as partições em um disco selecionado), ouEncolherpara usar o espaço livre em uma partição preservando os dados existentes. Alternativamente, você pode pressionar 'Excluir tudo' no canto inferior direito; isso excluirá todas as partições existentes em todos os discos e disponibilizará esse espaço para Fedora, mas todos os dados existentes em todos os discos serão perdidos.Depois de liberar espaço suficiente para a instalação do Fedora, pressione "Recuperar espaço" para concluir.
Nenhuma mudança em nenhum disco será feita até que você pressione
Iniciar a instalaçãoem Resumo da Instalação. A caixa de diálogoRecuperar espaço do discoapenas marca as partições para redimensionamento ou exclusão, mas nenhuma ação é realizada imediatamente. -
If you selected the
I will configure partitioningoption, pressingDonewill open theManual Partitioningscreen. See Manual Partitioning for further instructions.
Instalação do Carregador de Inicialização
Fedora usa GRUB2 (GRand Unified Bootloader version 2) como seu carregador de inicialização. O carregador de inicialização é o primeiro programa executado quando o computador é inicializado e é responsável por carregar e transferir o controle para um sistema operacional. GRUB2 pode inicializar qualquer sistema operacional compatível (incluindo Microsoft Windows) e também pode usar o carregamento em cadeia para transferir o controle para outros carregadores de inicialização para sistemas operacionais sem suporte.
|
Instalar o GRUB2 pode substituir seu carregador de inicialização existente. |
Se você tiver outros sistemas operacionais já instalados, o instalador do Fedora tentará detectar e configurar automaticamente o carregador de inicialização para iniciá-los. Você pode configurar manualmente quaisquer sistemas operacionais adicionais após concluir a instalação, se eles não forem detectados corretamente. Para obter instruções sobre como editar a configuração do Fedora System Administrator’s Guide (guia de administrador de sistema), disponível em https://docs.fedoraproject.org/
Se você estiver instalando o sistema Fedora com mais de um disco, pode ser desejável especificar manualmente onde o carregador de inicialização deve ser instalado. Clique no link Resumo completo do disco e carregador de inicialização na parte inferior da tela Destino de Instalação. A janela Discos Selecionados aparecerá. O carregador de inicialização será instalado no dispositivo de sua escolha ou, em um sistema UEFI, a partição de sistema EFI será criada nesse dispositivo durante a particionamento guiado.
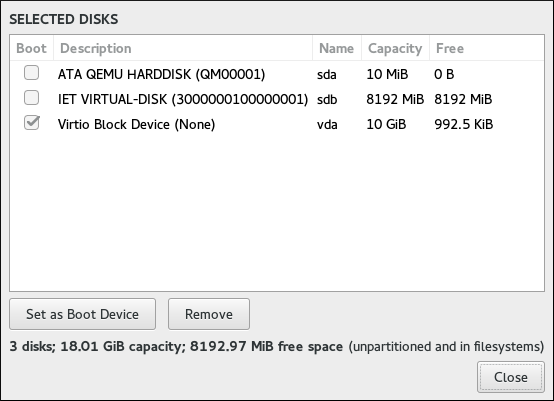
Na coluna Iniciar, um ícone de "seleção" marca um dos dispositivos como o dispositivo de inicialização pretendido. Para alterar o dispositivo de inicialização, selecione um dispositivo da lista e clique no botão Definir como dispositivo de inicialização para instalar o carregador de inicialização lá. Apenas um dispositivo pode ser definido como o dispositivo de inicialização.
Para recusar a instalação de um novo gerenciador de inicialização, selecione o dispositivo atualmente marcado para inicialização e clique no botão Não instalar carregador de inicialização. Isso removerá a seleção e garantirá que o GRUB2 não seja instalado em nenhum dispositivo.
|
Se você optar por não instalar um carregador de inicialização por qualquer motivo, não será capaz de inicializar o sistema diretamente e deve usar outro método de inicialização, como um aplicativo de carregador de inicialização comercial autônomo. Use esta opção apenas se tiver certeza de que possui outra maneira de inicializar o sistema. |
O carregador de inicialização também pode exigir a criação de uma partição especial, dependendo se o seu sistema usa BIOS ou firmware UEFI e também se a unidade de inicialização tem uma Tabela de Partição GUID (GPT) ou um Master Boot Record (MBR, também conhecido como rótulo msdos). Se você usar o particionamento automático, o instalador criará esta partição se necessário. Para obter detalhes, consulte Esquema de Particionamento Recomendado.
Destino da Instalação - Discos Especializados e de Rede
Esta parte da tela Destino da Instalação permite que você configure dispositivos de armazenamento não locais, ou seja, armazenamento iSCSI e FCoE. Esta seção será útil principalmente para usuários avançados que precisam de discos em rede. Para obter instruções sobre como configurar discos rígidos locais, consulte Destino da Instalação.
|
Esta seção explica apenas como disponibilizar os discos de rede existentes no instalador. Ele não explica como configurar sua rede ou um servidor de armazenamento, apenas como se conectar a eles. |
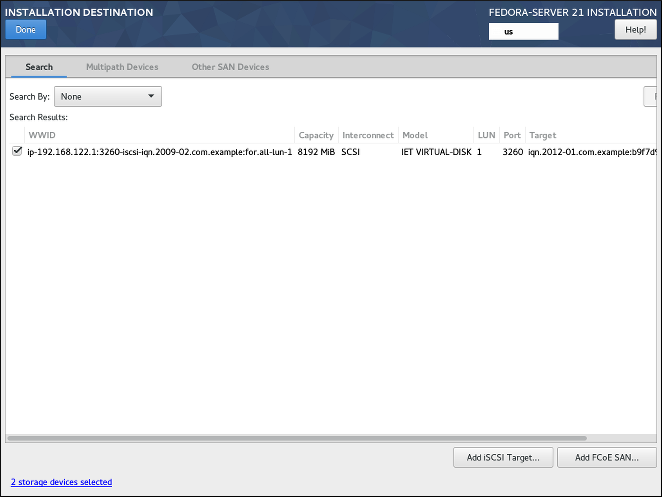
A tela contém uma lista de todos os dispositivos de armazenamento de rede atualmente disponíveis (descobertos). Quando a tela é aberta pela primeira vez, a lista estará vazia na maioria dos casos porque nenhum armazenamento de rede foi descoberto – o instalador não tenta descobrir isso a menos que você configure os discos de rede usando um arquivo Kickstart.
Para adicionar um ou mais dispositivos de armazenamento à tela para que você possa pesquisá-los e usá-los na instalação, clique em Adicionar destino iSCSI ou Adicionar FCoE SAN no canto inferior direito da tela e siga as instruções em Adicionar destino iSCSI ou Adicionar FCoE SAN, dependendo de qual tipo de armazenamento de rede você deseja adicionar.
Os dispositivos de armazenamento de rede descobertos e configurados com sucesso pelo instalador serão exibidos na lista principal, juntamente com informações de identificação, como Nome, WWID, Modelo e Destino. Para classificar a lista por uma coluna específica (por exemplo, WWID), clique no título da coluna.
|
Em resoluções de vídeo mais baixas, a lista pode ser muito ampla para caber na tela e algumas das colunas ou botões podem estar ocultos inicialmente. Use a barra de rolagem horizontal na parte inferior da lista para mover sua visualização e ver todas as colunas e controles da tabela disponíveis. |
Existem três abas no topo da lista, que exibem informações diferentes:
- Buscar
-
Exibe todos os dispositivos disponíveis, independentemente de seu tipo, e permite filtrá-los por seu World Wide Identifier (WWID) ou pela porta, destino ou número de unidade lógica (LUN) em que são acessados.
- Dispositivos de Caminhos Múltiplos
-
Dispositivos de armazenamento acessíveis por meio de mais de um caminho, como por meio de vários controladores SCSI ou portas Fibre Channel no mesmo sistema.
O programa de instalação detecta apenas dispositivos de armazenamento de caminhos múltiplos com números de série de 16 ou 32 caracteres.
- Outros dispositivos SAN
-
Dispositivos disponíveis em uma Rede de Área de Armazenamento (SAN).
Dependendo da guia em que você está atualmente, você pode filtrar os dispositivos descobertos usando o campo Filtrar por. Algumas das opções de filtragem são preenchidas automaticamente com base nos dispositivos descobertos (por exemplo, se você selecionar Filtrar por: Fabricante, outro menu suspenso aparecerá mostrando todos os fornecedores de todos os dispositivos descobertos). Outros filtros exigem sua entrada (por exemplo, ao filtrar por WWID) e apresentam um campo de entrada de texto em vez de um menu suspenso.
Na lista (independentemente de como é filtrado), cada dispositivo é apresentado em uma linha separada, com uma caixa de seleção à sua esquerda. Marque a caixa de seleção para disponibilizar o dispositivo durante o processo de instalação; isso fará com que este dispositivo (nó) seja mostrado na seção Discos de Rede e Especiais em Destino da Instalação. Lá, você pode selecionar o disco como um destino de instalação e prosseguir com o particionamento manual ou automático.
|
Os dispositivos selecionados aqui não são apagados automaticamente pelo processo de instalação. Selecionar um dispositivo nesta tela não coloca, por si só, os dados armazenados no dispositivo em risco. Observe também que quaisquer dispositivos que você não selecionar aqui para fazer parte do sistema instalado podem ser adicionados ao sistema após a instalação, modificando o arquivo |
Quando você tiver selecionado os dispositivos de armazenamento para disponibilizar durante a instalação, clique em Concluído para retornar a Destino da Instalação.
Adicionar Destino iSCSI
Para usar dispositivos de armazenamento iSCSI, o instalador deve ser capaz de descobri-los como destinos iSCSI e ser capaz de criar uma sessão iSCSI para acessá-los. Ambas as etapas podem exigir um nome de usuário e senha para autenticação Challenge Handshake Authentication Protocol (CHAP).
Você também pode configurar um destino iSCSI para autenticar o iniciador iSCSI no sistema ao qual o destino está conectado (CHAP reverso), tanto para descoberta quanto para sessão. Usados juntos, o CHAP e o CHAP reverso são chamados de CHAP mútuo ou CHAP de duas vias. O CHAP mútuo fornece o maior nível de segurança para conexões iSCSI, especialmente se o nome de usuário e a senha forem diferentes para autenticação CHAP e autenticação CHAP reversa.
Siga o procedimento abaixo para adicionar um Destino de Armazenamento iSCSI ao seu sistema.
-
Clique no botão
Adicionar Destino iSCSIno canto inferior direito da tela Destino da Instalação - Discos Especializados e de Rede. Uma nova janela de diálogo intituladaAdicionar Destino de Armazenamento iSCSIserá aberta. -
Insira o endereço IP do destino iSCSI no campo
Endereço IP do Destino. -
Forneça um nome no campo
Nome do Iniciador iSCSIpara o iniciador iSCSI no formato Nome Qualificado iSCSI (IQN). Uma entrada IQN válida contém:-
A string
iqn.(incluindo o ponto). -
Um código de data que especifica o ano e mês em que o domínio da Internet da sua organização ou nome de subdomínio foi registrado, representado como quatro dígitos para o ano, um travessão e dois dígitos para o mês, seguidos por um ponto. Por exemplo, represente setembro de 2010 como
2010-09. -
O domínio da Internet ou nome de subdomínio da sua organização, apresentado na ordem inversa (com o domínio de nível superior primeiro). Por exemplo, represente o subdomínio storage.example.com como
com.example.storage. -
Dois pontos (
:) seguido por uma string que identifica exclusivamente este iniciador iSCSI particular dentro de seu domínio ou subdomínio. Por exemplo,:diskarrays-sn-a8675309Um IQN completo irá, portanto, se parecer com:
iqn.2010-09.com.example.storage:diskarrays-sn-a8675309Um exemplo usando o formato correto também é exibido abaixo do campo de entrada para referência.
Para mais informações sobre IQNs, veja 3.2.6. iSCSI Names in RFC 3720 - Internet Small Computer Systems Interface (iSCSI), disponível em https://tools.ietf.org/html/rfc3720#section-3.2.6 e 1. iSCSI Names and Addresses in RFC 3721 - Internet Small Computer Systems Interface (iSCSI) Naming and Discovery, disponível em https://tools.ietf.org/html/rfc3721#section-1.
-
-
Especifique o tipo de autenticação a ser usado para descoberta iSCSI usando o menu suspenso
Descobrir Tipo de Autenticação. Dependendo do tipo de autenticação que você selecionou, campos de entrada adicionais (comoNome de Usuário CHAPeSenha CHAPpodem então se tornar visíveis. Preencha suas credenciais de autenticação; elas devem ser fornecidas por sua organização. -
Clique no botão
Iniciar Descoberta. O instalador agora tentará descobrir um destino iSCSI com base nas informações fornecidas e, se o destino exigir CHAP ou autenticação CHAP reversa, ele tentará usar as credenciais fornecidas. Este processo pode demorar algum tempo (geralmente menos de 30 segundos), dependendo da sua rede.Se a descoberta não foi bem-sucedida, uma mensagem de erro será exibida na janela de diálogo. Esta mensagem irá variar com base em qual parte da descoberta falhou. Se o instalador não encontrou o destino que você especificou, você deve verificar o endereço IP; se o problema for um erro de autenticação, certifique-se de inserir todas as credenciais do CHAP e do CHAP reverso corretamente e de ter acesso ao destino iSCSI.
A mensagem de erro
Nenhum nó descobertotambém pode significar que todos os nós no endereço que você especificou já estão configurados. Durante a descoberta, o Anaconda ignora os nós que já foram adicionados.Se a descoberta foi bem-sucedida, você verá uma lista de todos os nós descobertos.
-
Selecione um ou mais nós nos quais deseja fazer login marcando ou desmarcando a caixa de seleção ao lado de cada nó descoberto no destino. Abaixo da lista, selecione novamente o tipo de autenticação que deseja usar; você também pode selecionar a opção
Usar as credenciais da descobertase o nome de usuário e senha CHAP/CHAP reverso que você usou para descobrir o destino também forem válidos para fazer login nele.Depois de selecionar todos os nós que deseja usar, clique em
Loginpara iniciar uma sessão iSCSI. O Anaconda tentará fazer o login em todos os nós selecionados. Se o processo de login for bem-sucedido, a caixa de diálogoAdicionar destino de armazenamento iSCSIfechará e todos os nós que você configurou serão mostrados na lista de discos de rede em Destino da instalação - Discos especializados e de rede.
Você pode repetir este procedimento para descobrir destinos iSCSI adicionais ou para adicionar mais nós de um destino configurado anteriormente. No entanto, observe que depois de clicar no botão Iniciar Descoberta pela primeira vez, você não poderá alterar o Nome do Iniciador iSCSI. Se você cometeu um erro ao configurar o nome do iniciador, deve reiniciar a instalação.
Adicionar FCoE SAN
O procedimento a seguir explica como adicionar dispositivos de armazenamento Fibre Channel over Ethernet (FCoE) e torná-los disponíveis durante a instalação:
-
Clique no botão
Adicionar FCoE SANno canto inferior direito de Destino da instalação - Discos Especializados e de Rede. Uma nova janela de diálogo será aberta. -
Selecione a interface de rede (
NIC) que está conectada ao seu switch FCoE no menu suspenso. Note que esta interface de rede deve ser configurada e conectada - veja Rede e Nome do Host. -
Embaixo do menu suspenso
NICestão duas opções:Usar DCB-
Data Center Bridging (DCB) é um conjunto de melhorias para os protocolos Ethernet projetados para aumentar a eficiência das conexões Ethernet em redes de armazenamento e clusters. Esta opção deve ser habilitada apenas para interfaces de rede que requerem um cliente DCBX baseado em host. As configurações em interfaces que implementam um cliente DCBX de hardware devem deixar esta caixa de seleção vazia.
Usar auto vlan-
Esta opção indica se a descoberta de VLAN deve ser executada. Se esta caixa estiver marcada, o protocolo de descoberta de VLAN FCoE Initiation Protocol (FIP) será executado na interface Ethernet assim que a configuração do link for validada. Se ainda não estiverem configuradas, as interfaces de rede para quaisquer VLANs FCoE descobertas serão criadas automaticamente e as instâncias FCoE serão criadas nas interfaces VLAN. Essa opção está ativada por padrão.
-
Depois de selecionar qual interface e opções usar, clique em
Adicionar Disco(s) FCoE. Os dispositivos de armazenamento FCoE descobertos serão exibidos na abaOutros Dispositivos SANem Destino da Instalação - Discos Especializados e de Rede.
Particionamento Manual
A tela Particionamento Manual permite que você crie uma configuração de armazenamento para o seu sistema Fedora manualmente, dando a você um maior controle sobre o armazenamento do seu sistema.
Na maioria dos outros instaladores para Linux e outros sistemas operacionais, o particionamento de disco geralmente usa uma abordagem "de baixo para cima". Nesses instaladores, você primeiro cria dispositivos subjacentes, como volumes físicos LVM, em seguida, cria um layout como LVM sobre eles, cria sistemas de arquivos sobre volumes lógicos e a última etapa geralmente é atribuir um ponto de montagem para cada volume conforme necessário.
Anaconda usa uma abordagem oposta. Primeiro, você cria todos os pontos de montagem separados de que precisa e tudo o que é necessário para criá-los (criando um grupo de volumes, os volumes lógicos dentro dele e volumes físicos onde o grupo de volumes residirá) é executado automaticamente. Você pode então ajustar as configurações automáticas conforme necessário.
|
Nenhuma mudança permanente será feita em seus discos durante o processo de particionamento real. A configuração que você selecionou só será gravada em seu sistema após você pressionar o botão |
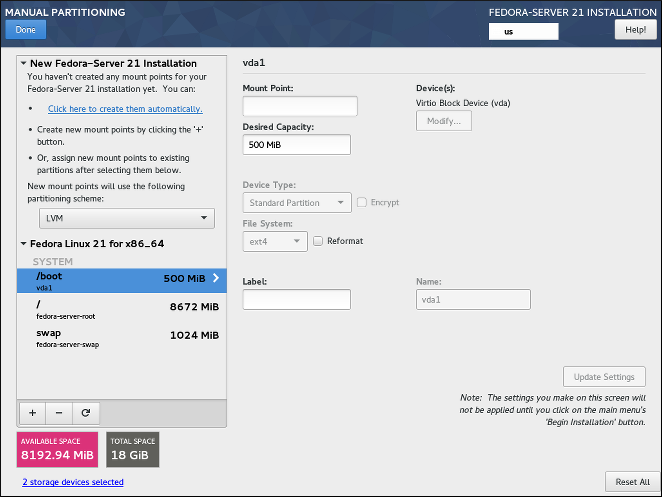
Quando você abre a tela Particionamento manual pela primeira vez, a coluna do lado esquerdo exibirá todas as partições existentes anteriormente em todas as unidades que você selecionou como alvos de instalação em Destino da instalação. Se nenhuma das unidades selecionadas contiver partições existentes, será exibida uma mensagem informando que nenhum ponto de montagem existe no momento.
Aqui, você pode escolher um esquema de particionamento como LVM ou` BTRFS` e clicar em Clicar aqui para criá-los automaticamente para solicitar ao instalador que crie um layout de particionamento básico; este layout segue as diretrizes descritas em Esquema de particionamento recomendado. O layout criado é um layout básico onde os tamanhos de partição/volume são determinados automaticamente com base na quantidade total de espaço disponível.
Clique no botão + para adicionar um ponto de montagem. Na janela de diálogo que se abre, escolha um ponto de montagem, como / ou /home, e a capacidade desejada para o ponto de montagem (como 10 GB ou 500 MB). Observe que especificar o ponto de montagem é obrigatório, mas você não precisa especificar a capacidade neste ponto; isso é útil ao adicionar um ponto de montagem que você deseja tornar maior do que o espaço disponível atual permite. Em seguida, clique em Adicionar um ponto de montagem para adicioná-lo à lista usando as configurações padrão, o que significa que ele será criado como um volume lógico e um novo grupo de volume será criado para ele, a menos que já exista um.
Em seguida, selecione o ponto de montagem recém-criado na lista do lado esquerdo. Um conjunto de controles será exibido no lado direito da tela, permitindo que você altere seu ponto de montagem, o dispositivo no qual ele residirá fisicamente, sua capacidade, sistema de arquivos, etc. Quando você alterar qualquer configuração, pressione Atualizar Configurações no canto inferior direito. Isso salvará a configuração ajustada; agora você pode criar outro ponto de montagem ou selecionar um ponto existente diferente e ajustar suas configurações também.
|
Para obter uma descrição dos tipos de dispositivos e sistemas de arquivos disponíveis, consulte Tipos de dispositivos, sistemas de arquivos e RAID. |
Para remover um ponto de montagem, selecione-o na lista e pressione o botão - abaixo.
As etapas exatas para configurar seu armazenamento dependem de suas necessidades específicas e da configuração do sistema. Os procedimentos para a criação de layouts específicos são descritos mais adiante neste capítulo. Antes de começar, você também deve revisar o Esquema de particionamento recomendado e Conselho sobre partições para obter uma lista de requisitos e dicas para particionar seus discos para o Fedora.
Embaixo da lista de pontos de montagem existentes, há dois campos, mostrando quanto espaço livre resta em seus dispositivos de armazenamento e quanto espaço total eles possuem.
Clique em X dispositivos de armazenamento selecionados para ver um resumo dos dispositivos de armazenamento selecionados atualmente; isso pode ajudá-lo com orientação em esquemas de armazenamento mais complicados. Os dispositivos exibidos aqui são aqueles que você selecionou em Destino da Instalação. Se você deseja adicionar ou remover qualquer dispositivo de armazenamento de sua configuração, volte para aquela tela e mude sua seleção.
Você pode pressionar o botão Redefinir Tudo no canto inferior direito a qualquer momento para redefinir a configuração de armazenamento para o estado em que estava quando você abriu a tela Particionamento Manual pela última vez. Isso significa que se você modificar a configuração de armazenamento, sair da tela e voltar, o botão Redefinir irá redefinir a configuração de volta ao estado já modificado, descartando apenas as alterações feitas recentemente, não todas as alterações na configuração de armazenamento desde que você inicializou o instalador.
Para descartar todas as alterações e também detectar quaisquer novas unidades que não tenham sido detectadas quando o instalador foi iniciado (geralmente quando você anexou uma nova unidade depois de iniciar), pressione o botão marcado por uma seta circular no conjunto de controles abaixo da lista de pontos de montagem no lado esquerdo da tela. Na janela de diálogo que se abre, pressione Nova Varredura de Discos e aguarde até que o processo de digitalização seja concluído. Então, pressione OK para retornar ao Destino da Instalação; todos os discos detectados, incluindo os novos, serão exibidos na seção Discos Locais Padrão.
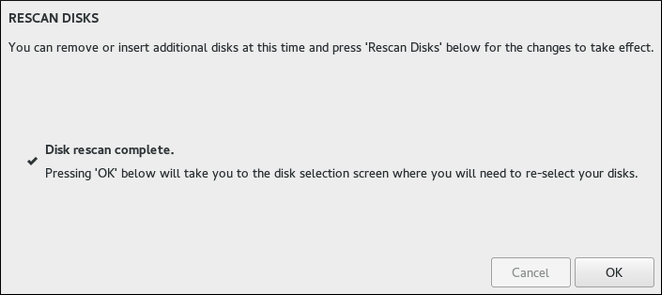
Depois de terminar de configurar o armazenamento do sistema, pressione Concluído no canto superior esquerdo para salvar a configuração e retornar à tela Resumo da Instalação. Neste ponto, o instalador verificará se sua configuração de armazenamento é válida. Se um erro for detectado, uma mensagem será exibida na parte inferior da tela. Clique na mensagem para abrir uma janela de diálogo explicando que tipo de erro foi detectado (por exemplo, você colocou /boot em um subvolume Btrfs ou não criou uma partição de inicialização do BIOS quando seu sistema requer uma).
Se tal mensagem for exibida, volte e corrija quaisquer problemas encontrados pelo instalador; caso contrário, você não poderá prosseguir com a instalação. Você também pode pressionar Concluído novamente para retornar ao Resumo da Instalação de qualquer maneira, mas um erro de configuração de armazenamento o impedirá de iniciar o processo de instalação real.
Se nenhuma mensagem de erro for exibida e se você fez alguma alteração desde a última vez que visitou esta tela, uma caixa de diálogo de resumo aparecerá, exibindo uma lista detalhada das alterações feitas. Revise a lista e clique em Aceitar mudanças para prosseguir com Resumo da Instalação ou clique em Cancelar e retornar para o particionamento personalizado se quiser fazer mais alterações .
Criando Partições Padrão
Partições padrão são o tipo mais comum de partição, com o suporte mais amplo entre os sistemas operacionais. Por exemplo, o Microsoft Windows usa partições exclusivamente físicas e não pode funcionar nativamente com LVM ou Btrfs. A maioria das configurações de particionamento do Fedora também exigirá pelo menos uma partição padrão para o diretório /boot e, possivelmente, também outra partição padrão com a BIOS Boot ou sistema de arquivos de sistema EFI para armazenar o carregador de inicialização.
Veja Uma Introdução às Partições de Disco para informações adicionais sobre os conceitos por trás das partições físicas.
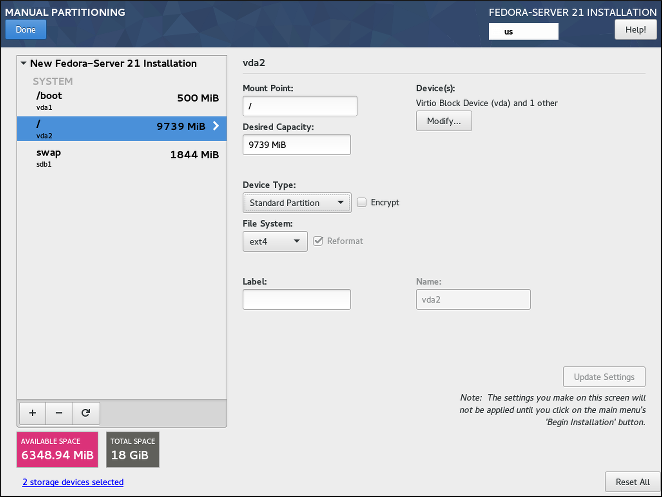
Siga o procedimento abaixo para criar pontos de montagem em partições físicas padrão:
-
Clique no botão
+na parte inferior da lista mostrando os pontos de montagem existentes. Uma nova janela de diálogo será aberta. -
Na nova janela de diálogo, especifique um ponto de montagem para o qual deseja criar um ponto de montagem separado – por exemplo,
/. Opcionalmente, especifique um tamanho para a partição usando unidades padrão como MB ou GB (por exemplo,50GB). Em seguida, clique emAdicionar um ponto de montagempara adicionar o ponto de montagem e retornar à tela principal de particionamento.Ao criar uma partição swap, especifique o ponto de montagem como
swap. Para uma partição de Inicialização do BIOS, usebiosboot. Para uma partição de Sistema EFI, use/boot/efi.Para informações sobre esses tipos de partição, veja Esquema de Partição Recomendado.
-
O ponto de montagem agora foi criado usando as configurações padrão, o que significa que foi criado como um volume lógico LVM. Selecione o ponto de montagem recém-criado no painel esquerdo para configurá-lo ainda mais e convertê-lo em uma partição física alterando a opção
Tipo de DispositivoparaPartição Padrão. Em seguida, clique emAtualizar Configuraçõesno canto inferior direito da tela. -
Na seção
Dispositivo(s)no lado direito da tela, você pode ver que a partição foi atribuída a um ou mais discos rígidos. Clique no botãoModificarpara configurar em qual drive esta partição será criada. -
Na caixa de diálogo
Configurar Ponto de Montagem, você pode especificar em quais dispositivos físicos (discos) este volume pode residir. Você pode selecionar um ou mais discos que serão usados para manter este volume, mantendo pressionado Ctrl e clicando em cada disco na lista. Se você selecionar vários discos aqui, o Anaconda determinará onde exatamente a partição deve ser criada com base em como você configurou o resto da instalação. Se você quiser ter certeza de que esta partição foi colocada em um disco rígido específico, selecione apenas essa unidade e desmarque todas as outras.Após terminar de configurar a localização da partição, clique em
Salvarpara retornar à tela principalParticionamento Manual. -
Defina as outras configurações específicas para a partição – seu
Ponto de Montagem,Capacidade DesejadaeSistema de Arquivos. PressioneAtualizar Configuraçõespara aplicar quaisquer alterações à configuração.
Repita este procedimento para todas as partições padrão adicionais que deseja criar.
Criando RAID por Software
Arranjos redundantes de discos independentes (RAIDs) são construídos a partir de vários dispositivos de armazenamento que são organizados para fornecer melhor desempenho e, em algumas configurações, maior tolerância a falhas. Veja em Tipos de dispositivos, sistema de arquivos e RAID uma descrição de diferentes tipos de RAIDs.
Um dispositivo RAID é criado em uma etapa e os discos são adicionados ou removidos conforme necessário. Uma partição RAID por disco físico é permitida para cada dispositivo, portanto, o número de discos disponíveis para o programa de instalação determina quais níveis de dispositivo RAID estão disponíveis para você. Por exemplo, se o seu sistema tiver dois discos rígidos, o programa de instalação não permitirá que você crie um dispositivo RAID10, que requer 4 partições separadas.
|
Esta seção explica apenas como criar RAID por software com partições (físicas) padrão. No entanto, você também pode configurar grupos de volume LVM e volumes Btrfs para usar RAID e colocar seus volumes lógicos ou subvolumes Btrfs no topo desta matriz RAID. Veja Criando um layout de Gerenciamento de Volume Lógico (LVM) e Criando um layout Btrfs para obter instruções sobre a criação de RAID em LVM e Btrfs. |
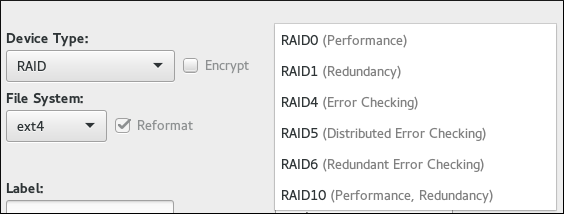
|
As opções de configuração de RAID só são visíveis se você selecionou dois ou mais discos para instalação. São necessários pelo menos dois discos para criar um dispositivo RAID, e alguns layouts RAID exigirão mais. Requisitos para diferentes tipos de RAID são descritos em Tipos de Dispositivos, Sistemas de Arquivos e RAID. |
Siga o procedimento abaixo para criar RAID por software:
-
Clique no botão
+na parte inferior da lista mostrando os pontos de montagem existentes. Uma nova janela de diálogo será aberta. -
Na nova janela de diálogo, especifique um ponto de montagem para o qual deseja criar uma partição RAID por software separada - por exemplo,
/. Opcionalmente, especifique um tamanho para a nova partição usando unidades padrão como MB ou GB (por exemplo,50GB). Em seguida, clique emAdicionar um ponto de montagempara adicionar o ponto de montagem e retornar à tela principal de particionamento.Ao criar um ponto de montagem para troca em RAID por software, especifique o ponto de montagem como
swap. -
O ponto de montagem agora foi criado usando as configurações padrão, o que significa que foi criado como um volume lógico LVM. Selecione o ponto de montagem recém-criado no painel esquerdo para configurá-lo ainda mais e convertê-lo em uma partição RAID de software alterando a opção
Tipo de DispositivoparaRAID. -
Escolha um tipo de RAID no menu suspenso
Nível de RAID. Os tipos de RAID disponíveis e seus requisitos são descritos em Tipos de Dispositivos, Sistemas de Arquivos e RAID. -
Na seção
Dispositivo(s)no lado direito da tela, você pode ver que a partição foi atribuída a vários discos físicos. Clique no botãoModificarpara configurar em quais drives esta partição será criada. -
Na caixa de diálogo
Configurar ponto de montagem, você pode especificar em quais dispositivos físicos (discos) esta partição deve residir. Você pode selecionar um ou mais discos que serão usados para manter esta partição pressionando Ctrl e clicando em cada disco na lista. Se você deseja ter certeza de que esta partição é colocada em um conjunto específico de discos rígidos, selecione apenas essas unidades e desmarque todas as outras.Após terminar de configurar a localização da partição, clique em
Salvarpara retornar à tela principalParticionamento Manual. -
Defina as outras configurações específicas para a partição – seu
Ponto de Montagem,Capacidade DesejadaeSistema de Arquivos. PressioneAtualizar Configuraçõespara aplicar quaisquer alterações à configuração.
Repita este procedimento para quaisquer partições padrão adicionais com RAID por software que deseja criar.
Criando um layout de Gerenciamento de Volume Lógico (LVM)
Gerenciador de Volume Lógico, ou Logical Volume Management (LVM), apresenta uma visão lógica simples do espaço de armazenamento físico subjacente, como discos rígidos ou LUNs. As partições no armazenamento físico são representadas como volumes físicos que podem ser agrupados em grupos de volume. Cada grupo de volume pode ser dividido em vários volumes lógicos, cada um dos quais é análogo a uma partição de disco padrão. Portanto, os volumes lógicos LVM funcionam como partições que podem abranger vários discos físicos.
Veja Entendendo LVM para obter informações adicionais sobre os conceitos por trás do Gerenciamento de Volume Lógico.
|
Alguns tipos de partição - notavelmente o diretório |
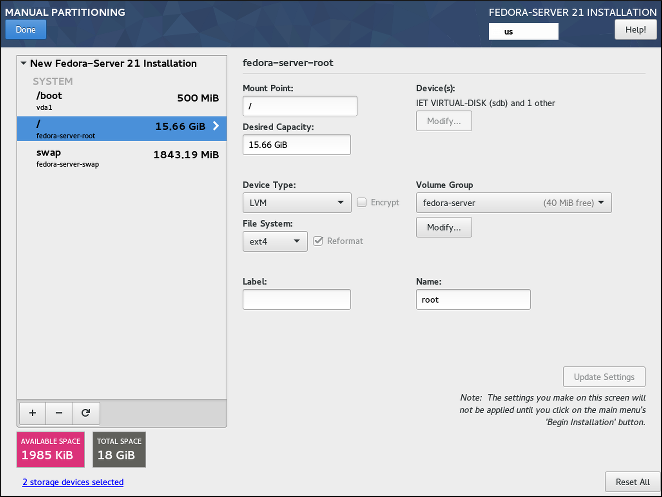
Siga o procedimento abaixo para criar volumes lógicos LVM e grupos de volumes.
-
Clique no botão
+na parte inferior da lista mostrando os pontos de montagem existentes. Uma nova janela de diálogo será aberta. -
Na nova janela de diálogo, especifique um ponto de montagem para o qual deseja criar um volume lógico separado – por exemplo,
/. Opcionalmente, especifique um tamanho para o volume usando unidades padrão como MB ou GB (por exemplo,50 GB). Em seguida, clique emAdicionar um ponto de montagempara adicionar o volume e retornar à tela principal de particionamento.Ao criar um ponto de montagem para swap no LVM, especifique o ponto de montagem como
swap. -
O ponto de montagem agora foi criado usando as configurações padrão, o que significa que foi criado como um volume lógico LVM e um grupo de volume foi criado para contê-lo. Selecione o ponto de montagem recém-criado no painel esquerdo para configurá-lo ainda mais. Se você deseja usar o provisionamento fino para este volume, altere a opção
Tipo de Dispositivopara`Provisionamento LVM Fino`. -
No menu
Grupo de Volume, você pode ver que o volume foi atribuído a um grupo de volume criado automaticamente, que é nomeado após a variante do Fedora que você está instalando (por exemplo,fedora-server. Clique no botãoModificarno menu suspenso para acessar as configurações do grupo de volume. -
Na caixa de diálogo
Configurar Grupo de Volume, você pode alterar o nome do grupo de volume, seuNível de RAID(veja Tipos de Dispositivos, Sistemas de Arquivos e RAID para obter informações sobre os tipos de RAID disponíveis), e você também pode especificar em quais dispositivos físicos (discos) este grupo de volume deve residir. Você pode selecionar um ou mais discos que serão usados para manter este grupo de volume, mantendo pressionado Ctrl e clicando em cada disco na lista.Se você selecionar um tipo de RAID redundante (como
RAID1 (Redundância)), o grupo de volume ocupará o dobro do tamanho real em seus discos. Um grupo de volume de 5 GB com RAID1 ocupará 10 GB de espaço.Você também pode ter certeza de que o grupo de volume está criptografado selecionando a opção
Criptografar; isso habilitará a criptografia LUKS para todo o grupo de volume. Veja o Guia de Segurança do Fedora, disponível em https://docs.fedoraproject.org/, para obter informações sobre criptografia de disco LUKS.Além disso, você pode definir um tamanho fixo para o grupo de volume selecionando a opção
Fixono menuPolítica de tamanhoe inserindo um tamanho para o grupo de volume.Depois de definir as configurações do grupo de volume, clique em
Salvarpara retornar à tela principalParticionamento Manual.A caixa de diálogo de configuração não permite que você especifique o tamanho das extensões físicas do grupo de volume. O tamanho sempre será definido com o valor padrão de 4 MiB. Se você deseja criar um grupo de volume com diferentes extensões físicas, crie-o manualmente alternando para um shell interativo e usando o comando vgcreate, ou use um arquivo Kickstart com o comando volgroup --pesize=tamanho.
-
Se você precisar criar mais de um grupo de volume, abra o menu suspenso
Grupo de Volumee selecione a opçãoCriar um novo grupo de volume. Uma nova janela de diálogo será aberta, idêntica à descrita na etapa anterior. Novamente, selecione um nome, dispositivos de armazenamento, configurações de criptografia, nível de RAID e política de tamanho para o novo grupo e clique emSalvar. O novo grupo de volume ficará disponível no menu suspensoGrupo de Volume; você pode então percorrer seus pontos de montagem existentes e alterar esta configuração para atribuí-los a um grupo de volume diferente. -
Defina outras configurações específicas para o volume lógico – seu
Ponto de Montagem,Capacidade Desejada,Sistemas de ArquivoseNome. PressioneAtualizar Configuraçõespara aplicar quaisquer alterações às configurações.
Repita este procedimento para quaisquer volumes lógicos adicionais que você deseja criar. Observe que, ao criar volumes lógicos LVM adicionais, um novo grupo de volume não é criado automaticamente a cada vez; em vez disso, quaisquer volumes adicionais são atribuídos a um grupo existente.
Para cada ponto de montagem que você criar, revise suas configurações e certifique-se de que esteja atribuído ao grupo correto, que tenha capacidade suficiente e que tenha um nome descritivo para que você possa identificar o volume posteriormente, se necessário.
Criando um Layout Btrfs
Btrfs is a type of file system, but it has several features characteristic of a storage device. It is designed to make the file system tolerant of errors, and to facilitate the detection and repair of errors when they occur. It uses checksums to ensure the validity of data and metadata, and maintains snapshots of the file system that can be used for backup or repair.
A criação de um layout Btrfs é um pouco semelhante ao LVM (descrito em Criando um layout de Gerenciamento de Volume Lógico (LVM)) com terminologia ligeiramente diferente. Um volume Btrfs é o equivalente a um grupo de volume LVM e um subvolume Btrfs é semelhante a um volume lógico LVM. Uma diferença importante a ser observada é como o Anaconda relata tamanhos para pontos de montagem separados: Para LVM, o tamanho exato de cada volume lógico é mostrado próximo a cada ponto de montagem no painel esquerdo, enquanto com Btrfs, o tamanho total de todo o volume é mostrado próximo a cada subvolume.
|
Some partition types - notably the |
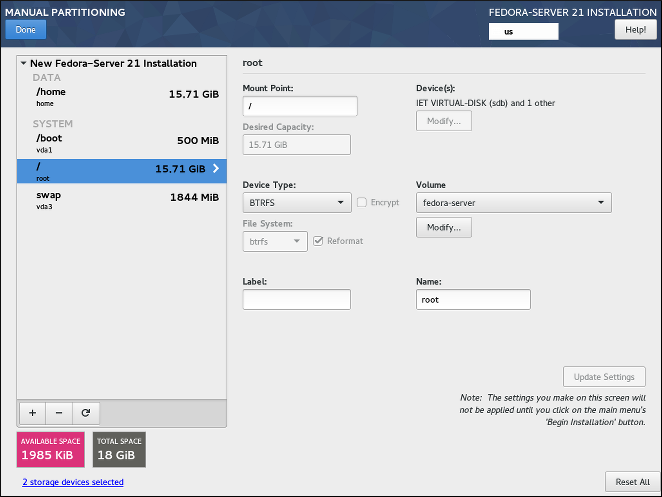
Siga o procedimento abaixo para criar volumes e subvolumes Btrfs:
-
Clique no botão
+na parte inferior da lista mostrando os pontos de montagem existentes. Uma nova janela de diálogo será aberta. -
Na nova janela de diálogo, especifique um ponto de montagem para o qual deseja criar um volume lógico separado – por exemplo,
/. Opcionalmente, especifique um tamanho para o volume usando unidades padrão como MB ou GB (por exemplo,50 GB). Em seguida, clique emAdicionar um ponto de montagempara adicionar o volume e retornar à tela principal de particionamento.Ao criar um ponto de montagem para swap no Btrfs, especifique o ponto de montagem como
swap. -
The mount point has now been created using the default settings, which means it has been created as an LVM logical volume. Select the newly created mount point in the left pane to configure it further, and convert it to a Btrfs subvolume by changing the
Device Typeoption toBtrfs. Then, clickUpdate Settingsin the bottom right corner of the screen. -
In the
Volumemenu, you can see that the subvolume has been assigned to an automatically created volume, which is named after the Fedora variant you are installing (for example,fedora-server00. Click theModifybutton under the drop-down menu to access the volume settings. -
In the
Configure Volumedialog, you can change the volume’s name, itsRAID level(see Device, File System and RAID Types for information about available RAID types), and you can also specify which physical devices (disks) this volume should reside on. You can select one or more disks which will be used to hold this volume by holding down Ctrl and clicking each disk in the list.If you select a redundant RAID type (such as
RAID1 (Redundancy)), the volume will take up twice its actual size on your disks. A 5 GB volume with RAID1 will take up 10 GB of space.Você também pode garantir que o volume seja criptografado selecionando a opção
Encrypt; isso ativará a criptografia LUKS para o volume inteiro. Consulte o [citetitle] Guia de Segurança do Fedora, disponível em https://docs.fedoraproject.org/, para obter informações sobre a criptografia de disco LUKS.Além disso, você pode definir um tamanho fixo para o volume selecionando a opção
Fixono menu` Política de tamanho` e inserindo um tamanho para o grupo de volume.Depois de definir as configurações de volume do Btrfs, clique em
Salvarpara retornar à tela principal` Particionamento Manual`. -
If you need to create more than one Btrfs volume, open the
Volumedrop-down menu and select theCreate a new volume groupoption. A new dialog window will open, identical to the one described in the previous step. Again, select a name, storage devices, encryption settings, RAID level and size policy for the new volume, and clickSave. The new volume will then become available in theVolume Groupdrop-down menu; you can then go through your existing mount points and change this setting to assign them to a different volume. -
Configure other settings specific to the subvolume - its
Mount Point,Desired Capacity,File System, andName. PressUpdate Settingsto apply any changes to the configuration.
Repita este procedimento para quaisquer subvolumes Btrfs adicionais que você deseja criar. Observe que, ao criar subvolumes adicionais, um novo volume não é criado automaticamente a cada vez; em vez disso, quaisquer subvolumes adicionais são atribuídos a um volume existente.
For each mount point you create, review its settings and make sure that it is assigned to the correct volume, that it has sufficient capacity, and that it has a descriptive name so you can identify the subvolume later if you need to.
Tipos de Dispositivos, Sistemas de Arquivos e RAID
Fedora tem suporte a vários tipos de dispositivos e sistemas de arquivos. As listas abaixo oferecem uma breve descrição de cada tipo de dispositivo, sistema de arquivos e RAID disponível e notas sobre seu uso.
Para selecionar um tipo de dispositivo ou sistema de arquivo de uma partição ou volume lógico, selecione-o na lista em Particionamento Manual e selecione um Tipo de Dispositivo e um Sistema de Arquivos de seus respectivos menus suspensos no lado direito da tela. Em seguida, clique em Atualizar Configurações e repita este processo para todos os pontos de montagem que deseja modificar.
Para configurar o RAID por software, certifique-se de ter unidades de disco rígido físicas suficientes selecionadas como alvos de instalação (o número de unidades separadas necessárias para cada tipo de RAID é anotado em sua descrição). Em seguida, escolha um nível de RAID ao criar ou modificar um volume Btrfs ou grupo de volume LVM, ou selecione RAID por software como o tipo de dispositivo para criar RAID por software com partições padrão. Para obter instruções detalhadas, consulte Criando um layout Btrfs, Criando um layout de Gerenciamento de Volume Lógico (LVM) e Criando RAID por Software conforme necessário.
-
Partição Padrão- Uma partição padrão pode conter um sistema de arquivos ou espaço de troca. As partições padrão são mais comumente usadas para/boote as partições BIOS Boot e Sistema EFI. Volumes lógicos LVM ou subvolumes Btrfs são recomendados para a maioria dos outros usos. Consulte Uma Introdução às Partições de Disco para obter informações adicionais sobre os conceitos por trás das partições físicas. -
LVM- EscolherLVMcomo oTipo de dispositivocria um volume lógico LVM e um grupo de volume para contê-lo (a menos que já exista, caso em que o novo volume é atribuído ao grupo existente). O LVM pode melhorar o desempenho ao usar discos físicos e permite que você use vários discos para um único ponto de montagem. Para obter informações sobre como criar um volume lógico, consulte Criando um layout de Gerenciamento de Volume Lógico (LVM). Consulte também Entendendo LVM para obter algumas informações adicionais sobre o LVM em geral. -
Provisionamento LVM Fino- Usando o provisionamento dinâmico, você pode gerenciar um pool de armazenamento de espaço livre, conhecido como conjunto fino, que pode ser alocado a um número arbitrário de dispositivos quando necessário pelos aplicativos. O pool fino pode ser expandido dinamicamente quando necessário para alocação econômica de espaço de armazenamento. -
RAID- A criação de duas ou mais partições de RAID de software permite que você crie um dispositivo de RAID por software. Uma partição RAID é atribuída a cada disco do sistema. Veja Criando RAID por Software para obter instruções sobre como criar RAID por software. -
BTRFS- Btrfs é um sistema de arquivos com vários recursos semelhantes a dispositivos. Ele é capaz de endereçar e gerenciar mais arquivos, arquivos maiores e volumes maiores do que os sistemas de arquivos ext2, ext3 e ext4. Veja Criando um Layout Btrfs para mais informações sobre a criação de volumes Btrfs.
-
ext4- O sistema de arquivos ext4 é baseado no sistema de arquivos ext3 e apresenta uma série de melhorias. Isso inclui suporte para sistemas de arquivos maiores e arquivos maiores, alocação mais rápida e eficiente de espaço em disco, sem limite no número de subdiretórios em um diretório, verificação mais rápida do sistema de arquivos e registro de diário mais robusto. Ext4 é o sistema de arquivos padrão e recomendado usado pela estação de trabalho e nuvem do Fedora. O tamanho máximo suportado de um único sistema de arquivo ext4 é 50 TB. -
ext3- O sistema de arquivos ext3 é baseado no sistema de arquivos ext2 e tem uma vantagem principal - journaling. O uso de um sistema de arquivos com journaling reduz o tempo gasto na recuperação de um sistema de arquivos após um travamento, pois não há necessidade de verificar a consistência dos metadados do sistema de arquivos executando o utilitário fsck toda vez que ocorre um travamento. -
ext2- Um sistema de arquivo ext2 oferece suporte a tipos de arquivo Unix padrão, incluindo arquivos regulares, diretórios ou links simbólicos. Ele fornece a capacidade de atribuir nomes de arquivo longos, de até 255 caracteres. -
swap- As partições de troca são usadas para oferecer suporte à memória virtual. Em outras palavras, os dados são gravados em uma partição swap quando não há RAM suficiente para armazenar os dados que seu sistema está processando. Uma partição swap deve sempre ser criada; veja Esquema de Particionamento Recomendado para detalhes como o tamanho recomendado. -
xfs- O XFS é um sistema de arquivos altamente escalonável e de alto desempenho que oferece suporte a sistemas de arquivos de até 16 exabytes (aproximadamente 16 milhões de terabytes), arquivos de até 8 exabytes (aproximadamente 8 milhões de terabytes) e estruturas de diretório contendo dezenas de milhões de entradas. O XFS também oferece suporte a registro de metadados, o que facilita a recuperação de falhas mais rápida. O tamanho máximo suportado de um único sistema de arquivos XFS é 500 TB. Começando com Fedora 22, XFS é o sistema de arquivos padrão e recomendado no Fedora Server.Observe que o tamanho de um sistema de arquivos XFS não pode ser reduzido atualmente sem destruir e recriar o sistema de arquivos. Se você espera que precise ajustar os tamanhos de seus sistemas de arquivos com frequência, o uso do XFS não é recomendado, pois torna a administração substancialmente mais demorada.
-
vfat- O sistema de arquivos VFAT é um sistema de arquivos Linux compatível com os nomes de arquivo longos do Microsoft Windows no sistema de arquivos FAT. -
BIOS Boot- Uma partição muito pequena necessária para inicializar a partir de um dispositivo com uma tabela de partição GUID (GPT) em sistemas BIOS e sistemas UEFI no modo de compatibilidade de BIOS. Veja Esquema de Particionamento Recomendado para detalhes. -
Partição de Sistema EFI- Uma pequena partição necessária para inicializar um dispositivo com uma tabela de partição GUID (GPT) em um sistema UEFI. Veja Esquema de Particionamento Recomendado para detalhes.
-
RAID0 (Desempenho)- Distribui dados em vários discos. O RAID de nível 0 oferece maior desempenho em relação às partições padrão e pode ser usado para agrupar o armazenamento de vários discos em um grande dispositivo virtual. Observe que os RAIDs de nível 0 não oferecem redundância e que a falha de um dispositivo no arranjo destrói os dados em todo o arranjo. O RAID 0 requer pelo menos dois discos. -
RAID1 (Redundância)- Espelha todos os dados de uma partição em um ou mais discos. Dispositivos adicionais no arranjo fornecem níveis crescentes de redundância. O RAID 1 requer pelo menos dois discos. -
RAID4- Distribui dados em vários discos e usa um disco no arranjo para armazenar informações de paridade que protegem o array no caso de falha de algum disco do arranjo. Como todas as informações de paridade são armazenadas em um disco, o acesso a esse disco cria um "gargalo" no desempenho do arranjo. O RAID de nível 4 requer pelo menos três discos. -
RAID5 (Verificação de Erros Distribuídos)- Distribui dados e informações de paridade em vários discos. Os RAIDs de nível 5, portanto, oferecem as vantagens de desempenho de distribuir dados em vários discos, mas não compartilham o gargalo de desempenho dos RAIDs de nível 4 porque as informações de paridade também são distribuídas por meio do arranjo. O RAID 5 requer pelo menos três discos. -
RAID6 (Verificação de Erros Redundantes)- Os RAIDs de nível 6 são semelhantes aos RAIDs de nível 5, mas em vez de armazenar apenas um conjunto de dados de paridade, eles armazenam dois conjuntos. O RAID 6 requer pelo menos quatro discos. -
RAID10 (Desempenho, Redundância)- Os RAIDs de nível 10 são RAIDs aninhados ou RAIDs híbridos. Eles são construídos com a distribuição de dados em conjuntos de discos espelhados. Por exemplo, uma matriz RAID de nível 10 construída a partir de quatro partições RAID consiste em dois pares espelhados de partições distribuídas. O RAID 10 requer pelo menos quatro discos.
Esquema de Particionamento Recomendado
Na maioria dos casos, pelo menos os seguintes pontos de montagem devem sempre ser criados:
/boot- 500 MB-
Esta partição contém o kernel do sistema operacional, que permite a inicialização do Fedora. Ele também contém outros arquivos usados durante o processo de inicialização. Devido às limitações da maioria do firmware, é recomendável criar uma pequena partição padrão separada para este diretório. Na maioria dos cenários, uma partição
/bootde 500 MB é adequada.Se o seu sistema tiver um controlador RAID de hardware, esteja ciente de que alguns tipos de BIOS não suportam a inicialização a partir dele. Nesse caso, a partição
/bootdeve ser criada em uma partição fora do conjunto RAID, como em um disco rígido separado.Observe também que o diretório
/bootnão pode ser colocado em um volume lógico LVM ou um subvolume Btrfs. Use uma partição padrão. /(raiz) - 10 GB-
É onde o diretório raiz está localizado. O diretório raiz é o nível superior da estrutura de diretório. Por padrão, todos os arquivos são escritos nesta partição, a menos que uma partição diferente seja montada no caminho que está sendo escrito (por exemplo,
/bootou/home). Se você seguir o esquema recomendado descrito nesta seção, esta será a partição onde a maioria dos pacotes de software serão instalados.Para uma instalação mínima, uma partição raiz de 5 GB será suficiente. No entanto, para a maioria das instalações comuns que incluem pacotes extras e uma interface gráfica de usuário, a partição raiz deve ter pelo menos 10 GB; com 20 GB sendo suficientes para os casos de uso mais comuns.
O ponto de montagem
/é o topo da hierarquia do sistema de arquivos Linux, e é referido como o sistema de arquivos raiz, ou raiz. O diretório/root, às vezes pronunciado "barra rúti", é o diretório pessoal, "home", do usuárioroot. /home- pelo menos 10 GB-
Para armazenar dados do usuário separadamente dos dados do sistema, crie um ponto de montagem dedicado para o diretório
/home. Essa partição deve ser dimensionada com base na quantidade de dados que serão armazenados localmente, no número de usuários e assim por diante. Isso permitirá que você atualize ou reinstale o Fedora sem apagar os arquivos de dados do usuário. Durante a instalação, uma partição/homeseparada será criada se houver 50 GB ou mais de espaço livre para a instalação do Fedora.Ao usar o Fedora como uma estação de trabalho para uso normal com um ambiente gráfico, este ponto de montagem deve ter mais espaço em disco atribuído a ele, pois provavelmente conterá a maioria dos dados (configurações do usuário, imagens, vídeos, etc).
- swap - baseado em parâmetros do seu sistema
-
As partições swap suportam memória virtual; os dados são escritos nelas quando não há RAM suficiente para armazenar os dados que o sistema está processando. O tamanho desta partição é em função da carga de trabalho da memória do sistema, não da memória total do sistema e, portanto, não é igual ao tamanho total da memória do sistema. Portanto, é importante analisar quais aplicativos um sistema estará executando e a carga desses aplicativos servirão para determinar a carga de trabalho da memória do sistema. Os provedores e desenvolvedores de aplicativos devem ser capazes de fornecer alguma orientação.
Quando o sistema fica sem espaço swap, o kernel encerra os processos à medida que a memória RAM do sistema se esgota. Configurar muito espaço swap resulta em dispositivos de armazenamento alocados, mas ociosos e em um uso inadequado dos recursos. Muito espaço swap também pode ocultar vazamentos de memória. O tamanho máximo para uma partição swap e outras informações adicionais podem ser encontrados na página do manual
mkswap(8).A tabela abaixo fornece o tamanho recomendado de uma partição swap dependendo da quantidade de RAM em seu sistema e se você deseja memória suficiente para seu sistema hibernar. Se você permitir que o programa de instalação particione seu sistema automaticamente, o tamanho da partição swap será estabelecido usando estas diretrizes. A configuração do particionamento automático pressupõe que a hibernação não está em uso e que o tamanho máximo da partição swap é limitado a 10% do tamanho total do disco rígido. Se você deseja configurar espaço swap suficiente para permitir a hibernação, ou se deseja definir o tamanho da partição swap para mais de 10% do espaço de armazenamento do sistema, você deve editar o layout de particionamento manualmente.
Tabela 2. Espaço Swap de Sistema Recomendado Quantidade de RAM no sistema Espaço swap recomendado Espaço swap recomendado se pretende usar hibernação menos de 2 GB
2 vezes a quantidade da RAM
3 vezes a quantidade da RAM
2 GB - 8 GB
Igual à quantidade da RAM
2 vezes a quantidade da RAM
8 GB - 64 GB
0,5 vezes a quantidade da RAM
1,5 vezes a quantidade da RAM
mais que 64 GB
dependendo da carga de uso
hibernação não recomendada
Na fronteira entre cada intervalo listado acima (por exemplo, um sistema com 2 GB, 8 GB ou 64 GB de RAM do sistema), o critério pode ser exercido em relação ao espaço swap escolhido e suporte de hibernação. Se os recursos do seu sistema permitirem, aumentar o espaço swap pode levar a um melhor desempenho.
Distribuir espaço swap em vários dispositivos de armazenamento – especialmente em sistemas com unidades rápidas, controladores e interfaces – também melhora o desempenho do espaço swap.
- Inicialização BIOS (1 MB) ou Partição de Sistema EFI (200 MB)
-
O carregador de inicialização GRUB2 pode ser instalado no Master Boot Record (MBR) ou na Tabela de Partição GUID (GPT) do dispositivo de inicialização. Para determinar qual desses métodos usar, o programa de instalação considera as seguintes variações:
- Sistemas com firmware BIOS e sistemas UEFI no modo de compatibilidade do BIOS
-
Se o disco já estiver formatado, o esquema de particionamento será mantido. Se o disco não estiver formatado ou se você apagou todas as partições existentes do disco, o instalador escolherá o seguinte:
-
MBR se o tamanho do disco for inferior a 2 TB (terabytes)
-
GPT se o tamanho do disco for maior que 2 TB
Você pode forçar o instalador a usar GPT em discos menores que 2 TB usando a opção de inicialização inst.gpt conforme descrito em Opções de inicialização. No entanto, o oposto não é possível – você não pode usar MBR em discos maiores que 2 TB.
Você precisa criar uma partição Inicialização BIOS com um tamanho de 1 MB para instalar em um sistema com firmware BIOS se o disco que contém o carregador de inicialização usa GPT. Se o disco usar um MBR, nenhuma partição especial será necessária em um sistema BIOS.
-
- Sistemas com firmware UEFI
-
Apenas GPT é permitido em sistemas UEFI. Para instalar em um disco formatado com MBR, ele deve ser reformatado e rotulado novamente. Todos os dados atualmente no disco serão perdidos.
Os sistemas baseados em UEFI requerem uma Partição de Sistema EFI com pelo menos 50 MB de tamanho (o tamanho recomendado é 200 MB), independentemente do esquema de particionamento.
Se o seu sistema requer uma partição de inicialização BIOS ou uma partição de sistema EFI com base nos requisitos detalhados acima, esta partição deve ser criada como uma partição física padrão. Ele não pode residir em um volume LVM ou em um subvolume Btrfs.
Observe também que se seu sistema não requer nenhuma dessas partições, elas não serão mostradas no menu
Sistema de Arquivosnas opções de ponto de montagem.
Muitos sistemas têm mais partições do que o mínimo listado acima. Escolha partições com base em suas necessidades particulares. Veja Conselhos Sobre Partições para informações adicionais e conselhos.
|
Atribua capacidade de armazenamento apenas às partições de que você precisa imediatamente. Você pode alocar espaço livre a qualquer momento, para atender às necessidades à medida que ocorrem. |
Se você não tem certeza da melhor forma de configurar as partições para o seu computador, aceite o layout de partição padrão automático fornecido pelo programa de instalação conforme descrito em Destino da Instalação.
Conselhos sobre Partições
Não existe a melhor maneira de particionar todos os sistemas; a configuração ideal depende de como você planeja usar o sistema que está sendo instalado. No entanto, as dicas a seguir podem ajudá-lo a encontrar o layout ideal para suas necessidades:
-
Considere criptografar quaisquer partições e volumes que possam conter dados confidenciais. A criptografia evita que pessoas não autorizadas acessem os dados nas partições, mesmo que tenham acesso ao dispositivo de armazenamento físico. Na maioria dos casos, você deve pelo menos criptografar a partição
/home, que contém os dados do usuário. -
Em alguns casos, criar pontos de montagem separados para diretórios diferentes de
/,/boote/homepode ser útil; por exemplo, em um servidor executando um banco de dados MySQL, ter um ponto de montagem separado para/var/lib/mysqlpermitirá que você preserve o banco de dados durante uma reinstalação sem ter que restaurá-lo do backup posteriormente. No entanto, ter pontos de montagem separados desnecessários tornará a administração do armazenamento mais difícil. -
Algumas restrições especiais se aplicam a certos diretórios com relação aos layouts de particionamento que eles podem ser colocados. Notavelmente, o diretório
/bootdeve sempre estar em uma partição física (não em um volume LVM ou um subvolume Btrfs), e/usrnão pode estar em um subvolume Btrfs. -
Se você é novo no Linux, considere revisar a Linux Filesystem Hierarchy Standard em https://refspecs.linuxfoundation.org/FHS_2.3/fhs-2.3.html para obter informações sobre vários diretórios de sistemas e seus conteúdos.
-
Cada kernel instalado em seu sistema requer aproximadamente 20 MB na partição
/boot. O tamanho da partição padrão de 500 MB para/bootdeve ser suficiente para os usos mais comuns; aumente o tamanho desta partição se você planeja manter muitos kernels instalados ao mesmo tempo. -
O diretório
/varcontém conteúdo para vários aplicativos, incluindo o servidor da web Apache, e é usado pelo gerenciador de pacotes DNF para armazenar temporariamente as atualizações dos pacotes baixados. Certifique-se de que a partição ou volume que contém/vartenha pelo menos 3 GB. -
O conteúdo do diretório
/vargeralmente muda com muita frequência. Isso pode causar problemas com unidades de estado sólido (SSDs) mais antigas, pois podem lidar com um número menor de ciclos de leitura/gravação antes de se tornarem inutilizáveis. Se a raiz do seu sistema estiver em um SSD, considere a criação de um ponto de montagem separado para/varem um HDD clássico. -
O diretório
/usrcontém a maioria do software em uma instalação típica do Fedora. A partição ou volume que contém este diretório deve, portanto, ter pelo menos 5 GB para instalações mínimas e pelo menos 10 GB para instalações com um ambiente gráfico. -
Se
/usrou/varfor particionado separadamente do resto do volume raiz, o processo de inicialização se torna muito mais complexo porque esses diretórios contêm componentes críticos para a inicialização. Em algumas situações, como quando esses diretórios são colocados em um drive iSCSI ou em um local FCoE, o sistema pode não conseguir inicializar ou pode travar com um erroDevice is busyao desligar ou reinicializar.Esta limitação se aplica apenas a
/usrou/var, não aos diretórios abaixo deles. Por exemplo, uma partição separada para/var/wwwfuncionará sem problemas. -
Considere deixar uma parte do espaço em um grupo de volume LVM não alocado. Este espaço não alocado oferece flexibilidade se seus requisitos de espaço mudarem, mas você não deseja remover dados de outros volumes. Você também pode selecionar o tipo de dispositivo de
Provisionamento finopara a partição para que o espaço não utilizado seja tratado automaticamente pelo volume. -
O tamanho de um sistema de arquivos
XFSnão pode ser reduzido – se você precisa diminuir uma partição ou volume com este sistema de arquivos, você deve fazer backup de seus dados, destruir o sistema de arquivos e criar um novo e menor em seu lugar. Portanto, se você espera precisar manipular seu layout de particionamento mais tarde, deve usar o sistema de arquivosext4. -
Use Gerenciador de Volume Lógico (LVM) se você pretende expandir seu armazenamento adicionando mais discos rígidos após a instalação. Com o LVM, você pode criar volumes físicos nas novas unidades e, em seguida, atribuí-los a qualquer grupo de volume e volume lógico conforme achar necessário – por exemplo, você pode facilmente expandir o
/homede seu sistema (ou qualquer outro diretório residente em um volume lógico). -
Pode ser necessário criar uma partição de inicialização do BIOS ou uma partição de sistema EFI, dependendo do firmware do sistema, tamanho da unidade de inicialização e rótulo do disco da unidade de inicialização. Veja Esquema de Particionamento Recomendado para informações sobre essas partições. Observe que o instalador gráfico não permitirá que você crie uma inicialização do BIOS ou partição do sistema EFI se o seu sistema não exigir uma – nesse caso, eles serão ocultados do menu.
-
Se você precisar fazer qualquer alteração em sua configuração de armazenamento após a instalação, os repositórios do Fedora oferecem várias ferramentas diferentes que podem ajudá-lo a fazer isso. Se você preferir uma ferramenta de linha de comando, tente system-storage-manager.
Kdump
|
Esta tela está desabilitada por padrão. Para habilitá-la durante a instalação, você deve usar a opção inst.kdump_addon=on no menu de inicialização. Consulte Opções Avançadas de Instalação para obter detalhes e O Menu de Inicialização para obter instruções sobre como usar opções de inicialização personalizadas. |
Use esta tela para selecionar se o Kdump será ativado ou não no sistema instalado e quanta memória será reservada para ele, se ativado.

Kdump é um mecanismo de despejo de falha do kernel que, no caso de uma falha do sistema, captura o conteúdo da memória do sistema no momento da falha. Essa memória capturada pode então ser analisada para encontrar a causa da falha. Se o Kdump estiver habilitado, ele deve ter uma pequena parte da memória do sistema (RAM) reservada para si mesmo. Esta memória reservada não estará acessível ao kernel principal.
Para habilitar o Kdump no sistema instalado, marque Enabled. Em seguida, selecione as configurações de reserva de memória Automatic ou Manual e, se você selecionou Manual, insira a quantidade de memória a ser reservada em megabytes no campo Memória a ser reservada.
A quantidade de memória que você deve reservar é determinada com base na arquitetura do seu sistema (AMD64 e Intel 64 terão requisitos diferentes do IBM Power, por exemplo), bem como a quantidade total de memória do sistema. Na maioria dos casos, a reserva automática será satisfatória. Se você insiste nas configurações manuais, consulte o Red Hat Enterprise Linux 7 Kernel Crash Dump Guide (guia de despejo da falha de kernel) para orientações. Este documento também contém informações mais detalhadas sobre como o Kdump funciona, como definir configurações adicionais e como analisar um despejo de memória salvo.
A leitura de Memória Utilizável do Sistema abaixo do campo de entrada de reserva mostra quanta memória estará acessível ao seu sistema principal uma vez que a quantidade de RAM selecionada for reservada.
|
Configurações adicionais, como o local onde os despejos de memória do kernel serão salvos, só podem ser configuradas após a instalação usando a interface gráfica |
Após ajustar as configurações do Kdump, clique em Pronto no canto superior esquerdo para retornar ao Resumo da Instalação.
Rede e Nome do Host
A tela Rede e Nome do Host é usada para configurar as interfaces de rede. As opções selecionadas aqui estarão disponíveis durante a instalação (se necessário para tarefas como baixar pacotes de um local remoto) e no sistema instalado.
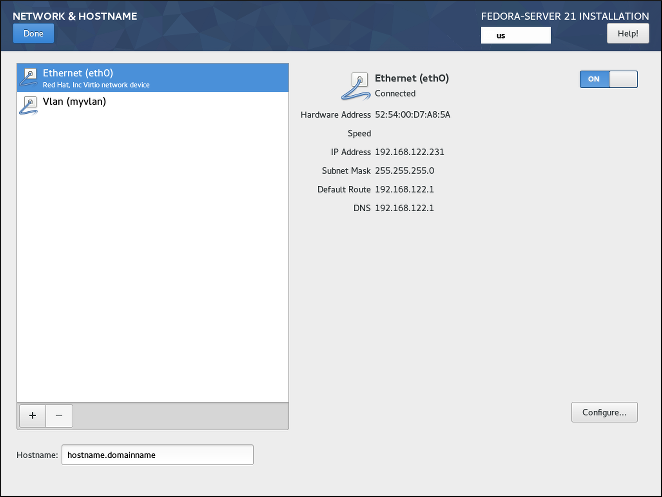
As interfaces acessíveis localmente são detectadas automaticamente pelo programa de instalação e não podem ser adicionadas ou excluídas manualmente. Todas as interfaces detectadas são listadas no lado esquerdo da tela. Clique em uma interface na lista para exibir sua configuração atual (como endereço IP e DNS); os detalhes são exibidos no lado direito da tela.
Abaixo da lista de interfaces estão dois botões. Use o botão + para adicionar uma interface de rede virtual (Team, Bond ou VLAN) conforme descrito em Adicionando uma Interface de Rede Virtual . Para remover uma interface virtual criada anteriormente, selecione-a na lista e clique no botão -.
Para alterar configurações como endereços IP, servidores DNS ou configuração de roteamento para uma interface existente (virtual e física), selecione a interface no painel esquerdo e clique em "Configurar" no canto inferior direito da tela. As configurações disponíveis estão descritas em Editar Configuração da Interface de Rede.
Use a chave ON/OFF no canto superior direito para habilitar ou desabilitar a interface selecionada no momento.
Abaixo da lista de conexões, digite um nome de host para este computador no campo de entrada Nome do Host. O nome do host pode ser um nome de domínio totalmente qualificado (FQDN) no formato hostname.domainname ou um nome de host curto sem nome de domínio. Muitas redes têm um serviço Dynamic Host Configuration Protocol (DHCP) que fornece automaticamente um nome de domínio aos sistemas conectados; para permitir que o serviço DHCP atribua o nome de domínio a esta máquina, especifique apenas o nome curto do host.
Adicionar Interface Virtual de Rede
Para adicionar uma interface de rede virtual, clique no botão + na parte inferior da lista de interfaces. Uma nova janela será aberta, solicitando que você selecione um dos três tipos de interfaces virtuais disponíveis:
-
Bond- NIC (Network Interface Controller) Bonding (em português, vinculação de interface de rede) é um método de vincular várias interfaces de rede físicas em um único canal vinculado. -
Team- NIC Teaming, uma nova implementação para agregar links, projetada para fornecer um pequeno driver de kernel para implementar o manuseio rápido de fluxos de pacotes e vários aplicativos para fazer todo o resto no espaço do usuário. -
Vlan(Virtual LAN) - Um método para criar vários domínios de broadcast distintos que são isolados mutuamente.
Selecione o tipo de interface que deseja adicionar e clique em Adicionar. Outra janela de diálogo será aberta, permitindo que você edite quaisquer configurações disponíveis para o tipo de interface escolhido. Para informações sobre as configurações disponíveis, veja as respectivas seções do Gua de Rede do Fedora, disponível no https://docs.fedoraproject.org/. A documentação básica também está disponível em Editando a Configuração da Interface de Rede.
|
Para acessar a caixa de diálogo de configurações novamente após fechá-la, selecione a mesma interface na lista de interfaces configuradas e clique em |
Editando a Configuração da Interface de Rede
Esta seção detalha apenas as configurações mais importantes para uma conexão com fio típica usada durante a instalação. Muitas das opções disponíveis não precisam ser alteradas na maioria dos cenários de instalação e não são transferidas para o sistema instalado. A configuração de outros tipos de redes é amplamente semelhante, embora os parâmetros de configuração específicos possam ser diferentes. Para saber mais sobre a configuração de rede após a instalação, consulte o Guia de Rede do Fedora, disponível no https://docs.fedoraproject.org/.
Para configurar uma conexão de rede manualmente, selecione essa conexão na lista do lado esquerdo da tela e clique no botão Configurar. Será exibida uma caixa de diálogo que permite configurar a conexão selecionada. As opções de configuração apresentadas dependem do tipo de conexão - as opções disponíveis serão ligeiramente diferentes dependendo se é uma interface física (controlador de interface de rede com ou sem fio) ou uma interface virtual (Bond, Team ou Vlan) que você configurou anteriormente no Adicionado uma Interface de Rede Virtual. Uma descrição completa de todas as definições de configuração para todos os tipos de conexão está além do escopo deste documento; consulte o Guia de Rede para obter detalhes.
As opções mais comuns e úteis na caixa de diálogo de configuração são:
- Habilitar ou desabilitar a conexão por padrão
-
Na guia
Geralda caixa de diálogo de configuração, você pode marcar ou desmarcar a caixa de seleçãoConectar-se automaticamente a esta rede quando estiver disponívelpara permitir ou proibir que esta conexão se conecte por padrão. Quando habilitado em uma conexão com fio, isso significa que o sistema normalmente se conectará durante a inicialização (a menos que você desconecte o cabo de rede); em uma conexão sem fio, significa que a interface tentará se conectar a qualquer rede sem fio conhecida dentro do alcance.Além disso, você pode permitir ou proibir que todos os usuários do sistema se conectem a esta rede usando a opção
Todos os usuários podem se conectar a esta rede. Se você desabilitar esta opção, apenasrootserá capaz de se conectar a esta rede.Não é possível permitir apenas que um usuário específico diferente de
rootuse esta interface, porque nenhum outro usuário é criado neste ponto durante a instalação. Se você precisar de uma conexão para um usuário diferente, deverá configurá-la após a instalação. - Definir configurações estáticas de IPv4 ou IPv6
-
Por padrão,
IPv4eIPv6são definidos para configuração automática dependendo das configurações de rede atuais. Isso significa que endereços como endereço IP local, endereço DNS e outras configurações serão detectados automaticamente sempre que a interface se conectar a uma rede. Em muitos casos, isso é suficiente, mas você também pode fornecer configuração estática nasConfigurações de IPv4eConfigurações de IPv6, respectivamente.Para definir a configuração de rede estática, navegue até uma das guias de configuração e selecione um método diferente de
Automático(por exemplo,Manual) no menu suspensoMétodo. Isso habilitará o campoEndereçosabaixo.Na guia
Configurações de IPv6, você também pode definir o método comoIgnorarpara desabilitarIPv6nesta interface.Em seguida, clique em
Adicionarno lado direito e adicione um conjunto de configurações:Endereço,Máscara de rede(paraIPv4),Prefixo(paraIPv6) eGateway.O campo
Servidores DNSaceita um ou mais endereços IP de servidores DNS - por exemplo,10.0.0.1,10.0.0.8.A opção final em ambas as abas é
Requer endereçamento IPvX para esta conexão ser concluída. Selecione esta opção na abaIPv4para permitir esta conexão somente seIPv4for bem sucedido; o mesmo princípio se aplica a esta configuração na abaIPv6. Se esta opção permanecer desabilitada paraIPv4eIPv6, a interface será capaz de se conectar se a configuração for bem-sucedida em qualquer um dos protocolos IP. - Configurar rotas
-
Nas abas
Configurações de IPv4eConfigurações de IPv4, clique no botãoRotasno canto inferior direito para definir as configurações de roteamento para um protocolo IP específico em uma interface. Uma nova caixa de diálogo será aberta, permitindo a vocêAdicionaruma rota específica.Se você configurar pelo menos uma rota estática, você pode desautorizar todas as rotas não configuradas especificamente aqui habilitando
Ignorar rotas obtidas automaticamente.Selecione
Usar esta conexão apenas para recursos em sua redepara evitar que esta conexão se torne a rota padrão. Esta opção pode ser selecionada mesmo se você não configurou nenhuma rota estática. Habilitar esta opção significa que esta rota só será usada quando necessário para acessar certos recursos, como páginas de intranet que requerem uma conexão local ou VPN. Outra rota (padrão) será usada para recursos disponíveis publicamente, se possível. Observe que, ao contrário das rotas adicionais configuradas nesta caixa de diálogo, esta configuração será transferida para o sistema instalado. Observe também que essa opção só é útil quando mais de uma interface está configurada.Quando terminar de definir as configurações de roteamento da interface, clique em
OKpara retornar à caixa de diálogo de configuração.
Assim que terminar de configurar a interface, clique em Salvar no canto inferior direito da janela de configuração para salvar suas configurações e voltar para Rede e Nome do Host.
Progresso de Configuração e Instalação
A tela Progresso da instalação é exibida após terminar de configurar todos os itens necessários em Resumo da instalação e pressione o botão Iniciar a instalação. Após este ponto, o processo de instalação realmente começa e as alterações estão sendo feitas nos discos selecionados. Não é possível voltar ao Resumo da instalação e alterar qualquer configuração lá configurada; se precisar fazer isso, você deve esperar que o processo de instalação termine, reinicie seu sistema, autentique-se e altere suas configurações no sistema instalado.
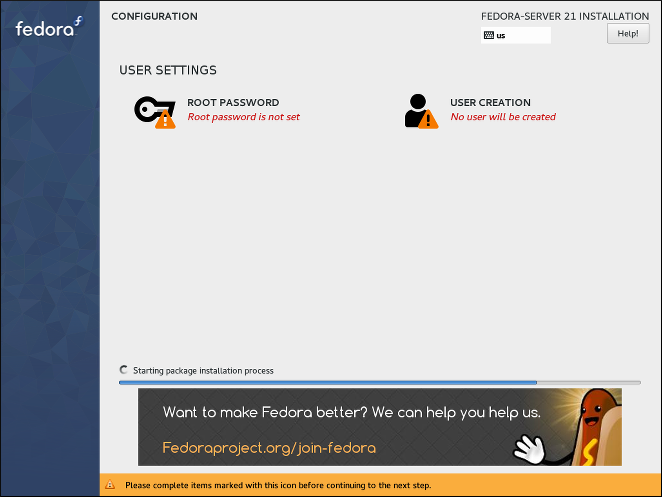
Na parte superior da tela, estão disponíveis mais duas opções que permitem configurar as configurações de autenticação - a senha de root e uma conta de usuário adicional. Configurar a senha de root é necessária para concluir a instalação; a criação de uma conta de usuário pode ser pulada. Se optar por isso, será solicitado a criar uma conta de usuário não-root após a conclusão da instalação e o reinício do sistema.
A parte inferior da tela mostra uma barra de progresso e uma mensagem informando sobre o progresso atual da instalação. Quando a instalação terminar e a senha root tiver sido definida, você pode pressionar o botão Finalizar a instalação para reinicializar seu computador e fazer login em seu sistema Fedora recém-instalado.
|
Antes de terminar a instalação e reinicializar, remova a mídia (CD, DVD ou unidade USB) que você usou para iniciar a instalação ou certifique-se de que o sistema tente inicializar a partir do disco rígido antes de tentar a mídia removível. Caso contrário, seu computador iniciará o instalador novamente em vez do sistema instalado. |
Senha Root
A tela Senha Root é usada para configurar a senha do root para o seu sistema. Esta senha será usada para se autenticar na conta do administrador (também conhecido como superusuário), que é usada para tarefas de administração do sistema, como instalação e atualização de pacotes de software e alteração da configuração de todo o sistema, como configurações de rede e firewall, opções de armazenamento e adição ou modificar usuários, grupos e permissões de arquivo.
A conta root sempre será criada durante a instalação. No entanto, você deve sempre criar uma conta de usuário normal em Criar usuário e usar essa conta para se autenticar no sistema. Mude para a conta de administrador apenas quando precisar executar uma tarefa que exija acesso de administrador.
|
A conta |

Depois de escolher uma senha forte, insira-a no campo Senha Root. Os caracteres que você escreve serão exibidos como pontos para segurança. Em seguida, digite a mesma senha no campo Confirmar para garantir que a inseriu corretamente. As duas senhas inseridas devem ser iguais.
Conforme você insere a senha, ela é avaliada e o instalador determina a força da senha. Caso o instalador considere sua senha fraca, aparecerá uma mensagem na parte inferior da tela, explicando qual aspecto da senha escolhida é considerado insuficiente. Por exemplo:
A senha inserida é fraca:A senha tem menos de 5 caracteres.
Se uma mensagem semelhante à acima for exibida, é altamente recomendável escolher uma senha diferente e mais forte.
Depois de configurar a senha do superusuário, clique em Pronto no canto superior esquerdo para retornar a Configuração e Progresso da instalação. Se você selecionou uma senha fraca, você deve pressionar o botão duas vezes.
Criar Usuário
A tela Criar Usuário pode ser usada para criar e configurar uma conta de usuário normal (não root) durante a instalação. Apenas uma conta de usuário pode ser configurada aqui; se você precisar de mais contas, espere até que a instalação seja concluída, reinicie seu sistema e crie outras contas usando o comando useradd em um terminal ou um utilitário gráfico para gerenciar contas de usuário (por exemplo, a tela `Usuários`no menu Configurações no GNOME).
|
Não é necessário criar uma conta de usuário normal para concluir a instalação; no entanto, é altamente recomendado. Se você não criar uma, você terá que fazer login no sistema como |
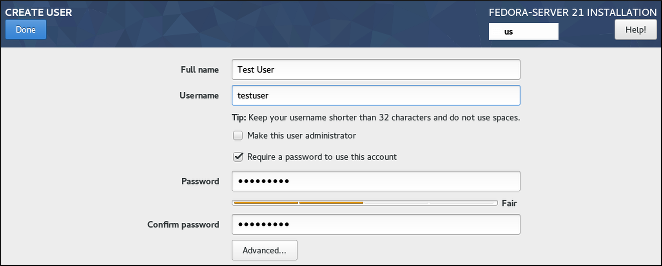
Para configurar uma conta de usuário, preencha o Nome completo (por exemplo, John Smith) e Nome de usuário (por exemplo, jsmith). O Nome de usuário será usado para efetuar login a partir de uma linha de comando; se você instalar um ambiente gráfico, seu gerenciador gráfico de login usará Nome completo.
Certifique-se de que a caixa de seleção Exigir uma senha para usar esta conta esteja habilitada, digite uma senha que você deseja usar para esta conta no campo Senha. Os caracteres que você escrever serão exibidos como pontos para segurança. Em seguida, repita a mesma senha no campo Confirmar senha abaixo para garantir que você a digitou corretamente. Ambas as senhas inseridas devem ser iguais.
Conforme você insere a senha, ela é avaliada e o instalador determina a força da senha. Caso o instalador considere sua senha fraca, aparecerá uma mensagem na parte inferior da tela, explicando qual aspecto da senha escolhida é considerado insuficiente. Por exemplo:
A senha inserida é fraca:A senha tem menos de 5 caracteres.
Se uma mensagem semelhante à acima for exibida, é altamente recomendável escolher uma senha diferente e mais forte.
A caixa de seleção Tornar este usuário administrador dá ao usuário que você está criando direitos administrativos (adicionando este usuário ao grupo wheel), permitindo que este usuário use o comando sudo para executar tarefas normalmente disponíveis apenas para root usando apenas a senha do usuário, em vez da senha root. Isso pode ser mais conveniente, mas também pode representar um risco de segurança.
|
Se você conceder privilégios de administrador a um usuário, certifique-se de que a conta esteja protegida por uma senha forte. Nunca conceda privilégios de administrador a um usuário sem exigir nenhuma senha para a conta. Consulte o Guia de Segurança do Fedora, disponível no https://docs.fedoraproject.org/, para informações detalhadas sobre segurança de senhas, incluindo diretrizes para selecionar senhas fortes. |
Para configurações adicionais, clique no botão Avançado abaixo dos campos de entrada de senha. Uma nova janela de diálogo intitulada Configuração Avançada do Usuário será aberta. Essa caixa de diálogo é descrita na seção a seguir.
Configuração Avançada do Usuário
A caixa de diálogo Configuração Avançada do Usuário permite que você altere as seguintes configurações para a nova conta de usuário.
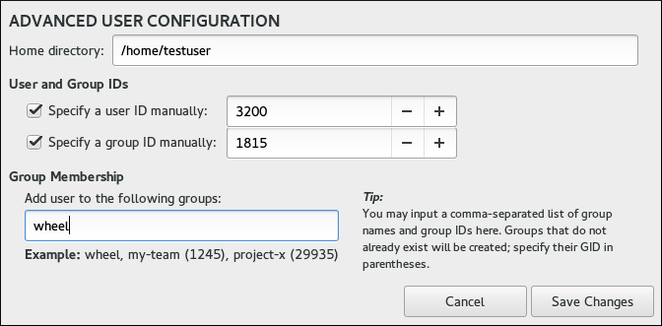
-
O
Diretório inicialdo usuário (/home/nomeusuáriopor padrão). -
O ID do usuário (UID). O valor padrão é 1000. UIDs 0-999 são reservados pelo sistema, portanto, não podem ser atribuídos a um usuário.
-
O ID do grupo (GID) do grupo padrão do usuário. O nome do grupo padrão será o mesmo que o nome do usuário e seu GID padrão é 1000. Os GIDs 0-999 são reservados pelo sistema para que não possam ser atribuídos a um grupo de usuários.
-
A associação ao grupo do usuário. A conta de usuário que você está criando sempre terá uma associação de grupo padrão (o grupo padrão do usuário com um ID definido no campo "Especificar um ID de grupo manualmente"). No campo
Associação ao Grupo, você pode especificar grupos adicionais como uma lista separada por vírgulas. Grupos que ainda não existem serão criados; você pode especificar GIDs personalizados para eles entre parênteses. Se você não especificar um GID personalizado para um novo grupo, ele será atribuído automaticamente.
Want to help? Learn how to contribute to Fedora Docs ›